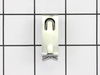
This replacement door catch is for your dryer door. If the catch is broken and the door will not stay shut, the dryer may not turn on. Use a putty knife to pop out the existing door catch by the locki...
Ask our experts a question about this model and we'll get back to you as soon as possible!
1 question answered by our experts.
Sort by:
< Prev
1
Next >
Search filter:
Clear Filter
Your search term must have 3 or more characters.
Keep searches simple. Use keywords, e.g. "leaking", "pump", "broken" or "fit".
Sorry, we couldn't find any existing answers that matched.Try using some different or simpler keywords, or submit your new question by using the "Ask a Question" button above!
Kimberly
January 8, 2023
The vent over our link catcher broke off. I would like to order a replacement.
For model number 11078102310
Hi Kimberly, thank you for reaching out. According to our research, the part number you are looking for is lint screen outlet housing, part number PS12114481. Customer service is available 7 days a week if you require assistance placing an order. Thanks again for reaching out!
After a few years of slamming the dryer door (at least that is what my husband says), the catch on the dryer door broke. Using pliers (I used needle nose) squeeze the outer edges of the catch together (vertically). With it compressed, it should slide out easily. My husband had jacked with ours prior to the repair, so the broken piece i
... Read moren the door was actually sideways and would not fit through the hole. Using a screwdriver, I pushed that piece into the door (it lives in the door somewhere now). I was then able to slide out the rest of the old catch. Compress the new catch and insert it into the hole in the door. Push it in until it clicks into place. DONE! Happy Drying!
took off about 8 screws, opened door into it's front & back parts, popped out the old/broken door catches and re-inserted replacements. Only 1 is needed, but this is the 2nd one to break. The first time a repairman switch the un-used from right side to left. (there are 2 so the door can be hung left or right opening)
Like another reviewer's repair story, I decided to take the door apart. It was too difficult, at least for me, to get the faulty catch out without damaging either the the door or my hands. This is why I give it an "easy" rather than "very easy" rating and put the total repair time at a half hour or better. I also decided I wanted a second
... Read more person to help - not with getting the door apart or putting it back together, but because a second pair arms was very helpful in rehanging the door well. We removed the door (four screws), marking which side of the hinge needed to be flush with the actual dryer when rehanging. Then we took the door apart, which comprises another sixteen screws (four on each edge). We used an electric drill but I'm sure it could be done manually. We used needle nosed pliers to get the faulty latch out of that side of the door, then replaced it with the "back up" from the other side. Then we put the door back together and carefully rehung it. Done. We did decide that, in future, all kids (we have three boys) slamming the door would be severely beaten. Pushing the door until it's against the dryer, then PUSHING (as opposed to slamming) the latch ONTO the catch pin on the dryer is obviously what was intended. However, I've learned not to count on my boys being particularly conscientious, so I'd ordered four replacement latches to keep on hand. This machine was delivered in April 2009 and I replaced the latch in April 2011. Based on this and our laundering habits, I'm sure the others will be used long before the dryer calls it quits.