


Models
>
11071652020
11071652020 Kenmore Dryer - Overview
Sections of the 11071652020
[Viewing 1 of 1]
Keep searches simple, eg. "belt" or "pump".

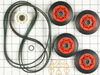
Dryer Repair Kit
PartSelect #: PS373088
Manufacturer #: 4392067
This dryer repair kit consists of five commonly replaced dryer parts: one multi-rib belt (part #661570V and measures 93 1/2 inches long), four drum support rollers, one idler assembly, nine tri-rings,...
$53.59
In Stock

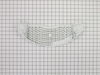
Outlet Screen Door Grille
PartSelect #: PS12070617
Manufacturer #: W11086603
Top cover for lint filter.
$27.90
In Stock

LP GAS CON
PartSelect #: PS16875225
Manufacturer #: W11581317
This gas conversion kit is used to convert natural gas burners to liquid propane in dryers. If your dryer will not start, heat, or there is an unusual smell, replacing this part can be a solution to t...
$78.33
In Stock

Motor Pulley
PartSelect #: PS11727942
Manufacturer #: W10837625
This part is the replacement motor pulley for your dryer. The motor pulley allows the dryer belt to run straight while the dryer is operating. If your motor pulley is damaged, your dryer may not tumbl...
$65.86
In Stock

Spray Paint - 12 oz. - White
PartSelect #: PS347819
Manufacturer #: 350930
Appliance spray paint is a great way to cover up any chips and scratches that have appeared on your appliances. Instead of replacing the part entirely, this is an easy fix. This is also a great way to...
$22.68
In Stock

Side and Bottom Vent Kit
PartSelect #: PS3633049
Manufacturer #: W10470674
This kit is used for the bottom and side exhaust. The kit includes both the straight and elbow vent.
$107.13
In Stock

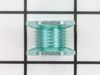
Retainer-Idler 1/4-20 x 1/16
PartSelect #: PS11741432
Manufacturer #: WP3389420
Sold individually.
$7.76
In Stock


Metal Vent Periscope - 0-18 Inch - with Clamps
PartSelect #: PS2347217
Manufacturer #: 4396037RP
The actual physical measurement of this part is 23 3/4 inches and has a 2 1/2 inch clearance. If there is any excess length, it can be trimmed to fit according to your specific needs.
$64.10
In Stock

Questions And Answers for 11071652020
We're sorry, but our Q&A experts are temporarily unavailable.
Please check back later if you still haven't found the answer you need.
Common Symptoms of the 11071652020
[Viewing 3 of 3]Noisy
Fixed by
these parts
these parts

Show All
Drum Not Spinning
Fixed by
these parts
these parts
Show All
Marks left on clothes
Fixed by
these parts
these parts
Show All


Keep searches simple. Use keywords, e.g. "leaking", "pump", "broken" or "fit".
very loud squeeling sound
The issue was the idler pulley. First I began opening up the front panel based on a youtube video but soon realized the model was slightly different and required a lot more items to remove. I saw the pulley in the back with nothing in the way so I put the front panel crap back on and removed the rear panel. There it was, very simple to re
... Read more
move and replace. I'm not looking forward to drum rollers though. Hopefully they're aren't as difficult as they appear.
Read less
Parts Used:
-
jason from HOLDEN, MA
-
Difficulty Level:Really Easy
-
Total Repair Time:30 - 60 mins
-
Tools:Socket set
67 of 68 people
found this instruction helpful.
Was this instruction helpful to you?
Thank you for voting!
Squeaky Dryer Noise
I purchased the dryer repair kit with the drum belt, wheels and idler pulley. I watched the instructional videos online and it seemed fairly straight forward. Breaking down the dryer and replacing the pulleys was easy enough. My problem began when I tried to feed the drum belt around the idler pulley. After finishing the job, the dryer wo
... Read more
uld not turn and the sensor light stayed on. I thought something else was broken with the dryer and spent hours trouble shooting other problems that I was having. Finally I figured out that the drum belt was not installed correctly around the idler pulley. However, I could not get it properly installed from the front of the machine so I tried from the rear still with no avail. I finally had to fish the old belt out of the garbage can that I had thrown away earlier. I lined up the old belt with the new one in the kit and discovered that the new belt was much smaller, so I put the old one back on the drum. Here's the lesson I learned...make sure the belts are the same size before attempting to install. The old idler was responsible for the squeaking and that stopped but I am still using the same old drum belt. Hope it lasts.
Read less
Parts Used:
-
Eddie from PELZER, SC
-
Difficulty Level:A Bit Difficult
-
Total Repair Time:More than 2 hours
-
Tools:Nutdriver, Screw drivers
53 of 58 people
found this instruction helpful.
Was this instruction helpful to you?
Thank you for voting!
Motor out
I found that the dryer would not start turning by itself. Could manually help it start and it would run fine. Anyway, after a new set of rollers, belt, etc. found that the motor still would not start by itself. Ordered new motor and it was taken care of. You have to take the back off, remove the belt and remove the tumbler. After tha
... Read more
t, it is fairly easy. Two screws hold the motor down and then you can take the whole motor assembly out. Be careful removing the fan as it takes a 3/8 socket drive and it is plastic. Two clips hold the motor to the assembly. Needle nose pliers takes care of it. Replace and all should be good.
Read less
Parts Used:
-
Jeff from Hutchinson, KS
-
Difficulty Level:Easy
-
Total Repair Time:30 - 60 mins
-
Tools:Nutdriver, Pliers, Screw drivers, Socket set
94 of 189 people
found this instruction helpful.
Was this instruction helpful to you?
Thank you for voting!