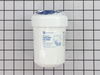
This OEM ice and water filter fits side-by-side and bottom-freezer GE models. The most common reason you would need to change this part is if you have never updated your model and it is no longer filt...
This sensor (Temperature Sensor, Thermistor, Refrigerator Temperature Sensor) sends the temperature reading of the compartment to the control board. If you notice your refrigerator is too warm, too co...
This 10 by 5 inch ice maker (Electromechanical Icemaker Kit, Ice Maker Assembly) produces ice. This particular model will produce seven crescent shaped cubes every cycle. It is constructed of plastic ...
This “Dispenser Door Assembly” (Door Recess Assembly, Ice Door Assembly, Dispenser Door, Refrigerator Dispenser Ice Chute Door Kit, Dispenser Door Flap, Ice Chute Door, Flapper) keeps the room air fro...
If you notice that your refrigerator or freezer is noisy or too warm, you may need to replace the evaporator fan grommet. This part is red in color, and is about 1 inch in diameter. The evaporator fan...
This door recess spring or dispenser lever spring in your refrigerator is used to return the ice door to the closed position or the dispenser lever to the home position once released. You will find th...
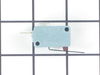
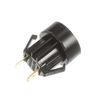
The interior light of your refrigerator is controlled by a switch that is activated when the door is opened and closed. If your refrigerator light will not turn on, there could be an issue with the sw...
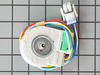
This evaporator fan motor circulates air to the fresh food compartments for efficient cooling. It powers the evaporator fan that draws air from the refrigerator and circulates it over the evaporator c...
This compression ring is meant to hold the evaporator fan motor in place in the freezer compartment of your refrigerator. This is is a genuine OEM part. The tools needed to complete this repair are a ...
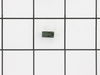
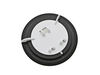
The lid bumper or evaporator fan motor bumper in your refrigerator prevents the fan motor from scraping against the side bracket. If your refrigerator/freezer is noisy, the bumper could be worn down o...
$10.97
In Stock
Questions And Answers for ZISP420DXASS
Be the first to ask our experts a question about this model!
✖
Ask a Question
Ask our experts a question on this model and we'll respond as soon as we can.
I went to a GE repair center to explain my problem, the service center reccomended that I have a techinician come out o look at it. $75.00 for the visit and what ever labor and materials wuld cost.
I went on line to see if there were others having this same problem and found that there were many with the same problem.
... Read more />After reading some of the ways that people found out what was wrong ...it became a matter of three components, the timer, heater or thermostat.
I tried the most common component and the less expensive one first , the thermostat switch I installed it very easily snipping two wires and attaching the news using wire nuts I used the diagram on this website to pinpoint the component and there has not been a problem since.
Unscrew old filter and remove(counterclockwise). Line up arrow on new filter with arrow on connection housing. Turn clockwise till resistance met. Do not overtighten. Follow directions. Simple.
I read in a previous post how to do the job from outside fridge which saved me lots of time. No need to remove inner door lining. Here is my procedure: 1.Turned off power. 2.Snapped off outside trim ring. 3.Located three small holes inside lip just above ice tube. The center hole was not used. 4.Pushed rather firmly up through
... Read more two remaining holes with small Allen wrench to release front control panel. 5.Removed (3) wire connectors from printed circuit board. Firmly pull/pry them straight out as lifting on retaining clip will break it off. I broke one & had to elect. tape it back in place later although I doubt it would have ever come off. 6.Release secondary panel by removing (4) screws. The problem was obvious as the solenoid had broken the crank arm off the flapper rod & trapped it open 7.Replaced solenoid, crank arm with flapper attached, spring & micro switch. Switch was okay but I changed anyway. 8.Cleaned all areas with 1/10 bleach water to sanitize. 9.Re-installed evrything in reverse order & all is okay. Thanks to someone for telling about those two small holes. Made job easy versus a very hard one.