This an authentic OEM 40-Watt replacement light bulb, used in a number of household appliances. It is specially designed to withstand extreme temperatures, which is why these replacement bulbs are mos...
This is a multi-use and multi-appliance screw. It can be used on a microwave, refrigerator, range/oven, air conditioner, dehumidifier, washer, or dryer. The measurements of this screw are 8 x 1/2 inch...
This is cookware designed for use in your range or oven. It is a two-piece dish that is used to grill or cook food while the broil function is on, meaning it can withstand high temperatures. This set ...
This is an oven rack for various models of ranges and ovens and is sold individually. This oven rack allows you to lay different kitchen items on it to cook or bake within your range, and over time th...
The clock knob attaches to the center of the oven control panel and is used to adjust the built-in clock. This clock knob is less than an inch in diameter. It is all black in color and is made of plas...
This rivet is an inch and a half long. It is used for many washing machines, microwaves, refrigerators, dryers, and ranges. Use of this rivet requires a rivet tool.
The oven seal replacement was very straight forward. Two screws held the door to the arms coming from the oven. I slid the door up off the arm and moved it to a workbench. This whole process should take about 15 minutes, a little longer if your unit is older and you want to clean as you go. Mine was fairly dirty and I gave it a cleani
... Read moreng as I removed parts. Unscrew all screws on the outer frame of the door, including two small ones on the side. Remove the outer frame and then the glass front and set them aside. A few more screws to remove the glass from the inner door, and even more on the remaining part of the door. You should also remove the screws holding the tiny brackets as well to release the portion that holds the oven seal in place. This is very straightforward, just keep pulling screws out until you can remove the old seal.
Once the old seal is out, insert the new one using the wire embedded in the seal as your guide...the gap in the seal goes to the bottom. Put everything back together and re-install the door. My door hinges were spring loaded and took a little effort to move them down so the door can be slipped on. This is a two person job since the hinges do not lock in place, they spring right back up flush with the oven and you cannot install the door. Re-install the two set screws holding the door to the hinges and you are done!
With the new seal in place, it felt a little puffy and the door did not seem to close as flush as it used to. This makes sense since the seal is new. I kept the door locked (like you would to use the oven cleaning cycle). I even kept it partially locked during cooking.
Frankly, the hardest part was the cleanup of nasty grease and dirt that built up over the past decade or so.
TURN OFF POWER TO RANGE AT FUSE BOX -- a)Open the oven door, b) Unscrew the left and right silver nuts (not the black screws)that are in the oven under the control panel, c)pull off the four control knobs on the control panel, d) gently tilt out the control panel, e) set the control panel in/on the protruding arms, f) pull off THE connect
... Read moreors at the back of the switches - remember which is top and bottom, g) use a screw drive to break off the plastic pieces that hold the switches in place, h) push out the old switches, i) push/snap in the new switches, j) reconnect wires, replace control panel and screw in the nuts.
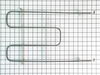
I removed three screws, pulled the element out from the rear wall, unplugged the electrical connections, reversed these steps in installing the new element. "A Piece Of Cake!"