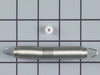
This is a multi-use and multi-appliance screw. It can be used on a microwave, refrigerator, range/oven, air conditioner, dehumidifier, washer, or dryer. The measurements of this screw are 8 x 1/2 inch...
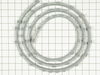
This hose clamp is used in a wide variety of household appliances. Most often it is found in washers, dishwashers, refrigerators, freezers, dehumidifiers, garbage disposals, or air conditioners. This ...
This pump housing filter is twenty-three inches long and a little over two inches wide. This filter wraps around a dishwasher's pump housing and clips in place. It is all white in color and is made of...
The hose clamp is used to hold the water hose in place which will prevent the hose from leaking water. Sometimes the clamp may lose its ability to latch on, causing a leaking washer. For the installat...
This is a heat-resistant adhesive for your appliance. The heat resistance allows you to stick parts such as grate feet, gaskets, and felt seals in hot areas, such as a cooktop, without compromising th...
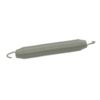
This inlet hose washer, also known as a high pressure inlet hose washer, is used in washing machines, refrigerators, freezers, and dishwashers. The function of this part is to create a watertight seal...
Ask our experts a question about this model and we'll get back to you as soon as possible!
1 question answered by our experts.
Sort by:
< Prev
1
Next >
Search filter:
Clear Filter
Your search term must have 3 or more characters.
Keep searches simple. Use keywords, e.g. "leaking", "pump", "broken" or "fit".
Sorry, we couldn't find any existing answers that matched.Try using some different or simpler keywords, or submit your new question by using the "Ask a Question" button above!
Ron
February 19, 2020
After many years of never having the holes plug up in the rotating arm, they are filling up with what looks like a gritty material that we need to clean out often or the water flow is restricted and thus poor dish cleaning. Is there a solution that can clean this material out or is there something else we should be doing??
For model number WU504
Hello and thank you for writing.
Ideally, you would change those arms after many years of use as the plastic is not as smooth as it was in the beginning and therefore debris sticks to it easier. However, as the arms are NLA we would suggest the following: If your dishwasher isn’t cleaning as well as it used to, the problem might be caused by clogged holes in the spray arms.
To unclog dishwasher spray armholes:
Remove the spray arms from the dishwasher.
Use a piece of wire, such as coat hanger wire, the same diameter as the holes to clean out the holes in the spray arms.
Put the arms back on the dishwasher and spin them to make sure they turn easily.
In extreme cases, soak the spray arms in warm water and vinegar to dissolve mineral deposits. We hope this helps. Please contact us anytime if you require further assistance.
1 person found this helpful.
Was this helpful?
Thank you for voting!
< Prev
1
Next >
✖
Ask a Question
Ask our experts a question on this model and we'll respond as soon as we can.
Remove old seal by pulling out tabs one at a time.
To install new seal, I had to remove the front control panel and door panel to access the back side of all of the slots that the new seal tabs go into. Using needlenose pliers i pulled each tab individually until they were locked into place. Replace door and control pan
... Read moreel.
With the dishwasher door open remove the 3 srews connecting the top of the dishwasher to the bottom of the kitchen counter top. Remove the lower access panel from the dishwasher and lower the dishwasher about 1/4 inch in the front and back of the dishwasher). Once you have lowered the dishwasher enough slide the dishwasher out about 6 inc
... Read morehes (enough to gain access to the door springs on the left and right side). Remove all broken spring parts and replace using new springs. The left side of the door contained a single heavy duty spring and the right side of the door contained a heavy duty and light duty 'helper' spring. I replaced only the right side springs since the left side spring was in excellent condition. When the springs are installed slide the dishwasher back into its original position and raise the dishwasher back up to its original height using the front and back adjustment screws. Replace the 3 screws holding the top of the dishwasher secure to the bottom of the countertop. Ensure that the door opens, closes and latches smoothly and then replace the lower access panel. Job done.
This repair is very simple. Partselect.com sells a repair kit for this problem that you can use but for simplicity the entire unit is not that much more. First remove the four outside lower philips head screws on the inside of your dishwasher door. Support outer door panel while removing screws. This will remove the outer door panel to ga
... Read morein access to the detergent cup. Remove panel by pulling out bottom first then slightly pulling downward. You will then see the detergent cup. Unplug the two leads that are connected to the unit keeping in mind their orientation. Remove the five screws that hold the detergent cup in place. Remove the cup assembly and gasket. Clean gasket area and install new cup and gasket. Reinstall five screws (do not overtighten) and plug leads back in. To reinstall door panel position door panel at a slight angle and install top first sliding upward into place under control panel then push inward at bottom. Reinstall the four philips head screws on the inside and you are finished. The complete repair will take you less than 30 minutes.


 Diagram and Parts List for Maytag Dishwasher")

 Diagram and Parts List for Maytag Dishwasher")

 Diagram and Parts List for Maytag Dishwasher")
 Diagram and Parts List for Maytag Dishwasher")


 Diagram and Parts List for Maytag Dishwasher")
 Diagram and Parts List for Maytag Dishwasher")