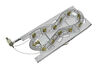
When connected to electricity the dryer heating element glows red hot and generates heat. When air is blown over it, it heats the air which is used to dry the clothes. The heating element fits inside ...
The front facing foot is sold individually. It is used on your washing machine and can also be known as an adjustable leveling leg. This specific front facing leveling leg has a rubber foot. It is imp...
The leveling leg locking nut is an OEM replacement fastener for use in dryers and washers. It has a head diameter of 3/8 inches and a thread pitch of 16 threads per inch. The nut secures the leveling ...
Remove the kick plate from the bottom of the dryer by sliding a putty knife along the top edge to release the plastic clamps, one on each side about 4" in from the edges. The kick plate folds out and down. You will see the heat shield on the right, held in by one hex head screw. Remove screw and heat shield. The element is positioned in a
... Read moren open-front housing and is fastened to the left side of the housing by two hex head screws, located on the "rail" of the element and right near the two wires. Remove the hex-head screws that hold the element in place and disconnected the two wires by pulling them out by hand or with needle nose pliers. The only difficulty here is the cramped working area...I recommend a stubby socket driver for these two screws. Most of this I had to do by feel because I could not see the screw heads. Once the screws are out and the wires have been disconnected, slide the old element straight out toward you. You may need to disconnect a small plastic hose located to the left front of the element, but this hose just pulls right off. Vacume the dust & lint build-up out of the whole area, wipe out the element housing and clean up the whole underside of the dryer prior to installing the new element. Installation is reverse of removal. It also might be a good opportunity to clean out your exhaust duct and the vent to the outside. (Never use the aluminum foil-accordian-type duct.) If the exterior dryer vent has any kind of screen over it, remove it and get rid of it. Screens collect lint, lint builds up and burns out elements.
Found a service manual on-line for the Whirlpool Duet Dryer. Did the troubleshooting for the problem stated. Found the heater element to be bad (open circuit across heater block). Ordered new element from PartSelect.com and installed. Dryer now works like a charm and I didn't have to call a repairman.
I first went to your site and studied the parts diagram to see where the element was located. I then unplugged the dryer and pulled from the wall. After that I popped open the front cover and accessed the bottom of the dryer where the element was located. I then removed two screws that held the element in place and removed the wires to
... Read more the element. After a little tug the old element came out. I slid the new one in place and connected the wiring and screws and replaced the cover and pluged it in. Works good as new...


 Diagram and Parts List for KitchenAid Dryer")