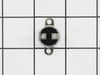
This rear drum bearing kit is designed for use with dryers. It supports the rear of the drum in your appliance as it tumbles your clothes during the drying cycle. If your drum will not tumble, or if i...
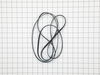
This drum belt, often referred to as a drive belt, is used in the assembly of dryers. It goes around the drum, the idler pulley, and the motor pulley. As the armature on the motor spins, this belt is ...
If your dryer does not tumble, will not start, is noisy, or is leaving marks on your clothing, you may need to replace the drum support bearing. The drum is supported at the rear by a bearing, which a...
The dryer thermal limiter, also known as a thermal fuse, blows the fuse to cut off power to the dryer when the dryer begins to overheat. Once the dryer reached 220 degrees Fahrenheit, the heat cuts ou...
The door catch on your dryer is an important part as it keeps your dryer door closed, in order to ensure no air or clothes can escape. This part works by holding the door strike, which allows the door...
Use this idler pulley assembly with gas or electric clothes dryer that has a flat dryer belt.
***Please NOTE: This part has been redesigned by the manufacturer and may not fit your appliance.
The door strike is attached to the door of your dryer and holds the door closed. If your dryer door is not closing, this might be due to the door strike needing to be replaced. This is a simple repair...
1. Unplug dryer from outlet 2. Using Lg. flat screwdriver, pry under the front edge of the top and release two spring tabs 3. Lift up top and tilt back out of your way 4. Unscrew two phillips scews on inside of front panel 5. Lift up and out the front panel. Two spring clips at bottom. 6. Rlease tension on drum be
... Read morelt at the motor. Access panel at rear of dryer. 7.Unscrew 3 screws from inside, center rear of drum. 8. Remove drum through the front of the dryer. You may have to spread the sides apart a little bit for it to fit 9. Lift up on the rear drum bearing to remove it from the bearing retainer. ( U shaped plastic socket) 10. unsrew 2 screws and remove the bearing retainer, ground ball. Ball retainer is on outside of dryer. 11. Vacuum everything--duct, blower, lint trap, ect. 12. Intall new bearing retainer and grounding ball, an assistant is helpful at this time, one to hold ball retainer on rear of dryer, one to screw it in from the inside 13. reassemble remainder of parts in reverse order.
Unplugged Dryer. Opened top of Dryer, over the drum. Removed Thermal Limiter. Tested the Thermal Limiter - found it was open. Checked all vents and exhaust tube for lint build-up. Replaced Thermal Limiter. Closed top of dryer. Plugged Dryer back. Tested Dryer - it works.
I found a electrical diagram and some common problems on some websites which led me to check the thermal limiters. There are two right up top near the back of the dryer - one mounted closer to the heating coils and one mounted directly to the sheet metal on the inside back of the dryer. Using an DMM on the "Ohms" setting, I checked each
... Read more sensor to make sure that they were "closed" (near zero ohms). Sure enough, the sensor mounted on the back of the enclosure was open (high resistance) which prevented the dryer from starting. To confirm, I shorted the two leads going to the sensor together temporarily and wrapped them with electrical tape and then tested the dryer - it worked perfectly. The part from Part Select was ordered and shipped very quickly. Since the sheet metal screws holding the sensor on were difficult to access with the drum in place, I used small machine screws/nuts to fasten the sensor - this allowed me to tighten the nuts from the outside of the dryer, making it very easy to attach.