Models > CRG0860AAL

CRG0860AAL Crosley Cooktop - Overview

Sections of the CRG0860AAL

[Viewing 1 of 1]
Keep searches simple, eg. "belt" or "pump".
Burner Head Cap with Spark Electrode – Part Number: WP3412D024-09
Burner Head Cap with Spark Electrode
★★★★★
★★★★★
(18)
PartSelect #: PS11741732
Manufacturer #: WP3412D024-09
The burner head cap with spark electrode directs the gas to the front and back burner heads and will equally distribute the gas across cooking areas. This part can help the following symptoms: if your...
$67.94
  In Stock
GRATE BURNER – Part Number: W11400301
GRATE BURNER
★★★★★
★★★★★
(2)
PartSelect #: PS12731250
Manufacturer #: W11400301
This square burner grate has sides measuring approximately nine inches. It is all black in color.
$106.04
  In Stock
Screw - 6-32 x 5/16 – Part Number: WP74004005
Screw - 6-32 x 5/16
PartSelect #: PS11744050
Manufacturer #: WP74004005
This screw is well under an inch long, and is made of metal.
$5.36
  Special Order
Igniter Wire – Part Number: WP5111A360-60
Igniter Wire
PartSelect #: PS11742785
Manufacturer #: WP5111A360-60
This igniter wire is twenty-eight inches long.
  No Longer Available
Igniter Switch (series 16) – Part Number: WP7403P287-60
Igniter Switch (series 16)
PartSelect #: PS11744491
Manufacturer #: WP7403P287-60
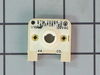
This switch is used with gas ranges and ovens. The part sits on top of the valve. Once the knob is turned it will create a spark that will light the gas and starts the burner.
$79.57
  In Stock
Nut – Part Number: M0282009
Nut
PartSelect #: PS1722352
Manufacturer #: M0282009
This part is sold individually. This nut can be found in various appliances including a dishwasher, air conditioner, washer, dryer, range/cooktop, oven, freezer, range hood, and refrigerator. There is...
$14.09
  Special Order
Valve Screw – Part Number: W10491986
Valve Screw
PartSelect #: PS3651486
Manufacturer #: W10491986
Part might differ in appearance, but functions same as original. Sold individually.
  No Longer Available
Front Orifice Fitting – Part Number: 7507P110-60
Front Orifice Fitting
PartSelect #: PS2090283
Manufacturer #: 7507P110-60
  No Longer Available
Screw – Part Number: WP7101P072-60
Screw
PartSelect #: PS11743906
Manufacturer #: WP7101P072-60
$8.04
  Special Order
Orifice Fitting Assembly – Part Number: 7507P112-60
Orifice Fitting Assembly
PartSelect #: PS2090284
Manufacturer #: 7507P112-60
This assembly is the right front burner. 12000BTU
  No Longer Available
DISCONTINUED – Part Number: 7507P107-60
DISCONTINUED
PartSelect #: PS2090281
Manufacturer #: 7507P107-60
  No Longer Available
Burner Valve – Part Number: 74003925
Burner Valve
PartSelect #: PS2081910
Manufacturer #: 74003925
This valve can be used for the left rear or the right front burner.
  No Longer Available

Questions And Answers for CRG0860AAL

Be the first to ask our experts a question about this model!

Common Symptoms of the CRG0860AAL

[Viewing 4 of 4]
Will Not Start
Fixed by
these parts
Fixing Fixing
Show All
Gas igniter glows, but will not light
Fixed by
these parts
Fixing
Show All
Gas smell
Fixed by
these parts
Fixing
Show All
Element will not heat
Fixed by
these parts
Fixing
Show All
Keep searches simple. Use keywords, e.g. "leaking", "pump", "broken" or "fit".
One burner was not igniting .. no clicking sound .. no spark.
On this range, the switch at any one burner causes the igniters to spark on all four burners. However, there was no spark anywhere when I turned the knob for the front right burner. This indicated a fault in the switch on that knob. Very important to start by unpluging the power cord (I got zapped trying to skip that part!) Then remove all four burners, by turning them counterclockwise and lifting. Remove all igniter wires and set the burners aside. At the edge of each of the burner holes is a screw. Remove all four of these screws, then you can pry the cooktop up and remove it. Pull all four knobs off, and remove the four screws attaching the cover behind the knobs (two on top and two below (above oven door). This exposes the igniter switches. Slide the broken switch off the shaft, and remove the wires. (There is a small release tab at each pole of the switch. Depress it with a small screw driver and the wires can be pulled out.) Push the wires into the new switch, slide it into place, and put everything back together. Solved my problem!
Parts Used:
Igniter Switch (series 16)
  • Herb from Sumas, WA
  • Difficulty Level:
    Easy
  • Total Repair Time:
    30 - 60 mins
  • Tools:
    Screw drivers
45 of 57 people found this instruction helpful.
Was this instruction helpful to you?
Thank you for voting!
Burner wouldn't start
Make a quarter turn counterclockwise, disengage a burner head, disconnect 2 wires, connect to a new head, install turn clockwise.

That's it!
Parts Used:
Burner Head Cap with Spark Electrode
  • Yury from Brooklyn, NY
  • Difficulty Level:
    Really Easy
  • Total Repair Time:
    Less than 15 mins
35 of 48 people found this instruction helpful.
Was this instruction helpful to you?
Thank you for voting!
burner head was rusted out. ordered 1 to see if part was correct. ordered 4 more to finish job.
unscrewed old burner head ;disconnected 2 wires; repaced with new burner head and replaced wires. Unfortunately, before we really needed to replace the other burner heads, the cooktop itself developed a gas leak. We decided to replace the whole thing, and therefore would like to return the unboxed, unused 4 remaining burner heads.
Parts Used:
Burner Head Cap with Spark Electrode
  • Robert from Somerville, TN
  • Difficulty Level:
    Really Easy
  • Total Repair Time:
    Less than 15 mins
13 of 17 people found this instruction helpful.
Was this instruction helpful to you?
Thank you for voting!