


Models
>
ADB1500AWB10
ADB1500AWB10 Amana Dishwasher - Overview
Sections of the ADB1500AWB10
[Viewing 10 of 10]


 Diagram and Parts List for Amana Dishwasher")
Manuals & Care Guides for ADB1500AWB10
Click to downloadInstall
Installation Instructions
(2.99MB)
Manual
Owner's Manuals
(3.38MB)
Manual
Owner's Manuals
(2.66MB)
Keep searches simple, eg. "belt" or "pump".

Lower Wheel Assembly
PartSelect #: PS11747717
Manufacturer #: WP99002780
This lower dishrack roller is less than two inches in diameter. It is made entirely of white plastic. If you find that your dishwasher is making loud noises or the lower rack is getting stuck when you...
$12.46
In Stock

Door Latch with Switches - NO Handle
PartSelect #: PS11751688
Manufacturer #: WPW10275768
This door latch, used in dishwashers, is located at the top of the door and locks the door shut when the dishwasher is working. If the door will not close or is damaged, changing the latch could be th...
$56.27
In Stock

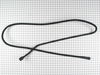
Hose Clamp
PartSelect #: PS11743008
Manufacturer #: WP596669
This hose clamp is used in a wide variety of household appliances. Most often it is found in washers, dishwashers, refrigerators, freezers, dehumidifiers, garbage disposals, or air conditioners. This ...
$11.80
In Stock

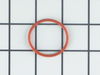
Tub Wheel - NOT a Rack Wheel
PartSelect #: PS11747734
Manufacturer #: WP99002947
This wheel attaches to the inside of the tub to help guide the track and support the top rack.
$16.15
In Stock

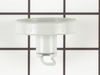
Accumulator Filter
PartSelect #: PS11749941
Manufacturer #: WPW10192799
This part is essential in your dishes getting clean during the wash cycle. If there is any debris or a tear in the filter, it can cause extra buildup and, therefore, causing dirty dishes.
$136.41
In Stock

Rail Stop
PartSelect #: PS11751405
Manufacturer #: WPW10261227
This part is at the end of the rails to stop your dishrack from being pulled all the way out. Sold individually.
$11.10
Special Order

Docking Station with Flappers
PartSelect #: PS2340934
Manufacturer #: 6-917647
The docking station is located on the water supply tube at the far back. It provides water to the upper and middle spray arm and also includes the flappers.
No Longer Available

Wash Impeller
PartSelect #: PS11747701
Manufacturer #: WP99002659
This impeller rotates and is used to force water up through to the spray arm.
$64.17
In Stock

Touch-Up Paint - White
PartSelect #: PS385132
Manufacturer #: 72017
This touch-up paint can be used on a wide variety of household appliances. It is most often used on washers, dryer, refrigerators, dishwashers, ranges, freezers, trash compactors, or microwaves. It is...
$8.00
In Stock

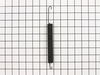
Door Cable Link
PartSelect #: PS11747772
Manufacturer #: WP99003446
This is a part for your dishwasher. The door cable link helps to keep the door steady and give support to the weight of the door when it is being opened or closed. If you notice the door latch has fai...
$11.14
In Stock

Water Valve
PartSelect #: PS12070506
Manufacturer #: W11082871
This is the replacement water valve for your dishwasher. The water inlet valve connects to the water source and solenoid wires, and ensures the tub has the right amount of water entering it. If your d...
$101.94
In Stock

Upper Wheel Assembly
PartSelect #: PS11747718
Manufacturer #: WP99002781
Sold Individually.
$13.95
In Stock
Questions And Answers for ADB1500AWB10
We're sorry, but our Q&A experts are temporarily unavailable.
Please check back later if you still haven't found the answer you need.
Common Symptoms of the ADB1500AWB10
[Viewing 10 of 10]Not cleaning dishes properly
Fixed by
these parts
these parts


Show All
Leaking
Fixed by
these parts
these parts


Show All
Door latch failure
Fixed by
these parts
these parts


Show All
Not draining
Fixed by
these parts
these parts

Show All
Noisy
Fixed by
these parts
these parts

Show All
Will not fill with water
Fixed by
these parts
these parts

Show All
Door won’t close
Fixed by
these parts
these parts
Show All
Will Not Start
Fixed by
these parts
these parts
Show All
Will not dispense detergent
Fixed by
these parts
these parts

Show All
Not drying dishes properly
Fixed by
these parts
these parts

Show All


Keep searches simple. Use keywords, e.g. "leaking", "pump", "broken" or "fit".
2 broken wheels on basket
unwrapped wheels ,pulled out drawer and easily put on new wheels...as we live way out in the boonies it was great to be able to order parts and have them delivered so fast...easy to fix....
Parts Used:

-
jeanne from waynesboro, TN
-
Difficulty Level:Really Easy
-
Total Repair Time:Less than 15 mins
371 of 374 people
found this instruction helpful.
Was this instruction helpful to you?
Thank you for voting!
Broken Inlet Valve due to freezing - water leak
Most of the time was spent pulling out the dishwasher from under the counter, as a new tile floor had been installed after the DW was installed.
Great pictures of components on this website confirmed what part to order.
Shut off water feed to DW and disconnect power to DW.
Unplug wire connector to old ... Read more valve (solenoid) and disconnect water inlet hose. Observe that valve is attached to sheet metal bracket.
Remove bracket, with valve attached. Don't remove valve from bracket. New valve comes with sheet metal bracket.
Remove female threaded adaptor (brass) from back of old valve and screw on to new valve using Teflon tape. That is the only piece you need to reuse.
Attached the new bracket (with valve attached) to DW. Attach water inlet hose. Attach plug to new valve.
Turn on water to DW. Check for leaks. Retighten hose connection if required. Run dishwasher. Keep lower panel off for a couple of days to be certain no leaks develop.
Read less
Parts Used:

-
Craig from Old Orchard Beach, ME
-
Difficulty Level:Really Easy
-
Total Repair Time:Less than 15 mins
-
Tools:Nutdriver, Wrench (Adjustable)
86 of 87 people
found this instruction helpful.
Was this instruction helpful to you?
Thank you for voting!
Dishwasher not draining completely
You have to pull the dishwasher out from underneath the counter and set it on its side. Before removing, I used a shop vac to remove any standing water from inside the dishwasher. Once I pulled out the dishwasher, I then tilted the dishwasher forward to let remaining water fall on the floor, again, using the wet vac for clean up. After
... Read more
it is on its side, I used a socket wrench to remove the one bolt that holds the drain valve on. Then I used a socket wrench to loosen the clamp for the drain hose and removed the hose. You then need to turn the entire drain valve 1/4 of a turn counter-clockwise to remove the old drain valve. Once it is off, remove the bracket from the old drain and attach it to the new drain valve using a phillips screwdriver. Before I reassambled the drain valve, I used my wet vac to remove any debree from where the drain valve connects to the dishwasher. Reverse the prior steps to install new drain valve and install dishwasher back under the counter. I tested the unit before installing the dishwasher back under the counter to insure it fixed the problem. The hardest part about doing this, was actually taking the dishwasher out from under the counter, very easy process in general. One thing I couldn't figure out about my original problem of the water not completely draining out, is why would the drain valve start draining the water then after 20 seconds it would stop? I couldn't find the answer, so I assumed the drain valve is like a 2 stage system and took a chance on replacing the drain valve; it worked.
Read less
Parts Used:

-
Tim from Troy, OH
-
Difficulty Level:Easy
-
Total Repair Time:1- 2 hours
-
Tools:Screw drivers, Socket set
85 of 88 people
found this instruction helpful.
Was this instruction helpful to you?
Thank you for voting!