Your coupon for will be reflected when you check out!
✖
Your coupon for
✖
Hello!
You're visiting the PartSelect site in U.S.
Would you like to shop on the Canadian site?
Stay on this site
Go to Canadian site
✖
Model Number Locations
1Select Category Type
Select Category Type
2Select Product Type
Select Product Type
3Select {MODEL} Type
Select {MODEL} Type
Sample Model Number Tags
Model numbers can be made up of numbers (1005400, for example) or a combination of letters and numbers (LAT1000AAE). The model number will most likely appear on either a paper sticker or a metal plate. Your appliance's model number tag may look similar to the sample model number tags shown here (model number highlighted in yellow):
Model has been saved to My Models. If you're not signed in, your lists are available on this device and will expire within 30 days.
Model has been saved to My Models.
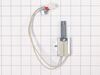
This temperature sensor, also known as a thermistor, is compatible with various makes and types of appliances. This thermistor uses electrical currents to detect the interior temperature of the applia...
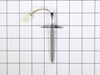
This gas range oven igniter is compatible with various models of LG gas ranges. It is made up of the igniter element, wire harness, connector and mounting bracket. The igniter is responsible for gener...
This is a genuine OEM leveling leg for various models of LG ranges. This leg is used to stabilize and support the range, and if damaged, broken, or missing, will cause your range to rock back and fort...
The burner cap attaches to the top of the burner head and acts like a cover for the burner head. This part helps to protect the burner from spills and helps to even the flame while cooking. The cap is...
This genuine OEM rack is placed inside your oven cavity, serving as a stable surface for your cookware. It measures approximately 25 inches by 17 inches. The wires can warp due to repeated temperature...
Ask our experts a question about this model and we'll get back to you as soon as possible!
1 question answered by our experts.
Sort by:
< Prev
1
Next >
Search filter:
Clear Filter
Your search term must have 3 or more characters.
Keep searches simple. Use keywords, e.g. "leaking", "pump", "broken" or "fit".
Sorry, we couldn't find any existing answers that matched.Try using some different or simpler keywords, or submit your new question by using the "Ask a Question" button above!
Carissa
December 12, 2023
Hi! I’ve been having an F9 code show up on my range occasionally, but it can usually be overcome by just starting the oven again. Yesterday I had to restart it twice and we are starting to notice that cook times are not always reliable.
The oven is igniting (bake and broil each ignite their parts when activated), and eventually gets to temperature, but perhaps more slowly than it should.
Possibly unrelated, but the bottom oven is supposed to have convection, and just a bit before we started having the F9 error, we noticed we couldn’t activate the convection.
I do t really want to replace the oven yet, but feel like F9 has a lot of possible causes and would like to narrow it down before attempting to purchase parts. Do you have any advice on other troubleshooting steps I could take to figure out what my issue is so I don’t buy parts I don’t need? Without guidance, I feel like I could be jumping down a rabbit hole and might be better off replacing it.
For model number LDG3036ST
Hello Carissa, Thank you for your inquiry. The F9 error code means that the oven failed at exceeding 150 degrees Fahrenheit after 5 minutes. We would recommend checking the temperature sensor, the convection fan motor for the lower oven, the fan motor for the upper oven, and the control board. You can test the fan motors and sensor with a multimeter and check the board for any loose connections or visible damage. If you are unfamiliar with how a multimeter functions, we have videos available to assist you. Good luck with your repair.
Took off the oven door then took out the racks and two screws in the oven bottom and removed it . Then removed the heat deflector. Then un plugged the old igniter and removed the burner to make it easier to remove the old igniter. Then installed the new igniter and reversed the process
As soon as my husband put it in the oven, the very thin prongs broke. There was no guard on either side of the prongs for protection like the one that had been in there. Very costly to us of $185 with no fix. Very disappointed in that ignitor. It would have been an easy fix. Had replaced one previously but it only lasted 6 months. Now
... Read morewe have a new stove
Remove oven bottoms Removed burners Remove igniters Pull out oven removed back disconnect wiring Installed new parts on burner made wiring hook ups Installed oven back and oven bottoms Tested and both work Took so long because I’m 75 years old Thanks for the proper parts