Your coupon for will be reflected when you check out!
✖
Your coupon for
✖
Hello!
You're visiting the PartSelect site in U.S.
Would you like to shop on the Canadian site?
Stay on this site
Go to Canadian site
✖
Model Number Locations
1Select Category Type
Select Category Type
2Select Product Type
Select Product Type
3Select {MODEL} Type
Select {MODEL} Type
Sample Model Number Tags
Model numbers can be made up of numbers (1005400, for example) or a combination of letters and numbers (LAT1000AAE). The model number will most likely appear on either a paper sticker or a metal plate. Your appliance's model number tag may look similar to the sample model number tags shown here (model number highlighted in yellow):
Model has been saved to My Models. If you're not signed in, your lists are available on this device and will expire within 30 days.
Model has been saved to My Models.
This drain pump assembly is for washers. Drain pump assembly removes water from the washer during the drain portion of the cycle. The assembly may include multiple parts; refer to your parts diagram f...
This water inlet valve assembly controls the flow of hot and cold water into your washing machine, ensuring each cycle uses the correct amount of water. If your washer isn’t filling properly, is leaki...
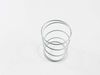
This is a manufacturer-made suspension rod and spring assembly for your washing machine. This suspension rod is one of four suspension rods that make up the entirety of the inner suspension of your wa...
This rod and spring assembly is designed to fit with washing machines and is made by the original manufacturer of your washer. It is a part of the washer suspension system that helps to stabilize and ...
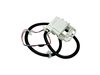
This is a mode shifter or shift actuator for models of washing machine. Mode shifters are designed to change the function of the washing machine motor, between spinning cycles and agitation, and is us...
This is a clutch for your washing machine. The clutch is made of a white plastic material and is used within washing machines to engage and disengage the transmission during the wash and spin cycles, ...
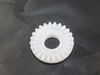
This auger is an authentic OEM replacement part specially designed for washing machines. It is a white, spiral-shaped agitator located in the center of the wash basket. During the wash cycle the auger...
This drive belt is sourced from the original manufacturer for use in various models of dryers. It is a rubber belt that connects the motor to the transmission of the washer. It enables the drum to spi...
This is a speed sensor for a variety of washing machine models. Speed sensors are used to monitor the speed of the washer drum and communicate it to the electronic control board to slow or quicken it....
Introducing the GE Spring Clutch, a crucial component for your washer. This intricate item applies steadfast pressure against the shifter hub, dutifully holding it in place for uninterrupted operation...
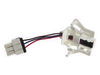
This electronic control board is for washers. This electronic control board manages the washer's functions such as filling, washing, draining and spinning.
$210.44
In Stock
Order now and your part arrives by Jun 13
Questions And Answers for GTW465ASN2WW
Ask our experts a question about this model and we'll get back to you as soon as possible!
7 questions answered by our experts.
Sort by:
< Prev
1
2
Next >
Search filter:
Clear Filter
Your search term must have 3 or more characters.
Keep searches simple. Use keywords, e.g. "leaking", "pump", "broken" or "fit".
Sorry, we couldn't find any existing answers that matched.Try using some different or simpler keywords, or submit your new question by using the "Ask a Question" button above!
Kevin
December 2, 2024
It will fill but won’t wash or anything other then fill and kicks it self off .
For model number GTW465ASN2WW
Hello Kevin, Thankyou for reaching out. This can be an indication the Lid Lock is faulty. The lid lock mechanism prevents the washer from starting the wash cycle while the lid is open. We hope this helps, good luck with the repair!
Water only fills the drum half full on Max and Deep Fill. We replaced the water inlet valve assembly because that’s what the answer was to similar questions on this sight. But that made no difference at all. Now what?
For model number GTW465ASN2WW
Hi Jane,
Thank you for your question. If water is only filling the washer half way, the issue may be with the water level hose or the water level switch. Before checking these parts, unplug the washer from the electrical outlet. Before suspecting the switch as the issue, check the water level hose by submerging it in water and sealing one end and blowing in the other. No bubbles should come out of the hose during this test. Additionally, you should inspect it for any signs of wear or damage. Then check the water level switch. It is found behind the control panel. Inspect the switch for any signs of wear, burning, cracking, or damage. If the air dome hose is not damaged or if your switch shows any the symptoms above, you may need a replacement water level switch. We hope this helps!
Washer won’t start, electricity on water on, just no control or. Indicator lights
For model number GTW465ASN2WW
Hi Jim, thank you for reaching out. Ensure that the lid is properly closed and that the lid switch is not faulty. Try opening and closing the lid to see if it resolves the issue. If this is not the case, the problem may be with the control board. We would suggest checking it, the part number is PS17874608. We hope this information is useful!
Hello Rebecca, Thank you for your inquiry. If you haven't already done so, try unplugging the washer for 5 minutes to see if that releases the lock. If you have already done so, then you can try accessing the lock assembly manually to unlock it. To do so, start by removing the back of the control panel with a nut driver, remove the metal plate, then use a nut driver again to remove the screws holding the control panel assembly on. Now disconnect the wiring connections from the control board. You should be now able to use a putty knife underneath the top panel to release the clips holding it on and lift it up to access the lock mechanism and be able to pull it out slightly and push in with a flat blade screwdriver to see if this releases the lock. We hope this helps.
1 person found this helpful.
Did this question help you?
Thank you for voting!
MELVIN
November 23, 2024
WHAT IS WRONG WHEN YOU HAVE BLACK SHAVINGS UNDER THE WASHER?
For model number GTW465ASN2WW
Hello Melvin, Thank you for contacting us. If the shavings are plastic, then they could be coming from the drive pulley or one of the motor pulleys so check both parts for any visible damage. It can also be mold, mildew, or detergent residue that has accumulated over time. You can use a washer cleaner or bleach to remove buildup and also check between the tub and the basket for any excess debris. We hope this helps.
Drain all the water out of the tub with a shop vac Remove rear drain hose and drained rest of water into a bucket Remove small rear panel (bottom left hand corner) where the drain hose connects Tipped washer up about 45 degrees to get underneath it - Supported it with a few paint cans Remove internal drain hose/clamps
... Read morefrom pump - w/ pliers Remove belt cover (gray plastic) with socket - 3 bolts Remove wire assembly plug from socket Remove old drain pump with socket - 3 bolts Install new drain pump - 3 bolts - plug wire assembly into socket Reinstall belt cover - 3 bolts Reinstall hose to drain pump (note panel will be inside washer) Feed drain hose panel through hole and reinstall - 1 nut Re attached drain hose to exterior drain plug You are done !
Very simple to repair. Be sure to drain the tub outside or into the sump pump then lay the washer on its side. The pump is right there on the bottom of the basket with 3 bolts. You will also need to remove the belt cover to get to the plug. So simple and saves you hundreds off repair man prices.
I thought it was the control board from the onset, but 'Online experts" said it was more likely the mode shifter or the lid lock. I ordered one of each, did not correct problem. Ordered the control board that was designated for this unit, it did not correct problem. Defective? Was send replacememnt, did not fix problem. Twice? Phone conve
... Read morersation with parts person, and after a little digging, it was NOT the correct board, correct board was not available. Returned all parts, refunds all around. Ordered correct board from another site, installed, programed, SUCCESS! Total repair time/installation-less than 15 minutes. Getting the correct part 30 days.