















Estate Dishwasher Hardware
- Search your model number to find:
- Genuine OEM parts guaranteed to fit
- Free manuals and guides
- Repair instructions and videos


Popular Estate Dishwasher Hardware

Your Price
$6.40
In Stock
Estate Dishwasher Range Torx Screw
This was made more difficult by the fact that the screws that hold the burners to the range top were rusted and had to be drilled out so the the burners could be released from the top.
1. Disconnect the power to the range.
2. Open the top oven door.
3. Remove 2 - 1/4" sheet metal screws at the front corners of the range top assy. Remove the Burner knobs and the two Phillps screws that holds the gas valve assembly to the range top.
4. With a drill, remove the tops of the screws to release the burners from the range top. If the screws are in good condition and just unscrew them and the upper burners from the Orifice Holders. (I had to replace the orifice holders because the screws were stuck in them due to rust).
5. When the burners are free, lift the range top at the front and remove it from the range. Disconnect the ignitor wires from the ignitors on each holder.
6. To replace the Orifice Holders, disconnect the gas supply pipes from each holder by loosening the compression nut at the holder using an adjustable wrench. Secure the Orifice Holders when loosening the fittings, BE CAREFUL not to damage the aluminum gas supply pipes.
7. Note that there are 3 different Holders, be sure to use the holder that matches the specific location.
8. For LP gas fueled ranges ONLY, remove the small gas jets from the old holders and install them in place of the parts supplied with the new orifice holders. The new parts contain NATURAL GAS jets which are not compatible with LP gas. Each Different Orifice Holder uses a specific orifice or jet, make certain that the orifice matches the orifice holder. Check for leaks at the gas connections using soapy water.
9. Carefully raise the old ignitor switches (4) off the shafts of the gas valves. Note the top and bottom configuration of the switches
10. Carefully release the wires that come from the rear of the range from the rearmost switch. Press a suitable pin or other suitable tool in a the hole, beside the wire, just enough to release the wire. (Look at the NEW switch assemble to see how this works). Remove the wires from the NEW switch first to see how it is done. Repeat the process on the old switches. (you will re-use the wires that come up from the rear of the range.
11. Install the new switch assembly over the four (4) burner gas valves, take care to align the "D" shaped shafts with the holes in each valve.
12. Insert the wires in the two connections on the rearmost switch. CAUTION!!! Be sure to install the wires so that the color codes agree with the wires on the new switch assembly. Black to black and gray to gray.
13. Install the 4 clear plastic "shields" over the shafts and against the top of each switch.
14. Re-connect the ignitor wires to the burners and Re-Install the range top, in the reverse order of dis-assembly. Read more...
PartSelect Number PS11741257
Manufacturer Part Number WP3368921
7-18 x 3/4-Inch - sold individually.
Fixes these symptoms
- Gas igniter glows, but will not light
- Will Not Start
- See more...
Installation Instructions
Michael from Dardanelle, AR
Ignitor switches shorted out
The ignitor switches are installed on top of the 4 gas valves for the range top. These switches control the electronic ignition. To replace the switch assembly the top of the range must be removed to gain access. This was made more difficult by the fact that the screws that hold the burners to the range top were rusted and had to be drilled out so the the burners could be released from the top.
1. Disconnect the power to the range.
2. Open the top oven door.
3. Remove 2 - 1/4" sheet metal screws at the front corners of the range top assy. Remove the Burner knobs and the two Phillps screws that holds the gas valve assembly to the range top.
4. With a drill, remove the tops of the screws to release the burners from the range top. If the screws are in good condition and just unscrew them and the upper burners from the Orifice Holders. (I had to replace the orifice holders because the screws were stuck in them due to rust).
5. When the burners are free, lift the range top at the front and remove it from the range. Disconnect the ignitor wires from the ignitors on each holder.
6. To replace the Orifice Holders, disconnect the gas supply pipes from each holder by loosening the compression nut at the holder using an adjustable wrench. Secure the Orifice Holders when loosening the fittings, BE CAREFUL not to damage the aluminum gas supply pipes.
7. Note that there are 3 different Holders, be sure to use the holder that matches the specific location.
8. For LP gas fueled ranges ONLY, remove the small gas jets from the old holders and install them in place of the parts supplied with the new orifice holders. The new parts contain NATURAL GAS jets which are not compatible with LP gas. Each Different Orifice Holder uses a specific orifice or jet, make certain that the orifice matches the orifice holder. Check for leaks at the gas connections using soapy water.
9. Carefully raise the old ignitor switches (4) off the shafts of the gas valves. Note the top and bottom configuration of the switches
10. Carefully release the wires that come from the rear of the range from the rearmost switch. Press a suitable pin or other suitable tool in a the hole, beside the wire, just enough to release the wire. (Look at the NEW switch assemble to see how this works). Remove the wires from the NEW switch first to see how it is done. Repeat the process on the old switches. (you will re-use the wires that come up from the rear of the range.
11. Install the new switch assembly over the four (4) burner gas valves, take care to align the "D" shaped shafts with the holes in each valve.
12. Insert the wires in the two connections on the rearmost switch. CAUTION!!! Be sure to install the wires so that the color codes agree with the wires on the new switch assembly. Black to black and gray to gray.
13. Install the 4 clear plastic "shields" over the shafts and against the top of each switch.
14. Re-connect the ignitor wires to the burners and Re-Install the range top, in the reverse order of dis-assembly. Read more...
Your Price
$7.47
In Stock
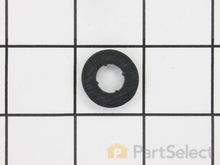
Estate Dishwasher Rubber Washer
PartSelect Number PS11743934
Manufacturer Part Number WP717273
The rubber washer is a part which is specific to dishwashers and should not be substituted by a similar part. It works with the heating element to seal the receptacle opening where the heating element is attached. The rubber washer is used to prevent water leaking from your dishwasher during its cycle. Before making any repairs to your dishwasher make sure that you disconnect the power by finding the breaker for the dishwasher, and turning it off. The tools you will need to complete this repair include an adjustable wrench, and a 1/4 inch nut driver. This specific rubber washer is sold individually.
Fixes these symptoms
- Leaking
- Not cleaning dishes properly
- Not drying dishes properly
- See more...
Installation Instructions
PAUL from ESTES PARK, CO
Unit Wouldn't Work. "Clean" Light Blinking
The unit had power, but the controls would not work. The "clean" light was blinking. I first replaced the control unit, no help. I then used the "just ask" and was told the problem was the heating element and/or the hi-temp thermostat. I replaced both those and used the re-set code pushing the "hi-temp/air dry, hi-temp/air dry" buttons. That did it. Easy parts to locate and replace. It took longer pulling the unit out and putting it back than it did to replace the parts.
Read more...

Your Price
$7.47
In Stock
Estate Dishwasher Washer Hose Clamp
PartSelect Number PS11743008
Manufacturer Part Number WP596669
This hose clamp is used in a wide variety of household appliances. Most often it is found in washers, dishwashers, refrigerators, freezers, dehumidifiers, garbage disposals, or air conditioners. This clamp is used to securely attach a hose to another part of your appliance, which helps prevent leaks from those connections. Depending on the appliance, it can attach hoses to drain pumps, water inlet valves, pressure switches, and injector nozzles. We recommend you refer to model-specific diagrams for appropriate uses and exact placement. This hose clamp is made of metal, and is sold individually. To access and replace this part you will need a nut driver, pliers, and screwdrivers. Before you begin any repair work, make sure you have unplugged your appliance, and shut off the water supply if applicable.
Fixes these symptoms
- Leaking
- See more...
Installation Instructions
jeff from lindenhurst, IL
Washing Machine was leaking water
Loosened the hose clamp, removed the injector valve and injector nozzle assembly, replaced both and tightened with new hose clamp. Fixed the problem for less than $20!! Washing machine is 20 years old and this was the first problem--hopefully it is now good for another 20 years!
Read more...

Your Price
$32.63
In Stock
Estate Dishwasher Push-in Retainer Clip
PartSelect Number PS11741622
Manufacturer Part Number WP3400918
Sold individually.
Fixes these symptoms
- Not cleaning dishes properly
- See more...
Installation Instructions
Steven from Cicero, NY
top rack wouldnt line up due to broken adjuster
popped cover off broken adjuster and replaced it with new cover and supplied screws. Old holder also broke and that just popped into place. Dishes on top rack now are clean!
Read more...

Your Price
$9.62
In Stock
Estate Dishwasher Terminal Nut
PartSelect Number PS11755402
Manufacturer Part Number WPW10477552
Presenting the Terminal Nut from Whirlpool, a genuine OEM part specifically designed for Whirlpool's range of dishwashers, ensuring an optimal fit and reliable performance. This is an original retaining nut for the heating element, designed keeping the exact specifications of Whirlpool dishwashers in mind. A critical component for the proper functioning of your dishwasher's heating element, this retaining nut is crucial to secure its position. The installation procedure requires appropriate safety practices. Please check the precise part requirement for your specific Whirlpool model before purchasing. Effective utilization of this product ensures the longevity and efficiency of your Whirlpool dishwasher.
Installation Instructions
PAUL from ESTES PARK, CO
Unit Wouldn't Work. "Clean" Light Blinking
The unit had power, but the controls would not work. The "clean" light was blinking. I first replaced the control unit, no help. I then used the "just ask" and was told the problem was the heating element and/or the hi-temp thermostat. I replaced both those and used the re-set code pushing the "hi-temp/air dry, hi-temp/air dry" buttons. That did it. Easy parts to locate and replace. It took longer pulling the unit out and putting it back than it did to replace the parts.
Read more...

Your Price
$7.47
In Stock
Estate Dishwasher Screw - 8-18 X 1/2
I had to unplug an electronic tape from the inside of the beige control panel and plug the same tape back into the black control panel. I also had to remove the beige handle that was on the inside of the control panel, attached to the door, and replace it with the new black one I'd received. I then installed the black control panel and reattached it with screws and finished replacing the rest of the screws I had removed from the inside of the door.
I tested the handle to make sure it opened the door and locked it like it should and then went outside and turned the breaker back on. Came in and turned on the dishwasher and did a load of dishes. It looks awesome, matches the rest of my black appliances and I am very proud to have done it myself. I also wanted to thank the customer service lady who was so great to work with on the phone. I would shop with you again. Read more...
PartSelect Number PS11740645
Manufacturer Part Number WP302868
Sold Individually.
Installation Instructions
Margaret from San Diego, CA
Wanted to change beige dishwasher front to black.
First , I went outside and turned the breaker for the dishwasher off. Next,I removed the screws that held the bottom 2 pieces, that rest on the floo,r in place. Then removed the two beige metal pcs. . Next I replaced them with the 2 black pieces I had ordered and secured them with the 2 black screws I had received as part of my order. Then I removed the scews from the inside of the door of my KitchenAid Dishwasher. This released both the front bottom panel and the control panel. . I took the beige bottom door panel off and moved the insulation piece from the back of thebeige panel to the back of the black panel. Then I intalled the new black panel I ordered and resecured it with two screws until I had finished with the control panel switch out.I had to unplug an electronic tape from the inside of the beige control panel and plug the same tape back into the black control panel. I also had to remove the beige handle that was on the inside of the control panel, attached to the door, and replace it with the new black one I'd received. I then installed the black control panel and reattached it with screws and finished replacing the rest of the screws I had removed from the inside of the door.
I tested the handle to make sure it opened the door and locked it like it should and then went outside and turned the breaker back on. Came in and turned on the dishwasher and did a load of dishes. It looks awesome, matches the rest of my black appliances and I am very proud to have done it myself. I also wanted to thank the customer service lady who was so great to work with on the phone. I would shop with you again. Read more...

Your Price
$7.47
In Stock
Estate Dishwasher Air Conditioner Cover Screw
In this spirit of any repair, I replaced them, and it was not the issue. I don't know what I expected.
Ceiling. YouTube. Pacing.
Then I figured it was this part - the motor coupling. I unplugged the machine and took out the drain tube. I leaned the machine back and propped it up with an empty detergent bottle, because those were abundant. Ratchet off a few bolts and the motor comes out. The coupling was indeed broken. The new one slips right in - I tapped it a few times with a mallet for good measure / vengeance. Ratcheted the bolts back on and tipped it back up.
Pros: Washer works now.
Cons: Everest-esque laundry pile to address.
But hey, it worked! I am no handyman and it wasn't too bad at all. Half hour tops. Read more...
PartSelect Number PS11740701
Manufacturer Part Number WP308685
Sold individually.
Installation Instructions
Peter from WRENTHAM, MA
Kenmore 80 Series Washer - Agitator Stopped Working
First I screamed at the ceiling, because I have a three year old and an infant, and the washing machine was dead. Then I went to youtube. It seemed like the "agitator dogs" were the issue. In this spirit of any repair, I replaced them, and it was not the issue. I don't know what I expected.
Ceiling. YouTube. Pacing.
Then I figured it was this part - the motor coupling. I unplugged the machine and took out the drain tube. I leaned the machine back and propped it up with an empty detergent bottle, because those were abundant. Ratchet off a few bolts and the motor comes out. The coupling was indeed broken. The new one slips right in - I tapped it a few times with a mallet for good measure / vengeance. Ratcheted the bolts back on and tipped it back up.
Pros: Washer works now.
Cons: Everest-esque laundry pile to address.
But hey, it worked! I am no handyman and it wasn't too bad at all. Half hour tops. Read more...

Your Price
$7.47
In Stock
Estate Dishwasher Screw 818 X 5/8
Once I removed the pump outlet housing I saw that the gasket was out of place almost all the way around. I cleaned around the housing, replaced the gasket and the missing screw.
You need a Torx T-15 for this repair. Note that all of the screws on the housing were loose so you might need to tighten them from time to time.
Be careful not to drip a screw when you are installing it since it's a real hassle to fish it out from under the screen.
Once everything was tightened up, the wash pressure seemed to be much higher. Read more...
PartSelect Number PS11747050
Manufacturer Part Number WP9741232
Sold individually.
Fixes these symptoms
- Leaking
- Not cleaning dishes properly
- See more...
Installation Instructions
Charles from Brooklyn, NY
Water leaking out under door
The pump outlet gasket was sticking out and a screw was missing from the pump outlet housing. This was causing water to flood out under the door.Once I removed the pump outlet housing I saw that the gasket was out of place almost all the way around. I cleaned around the housing, replaced the gasket and the missing screw.
You need a Torx T-15 for this repair. Note that all of the screws on the housing were loose so you might need to tighten them from time to time.
Be careful not to drip a screw when you are installing it since it's a real hassle to fish it out from under the screen.
Once everything was tightened up, the wash pressure seemed to be much higher. Read more...

Your Price
$10.70
In Stock
Estate Dishwasher Lid Hinge Pin
PartSelect Number PS11741308
Manufacturer Part Number WP3372028
The lid hinge pin or detergent lid pin on your dishwasher helps dispense your dish detergent when your dishwasher is running. The pin fits with the dispenser lid and allows the lid to pop open and dispense detergent. It is a small, plastic pin that is approximately 3 inches in length. Due to its small size, the pin can be damaged relatively easily, and if your pin is broken or missing, it will need to be replaced. This product is sold individually.
Fixes these symptoms
- Door latch failure
- Door won’t close
- Not cleaning dishes properly
- See more...
Installation Instructions
HAROLD from FISHERSVILLE, VA
Worn out spring on detergent release box lid
First, examine very carefully how the old spring relates to the detergent release box lid. Note that the top of the spring has a square-end upside down "U" . This rests on a small ledge on the detergent box. Also note that on either end of the spring is a straight extension of the spring wire. These two "legs" must rest on the inside of the edge of the detergent box. Second, use a flat blade screw driver to pry the LID hinge pin from the mounting "posts. Remove the pin, first noting the position of the spring. Reassemble the spring on the hinge pin in reverse order. Then snap the lid onto the spring using the two mounting "posts". NOTE: I used a very fine needle nose pliers to move the two spring "legs" behind the detergent box edge after I had mounted the lid. Flip the lid down to test if the spring pressure on the lid can be felt. Harold Kitzmann, Fishersville VA
Read more...

Your Price
$7.47
In Stock
Estate Dishwasher Screw
PartSelect Number PS11753384
Manufacturer Part Number WPW10348409
Sold individually.
Fixes these symptoms
- Door latch failure
- See more...
Installation Instructions
REBECCA from GREENFIELD TWP., PA
My son broke the door handle off the Refrigerator
I removed two screws that were holding on broken handle. I put new handle in place and attached it with new screws. Ordering parts on line and receving them in mail a few days later was awsome. I did not need my husbands help at all .
Read more...
Related Estate Dishwasher Parts
- All Estate Dishwasher parts
- Estate Dishwasher Brackets and Flanges
- Estate Dishwasher Caps and Lids
- Estate Dishwasher Circuit Boards and Touch Pads
- Estate Dishwasher Dishracks
- Estate Dishwasher Doors
- Estate Dishwasher Hoses and Tubes
- Estate Dishwasher Pumps
- Estate Dishwasher Seals and Gaskets
- Estate Dishwasher Spray Arms