Models > WRT17CVAW2

WRT17CVAW2 Frigidaire Refrigerator - Overview

Sections of the WRT17CVAW2

[Viewing 4 of 4]
Keep searches simple, eg. "belt" or "pump".
Defrost Thermostat – Part Number: 5303917954
Defrost Thermostat
★★★★★
★★★★★
(7)
PartSelect #: PS469269
Manufacturer #: 5303917954
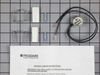
This limiter thermostat cuts out when the temperature inside your refrigerator reaches 55 degrees Fahrenheit and kicks back in when the internal temperature drops to 20 degrees Fahrenheit. If you disc...
$22.68
  In Stock
Evaporator Fan Blade – Part Number: 5308000010
Evaporator Fan Blade
★★★★★
★★★★★
(5)
PartSelect #: PS473177
Manufacturer #: 5308000010
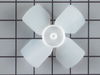
This evaporator fan blade is a genuine OEM part that is sourced directly from the manufacturer. The evaporator fan blade circulates air through the refrigerator to control the amount of cold air goes ...
$47.83
  In Stock
Hexagonal Screw – Part Number: 241710601
Hexagonal Screw
PartSelect #: PS1526503
Manufacturer #: 241710601
Sold individually.
$11.21
  In Stock
White Touch up Paint – Part Number: 5303321319
White Touch up Paint
PartSelect #: PS467298
Manufacturer #: 5303321319
This is white touch up paint for refrigerators, microwaves, ranges, dryers, and freezers. It is used to cover, or touch up, nicks and scratches on the appliance from wear and tear. It is an 18ml bottl...
$11.98
  On Order
Door Shelf Retainer Bar End Cap - Right Side – Part Number: 5303207230
Door Shelf Retainer Bar End Cap - Right Side
PartSelect #: PS455089
Manufacturer #: 5303207230
This white end cap is designed for the right side of your refrigerator door shelf retainer bar.
$13.99
  In Stock
Ice Cube Tray – Part Number: 215667501
Ice Cube Tray
PartSelect #: PS423293
Manufacturer #: 215667501
The ice cube tray is made of plastic, is white in color, and is sold individually. This is a part for your freezer. The ice cube tray is sturdy but flexible to allow you to easily release the ice once...
$7.75
  In Stock
Door Shelf Retainer Bar End Cap - Left Side – Part Number: 5303207229
Door Shelf Retainer Bar End Cap - Left Side
PartSelect #: PS455088
Manufacturer #: 5303207229
$14.15
  Special Order
Freezer Door Gasket – Part Number: 5308007123
Freezer Door Gasket
★★★★★
★★★★★
(1)
PartSelect #: PS473582
Manufacturer #: 5308007123
This white door gasket is used to make an air-tight seal for the cabinet when the door is closed.
$143.38
  In Stock
Door Hinge Pin Bearing – Part Number: 218519300
Door Hinge Pin Bearing
PartSelect #: PS428213
Manufacturer #: 218519300
This white hinge pin bearing pivots the freezer and refrigerator door.
  No Longer Available
SCREW – Part Number: 218252201
SCREW
PartSelect #: PS1525782
Manufacturer #: 218252201
Sold individually.
$11.75
  In Stock
Hex Head Screw – Part Number: 5304455650
Hex Head Screw
PartSelect #: PS1532376
Manufacturer #: 5304455650
Sold individually.
$12.02
  In Stock
Center Door Hinge Retainer Bracket – Part Number: 218998901
Center Door Hinge Retainer Bracket
PartSelect #: PS429475
Manufacturer #: 218998901
Center Hinge Pin not included.
  No Longer Available

Questions And Answers for WRT17CVAW2

Be the first to ask our experts a question about this model!

Common Symptoms of the WRT17CVAW2

[Viewing 13 of 13]
Fridge too warm
Fixed by
these parts
Fixing Fixing Fixing
Show All
Noisy
Fixed by
these parts
Fixing Fixing
Show All
Freezer not defrosting
Fixed by
these parts
Fixing
Show All
Freezer section too warm
Fixed by
these parts
Fixing
Show All
Light not working
Fixed by
these parts
Fixing
Show All
Fridge too cold
Fixed by
these parts
Fixing Fixing
Show All
Fridge runs too long
Fixed by
these parts
Fixing
Show All
Freezer too cold
Fixed by
these parts
Fixing
Show All
Frost buildup
Fixed by
these parts
Fixing
Show All
Fridge and Freezer are too warm
Fixed by
these parts
Fixing
Show All
Door Sweating
Fixed by
these parts
Fixing
Show All
Leaking
Fixed by
these parts
Fixing Fixing
Show All
Too warm
Fixed by
these parts
Fixing
Show All
Keep searches simple. Use keywords, e.g. "leaking", "pump", "broken" or "fit".
freezer kept icing over, refrigerator too hot
First, I unplugged the appliance. Safety, first.
Than I removed the shield which was held in by screws. This covered the fan, thermometer.
The defrost thermostat was taken out, with a little extra force. The wires on the defective part were no longer attached to the part. The instructions were easy to follow in replacing the defrost thermostat. I stripped the coating on the wire, attached it with the enclosed electical bugs. The assy was able to follow, and the part went back on. The refrigerator is working perfectly. I couldn't have done it without the help in diagnosing the problem and with the speedy delivery of the new part. Thanks for all your help and the ease of the installing the new part!
Parts Used:
Defrost Thermostat
  • debra from new washington, OH
  • Difficulty Level:
    Really Easy
  • Total Repair Time:
    15 - 30 mins
  • Tools:
    Nutdriver, Pliers
11 of 13 people found this instruction helpful.
Was this instruction helpful to you?
Thank you for voting!
Drip pan had rusted & was leaking water on the floor
The BIG problem was getting the old drip pan off. The bolt on top of the compressor was too long to allow the removal of the old drip pan. I removed the old drip pan by cutting most of it away with tin shears then cutting the remaining part of the pan around the bolt with a hack saw (taking care not to damage freon lines and raising the pan above the threads of the bolt so as not to damage the threads). I still had to cut half the bolt away with a hack saw by replacing the nut and cutting a third of the bolt away (above the nut), so the new pan would fit. Putting the new pan on was a breeze after that. It may be easier to just cut the bolt off altogether on top of the compressor and use the wire clips per the instructions supplied with the kit to install the new one.
Parts Used:
Defrost Drain Pan Kit
  • John from Forest, VA
  • Difficulty Level:
    A Bit Difficult
  • Total Repair Time:
    1- 2 hours
  • Tools:
    Pliers, Wrench (Adjustable)
9 of 10 people found this instruction helpful.
Was this instruction helpful to you?
Thank you for voting!
Erratic light.
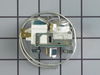
Simple switch repair: Unplug fridge, pull down to remove switch assembly, slip contacts off. Reverse with replacement switch. HOWEVER, check first to see if the bulb filament might be broken, as this could cause the same symptom. OR in my case, the light socket connection was the culprit. Check that too before ordering a replacement switch.
Parts Used:
Door/Light Switch
  • D KIRKE from CORVALLIS, OR
  • Difficulty Level:
    Really Easy
  • Total Repair Time:
    Less than 15 mins
9 of 11 people found this instruction helpful.
Was this instruction helpful to you?
Thank you for voting!