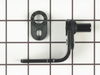
This drawer slide rail is for the right side of your refrigerator. The drawer slide rail attaches horizontally to the refrigerator wall and supports the drawer so it can easily slide in and out. If th...
$42.55
In Stock
Order within the next 11 hrs and your part ships today!
This is a manufacturer-approved drawer slide rail for your refrigerator. This slide rail is for the left side of the fridge. All you need to complete this repair is a Phillips screwdriver. Remove the ...
$29.73
In Stock
Order within the next 11 hrs and your part ships today!
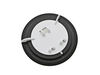
This 10 by 5 inch ice maker (Electromechanical Icemaker Kit, Ice Maker Assembly) produces ice. This particular model will produce seven crescent shaped cubes every cycle. It is constructed of plastic ...
$216.23
In Stock
Order within the next 11 hrs and your part ships today!
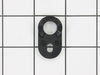
This “Dispenser Door Assembly” (Door Recess Assembly, Ice Door Assembly, Dispenser Door, Refrigerator Dispenser Ice Chute Door Kit, Dispenser Door Flap, Ice Chute Door, Flapper) keeps the room air fro...
$15.58
In Stock
Order within the next 11 hrs and your part ships today!
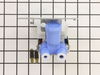
This valve comes with 1/4" compression inlet.
NOTE: This part comes with new quick connections. To install - cut retaining nuts off of existing plastic water lines and gently push them into new valv...
$61.57
In Stock
Order within the next 11 hrs and your part ships today!
This is the drawer slide rail or slide assembly for your refrigerator. You will find the drawer slide rail at the bottom of your refrigerator, mounted to the right-hand side of the cabinet wall. It is...
$44.25
In Stock
Order within the next 11 hrs and your part ships today!
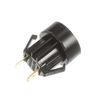
The interior light of your refrigerator is controlled by a switch that is activated when the door is opened and closed. If your refrigerator light will not turn on, there could be an issue with the sw...
$8.56
In Stock
Order within the next 11 hrs and your part ships today!
This drawer slide rail is for the left side of the refrigerator, and allows the bottom shelf to slide in and out. If your refrigerator door will not close, or the bottom drawer will not slide properly...
$31.32
In Stock
Order within the next 11 hrs and your part ships today!
Questions And Answers for TFJ22PRDAAA
Be the first to ask our experts a question about this model!
✖
Ask a Question
Ask our experts a question on this model and we'll respond as soon as we can.
Disclaimer - if you aren't confident about doing this repair, call a repair specialist in. Also, take care not to damage the freezer coils as they have refrigerant in them that I'm told is harmful if it leaks. It may also be under pressure. The instructions that follow won't require you to touch the coils. There is no need to unplug the r
... Read moreefrigerator or disconnect the water supply to do this repair. The screw driver you will need is a phillips (the one withe the + head).
1st, take out your frozen food (which, if you need to do this repair may not be frozen) and put it in a cooler or the refrigerator. 2nd, remove the ice cube bucket and dump the ice cubes in the cooler to help keep the frozen food cool. Turn the ice cube maker off. 3rd, remove the freezer shelves. 4th, locate the panel covering the freezer coils. It's a panel at the back of the freezer. It hides the freezer coils and protects them from damage. It's held in place by two screws located at the top left and right corners of the panel. 5th, unscrew the screws holding the panel to the refrigerator. 6th, detach the clip at the top of the panel. 7th, remove the panel. You should see the coils now. The coils will be covered in frost if the defroster heater has failed. If the coils are not covered in frost, there may be another reason for the refrigerator failing to cool. 8th, even if the coils are covered in frost, you should also inspect the defroster heater at the bottom, underneath the coils. The business end of it is a long tube running horizontally between two wires. If it's black like a badly burned out light bulb, then it's failed. If the bulb appears fine, you may have a different reason for your refrigerator and freezer frosting up. We'll assume that the defroster heater has blown out, and proceed. 9th, place a towel at the bottom of the panel space, to soak up any water that melts and runs down. There is a drain under the coils. It collects water that melts during the defrost cycle, but I'd rather mop up the water instead of relying on the drain. 10th, use hot air blowing from the hair dryer to defrost the coils. Just play the air from the hair dryer over the coils, starting at the top, and working down. The frost will quickly melt and the water will be soaked up by the towels. If you want things to go faster, you can throw hot water on the coils to melt them faster, but that produces more water to mop up, and makes a big mess. It's also dangerous to have water lying around if you then decide to use the hair dryer to continue defrosting the coils. 11th. MOST IMPORTANT. Don't use your screwdriver or any other sharp object to pick away at the frost on the coils. If you damage the coils the refrigerant could leak out. I'm told that it's dangerous stuff. Furthermore, I expect that you'd have to buy a new refrigerator if you damaged the coils. 12th, once you've defrosted the coils, locate the defroster heater and bracket assembly again. It's held in place by two screws, and has two insulated wires running into it on either side. Unscrew the screws, disconnect the wires and remove the assembly. Throw it away - there are no useful parts in it. 13th, install the new defroster heater and bracket assembly by connecting the wires to it, mounting it back into its place, and rescrewing the screws. 14th, put the panel back in place, replace the clip, and screw the panel back in place. 15th, turn the ice cube maker back on and replace the ice cube bucket and shelves. Put your food back into the freezer. 16th, use the freezer and refrigerator as normal. If the defroster heater fails again (I'm on my third one in less than six years), you'll notice frost building up on the panel at the back of the freezer before your freezer and refrigerator stops cooling. The frost build up is your signal to defrost the freezer and buy another defroster heater and bracket assembly. I don't know why this part is so weak, and don't know any fix except to keep replacing it.
1. Turn off water supply, and electrical ( unplug it) to fridge. 2. Remove water line to valve. Watch for water to pour out of the line. Have a towel handy. 3. Remove the cardboard cover on the bottom of the fridge. 4. Remove the screws that hold the valve in place. 5. Remove the valve, be careful the waterlines ar
... Read moree still attached. 6. Place a towel under valve to catch any water that leaks out from water lines. 7. Remove electrical lines, make sure to mark which went where. One is for the ice, and one is for the water. Make sure the power is off, there is 120 volts present at those connections. - now my waterlines attached using a compression type fitting. The new valve I got used just a push in type of attachment. But, easy enough I just removed the pieces for the compression and the waterlines pushed right in and worked fine. - the mounting harness for the valve was alittle different but the parts I need were in the right location and she fit in fine. 8. Attach water lines. They are different sizes so you can't get those mixed up. 9. Attach electrical lines. - the new valve came with adaptors for my electrical connection. Just snapped them on and kept on going. 10. turn on watersupply for fridge. Plug it back in. 11. Test for leaks, and proper operation. ie. When you push the water does the water valve open? 12. Unplug fridge 13. Now is a good time to clean out any dust or dirt that has accumallated in under around your fridge. 14. reassemble, valve, then cover. move fridge back into place. 15. Plug fridge back in. 16. Take a clean glass. 17. Fill with water from the front. 18. Take full glass of water and go watch tv. You've earned it, and saved yourself probably $100.00 in labor costs. Good Job.
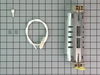
First of all, the larger white plastic tubes in this thing are 5/16" OD, which no plumbing store seems to stock. At the lower left rear end there are 2 tubes, one for water and one for ice, that are doomed to fail being in proximity of a heat source - they essentially get cooked to the point of becoming brittle and cracking. The smaller
... Read more tube and union can be easily found, but do yourself a favor if the larger one cracks and order the plastic tube and water tube union here, and just cut off the brittle part and amend the old tube using the union.