Your coupon for will be reflected when you check out!
✖
Your coupon for
✖
Hello!
You're visiting the PartSelect site in U.S.
Would you like to shop on the Canadian site?
Stay on this site
Go to Canadian site
✖
Model Number Locations
1Select Category Type
Select Category Type
2Select Product Type
Select Product Type
3Select {MODEL} Type
Select {MODEL} Type
Sample Model Number Tags
Model numbers can be made up of numbers (1005400, for example) or a combination of letters and numbers (LAT1000AAE). The model number will most likely appear on either a paper sticker or a metal plate. Your appliance's model number tag may look similar to the sample model number tags shown here (model number highlighted in yellow):
SCB2001KSS02 General Electric Microwave Oven Combo - Overview
Save your modelModel Saved!
Save your model for later to make things easier.
Model has been saved to My Models. If you're not signed in, your lists are available on this device and will expire within 30 days.
Model has been saved to My Models.
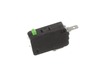
This ceramic microwave fuse is just over an inch in length. It is white in the center, and metal on both ends. This is a 20-amp fuse, and is used to power your microwave. If the touch pad on the micro...
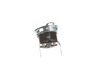
This switch monitor interlock is a critical safety component designed to ensure proper communication between the microwave door latch and the control board. When functioning correctly, it confirms tha...
Introducing the GE Microwave Thermostat - a vital safety component for your microwave. Crafted with precision, this thermostat is specifically designed to prevent overheating scenarios which can cause...
This diode cable is a replacement electrical component designed to regulate current flow within an appliance circuit. It helps protect sensitive components and is commonly replaced when electrical fau...
Introducing the GE Advantium Metal Tray, an essential part of your microwave. This non-stick metal tray serves a vital role in your cooking process, revolving in the center of your microwave, thereby ...
NOTE: This is a manufacturer substitution. Part may differ in appearance and size but is a functional equivalent to prior part.This tray rotates in your microwave ensuring more even temperatures.
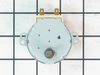
This capacitor delivers the electrical boost required for motors to start and operate efficiently. Proper capacitance reduces strain on motor components and helps prevent startup failures or inconsist...
This GE Thermostat Thermal Cut-off is a crucial safety component for microwaves. Specifically designed to prevent overheating, it functions as a protective measure by shutting down the appliance if te...
Ask our experts a question about this model and we'll get back to you as soon as possible!
2 questions answered by our experts.
Sort by:
< Prev
1
Next >
Search filter:
Clear Filter
Your search term must have 3 or more characters.
Keep searches simple. Use keywords, e.g. "leaking", "pump", "broken" or "fit".
Sorry, we couldn't find any existing answers that matched.Try using some different or simpler keywords, or submit your new question by using the "Ask a Question" button above!
Greg
December 17, 2019
How does one access the display circuit board for replacement? I found 2 screws behind the top of the control panel but it seems to be attached on the bottom also, behind or above the black vent, but it isn't obvious how the vent panel is attached.
For model number SCB2001KSS02
Hello Greg and thanks for writing.
use a Phillips head screwdriver to
unthread the two mounting screws
securing the grill with the screws
unthreaded open the oven door then slide
the grill to the left and lift it up to
remove next remove the control panel
mounting screw lift the control panel up
to detach note the orientation of the
wires connect it to the control board
then depress the locking tabs if
necessary to disconnect the wires
remove the screws securing the grounding
wire and set the control panel on a
sturdy surface release the ribbon
connector now and thread the mounting
screws securing the main control board
to the housing with the screws removed
lift out the board prepare the new
control panel for installation by
removing all of the protective coverings
make sure the new switch cable is
inserted through the hole in the control
board housing then position the board in
the housing thread the screws to secure
the ribbon connector secured the
grounding wire to the control board
housing reconnect the remaining wires to
the appropriate terminals on the board
now insert the control panel tabs into
the slots in the frame and push the
panel down replace the mounting screw to
secure insert the tabs on the grille
into the slots in the frame and slide
the grille to the right rethread the
mounting screws with the repair
completed plug the power cord back in
and your microwave oven should be ready
for use, We hope this helps. Please contact us anytime.
Did this question help you?
Thank you for voting!
Terri
January 14, 2020
What tool do i need to remove the screw holding the existing wave guide mica cover in place?
For model number SCB2001KSS02
Hi Terri, thank you for your question. You would need a screw driver to remove the screw holding the wave guide in place. Good luck with your repair.
Did this question help you?
Thank you for voting!
< Prev
1
Next >
✖
Ask a Question
Ask our experts a question on this model and we'll respond as soon as we can.
Turned out the issue was easily solved by replacing a single, inexpensive fuse.
First off, UNPLUG THE MICROWAVE.
The fuse is located under the plastic grill at the top of the microwave. It's held on by two screws. Once you've removed the screws and taken off the plastic grill, you go to the right side of the mic
... Read morerowave and remove another screw that holds a small metal grill in place. Removing the small metal grill is probably the toughest part of this repair. You kind of have to rock it back and forth a bit to get it to release. Once that's off, you can get to the fuse. I removed the burnt out one with a pair of needle nose pliers. I also put a small piece of cardboard under the fuse when I did this so I didn't accidentally drop it into the innards of the microwave. I did the same thing when I replaced the new fuse. I then plugged the appliance back in and made sure it worked. Once that was confirmed, I replaced both grills.
First I disconnected the power and opened the door. Then I removed the top screws holding the top vent louvers, then removed the screw at the top of the touch pad. The touch pad removes by sliding up slightly then tilting top out. I unscrewed two screws holding the door latch assembly. Press the tab to remove and replace switch. Reco
... Read morennect wires, reseat latch mount by placing top bracket tab in place first, allign and secure with screws. Reseat touch pad by placing bottom tabs in first, tilt forward and press up to seat top tabs, secure with top screw. Secure vent louver screws, plug in and watch your microwave work again.