Your coupon for will be reflected when you check out!
✖
Your coupon for
✖
Hello!
You're visiting the PartSelect site in U.S.
Would you like to shop on the Canadian site?
Stay on this site
Go to Canadian site
✖
Model Number Locations
1Select Category Type
Select Category Type
2Select Product Type
Select Product Type
3Select {MODEL} Type
Select {MODEL} Type
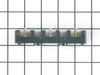
Sample Model Number Tags
Model numbers can be made up of numbers (1005400, for example) or a combination of letters and numbers (LAT1000AAE). The model number will most likely appear on either a paper sticker or a metal plate. Your appliance's model number tag may look similar to the sample model number tags shown here (model number highlighted in yellow):
Model has been saved to My Models. If you're not signed in, your lists are available on this device and will expire within 30 days.
Model has been saved to My Models.
This an authentic OEM 40-Watt replacement light bulb, used in a number of household appliances. It is specially designed to withstand extreme temperatures, which is why these replacement bulbs are mos...
The knob skirt or grommet on your range goes around the knob, forming a buffer between it and the range surface. If your knob skirt is damaged, you should consider replacing it. This product is approx...
This white knob skirt is located between the glass top and the control knobs of your stove top. The skirt has an outside diameter of approximately 2 inches. The most common reasons to replace the time...
This broiler pan and roasting rack set is designed to help reduce mess while cooking by allowing grease to drain away from food. Its durable porcelain-coated construction stands up to high temperature...
This part is a black plastic knob that is most often used as a burner control knob. This knob allows you to turn the burner on your range or cooktop on, and it allows you to control the temperature of...
The light socket on your electric range connects the power source to the light bulb. If your oven light is malfunctioning, you may need to replace the light socket. The light socket is located in the ...
This inner oven door glass panel is a durable, heat-resistant replacement designed to restore the clarity and safety of your oven, wall oven, or oven/microwave combination unit. Crafted from high-hard...
Socket Lite come with clips attached to the outside of the housing. After you unhook the 3 lead wires that are attached to the unit. All you have to do is push in on the clips and release the unit. Then you snap in the new unit. Attach the 3 wire leads, put a oven bulb in the socket end, and the install the light cove
... Read morer
Turned off the gas then disconnected the gas line. Unplugged the AC cord and removed the unit from the counter top. Had to locate a suitable area to lay the cooktop, rather large. The bottom cover is held on by 6-8 sheet metal screws, however, the gas regulator and nipple must be removed also for the cover to come off. I removed the Ignit
... Read moreer module screws, leaving the wires connected and mounted the new module in it's place. I then removed one wire at a time from the old and put it on the new part. Replaced the back cover and reinstalled the gas regulator with fresh pipe sealant. Probably took an hour including cleaning the top and counter top.
I first removed the two screws (located on the inner side of the door about halfway from the top) which hold the hinges to the door. With the screws removed, I was able to remove the entire door by grasping the door on each side and puling up and sliding the door away from the hinges.
The rest involves deconstructing the door
... Read moreby removing the screws and layers of metal liner layers and frames until you reach the inner glass.
You're likely to get anxious about remembering where all the screws go when reassembling, but if you lay out the screws in the same orientation they were in prior to disassembly, you should be fine.