


Models
>
JCBP36SK3SS
JCBP36SK3SS General Electric Range - Overview
Sections of the JCBP36SK3SS
[Viewing 4 of 4]


Keep searches simple, eg. "belt" or "pump".

Burner Bowl - 8 Inch
PartSelect #: PS244399
Manufacturer #: WB31T10015
This part is located beneath the element and catches any spills.
$17.92
In Stock

Bake Element - Push On Terminals - 240V
PartSelect #: PS249238
Manufacturer #: WB44K10005
The bake element is located on the bottom of the oven. If your oven will not heat properly it may be due to a faulty or damaged baking element. If you can see that the element has been separated or bl...
$122.85
In Stock

Burner Bowl - 6 Inch
PartSelect #: PS244398
Manufacturer #: WB31T10014
This burner bowl is also known as a burner drip bowl or burner drip pan, and is designed for use with your cooktop or range. It is black in color and is approximately 6 inches in diameter. It can be f...
$16.56
In Stock

Temperature Sensor
PartSelect #: PS10059162
Manufacturer #: WB21X22134
The temperature sensor, also known as the oven temperature sensor assembly is usually found in the back of the oven. The function of the oven temperature sensor assembly is to measure the temperature ...
$38.48
In Stock

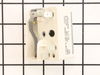
Range Surface Element Control Switch - 6 Inch - 1560 W
PartSelect #: PS236754
Manufacturer #: WB24T10029
This switch controls the small burner on a range/stove top.
$45.15
In Stock

Drawer Support
PartSelect #: PS2320972
Manufacturer #: WB02K10158
This is a replacement drawer support for your oven. The drawer support provides stability to the drawer unit as it opens and closes. If your oven drawer is hanging or will not slide in or out efficien...
$11.07
In Stock

Broil Element - 240V
PartSelect #: PS249236
Manufacturer #: WB44K10002
This broil element is found on the roof of the oven.
$104.66
In Stock

Foot - Leveller
PartSelect #: PS223802
Manufacturer #: WB02X10521
Sold individually.
$23.43
In Stock


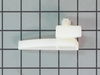
RECEPTACLE PUSH-IN
PartSelect #: PS752188
Manufacturer #: WB08T10026
This part is the replacement light socket for your oven. The oven light socket provides power to the light, and at the same time holds the light bulb in place.
$8.54
In Stock


Lens
PartSelect #: PS1020380
Manufacturer #: WB25T10041
This part is a replacement lens for your oven or range. The lens is red in color, and when the elements are turned on, the light behind the lens will turn on to inform the user that the element is, in...
$12.51
In Stock
Questions And Answers for JCBP36SK3SS
We're sorry, but our Q&A experts are temporarily unavailable.
Please check back later if you still haven't found the answer you need.
Common Symptoms of the JCBP36SK3SS
[Viewing 8 of 8]Little to no heat when baking
Fixed by
these parts
these parts


Show All
Element will not heat
Fixed by
these parts
these parts

Show All
Oven not heating evenly
Fixed by
these parts
these parts
Show All
Oven is too hot
Fixed by
these parts
these parts
Show All
Will Not Start
Fixed by
these parts
these parts
Show All
Little to no heat when broiling
Fixed by
these parts
these parts
Show All
Door won’t close
Fixed by
these parts
these parts

Show All
Touchpad does not respond
Fixed by
these parts
these parts
Show All


Keep searches simple. Use keywords, e.g. "leaking", "pump", "broken" or "fit".
Lower bake Element would not heat.
First I slid the stove out and unpluged it, then removed two screws,slid out element, disconected two wires, slid new element in to place, pluged two wires in ,put into place and installed two screws, pluged stove back in, and turned on to try. Works perfect.
Parts Used:
-
Ronald from Nassau, NY
-
Difficulty Level:Really Easy
-
Total Repair Time:Less than 15 mins
-
Tools:Nutdriver, Pliers
221 of 244 people
found this instruction helpful.
Was this instruction helpful to you?
Thank you for voting!
Oven would go in to a F2 Error
Removed six 1/4" hex nuts on rear of oven. Then through front/inside removed a single 1/4" hex nut to actually remove sensor. Unplug sensor connector, remove. Reversed steps, push oven back in place and plugged in. Tested oven function.
Parts Used:
-
Peter from stamford, CT
-
Difficulty Level:Really Easy
-
Total Repair Time:15 - 30 mins
-
Tools:Nutdriver
142 of 205 people
found this instruction helpful.
Was this instruction helpful to you?
Thank you for voting!
Broken heating element
1)Turn off power to stove
2)remove 2 bolts holding heating element
3)pull element out of the back of the oven about 8" so that the wire connects is visable
4)pull wire clips off of heating element and remove element from the oven
5)put wire clips on the new heating element
6)push new heating element back into the ... Read more holes in the back of the oven
7)screw botls back into the oven holding the heating element in place
8)Turn power back on
Read less
Parts Used:
-
Paul from anna, TX
-
Difficulty Level:Really Easy
-
Total Repair Time:15 - 30 mins
-
Tools:Nutdriver, Pliers
73 of 85 people
found this instruction helpful.
Was this instruction helpful to you?
Thank you for voting!