Your coupon for will be reflected when you check out!
✖
Your coupon for
✖
Hello!
You're visiting the PartSelect site in U.S.
Would you like to shop on the Canadian site?
Stay on this site
Go to Canadian site
✖
Model Number Locations
1Select Category Type
Select Category Type
2Select Product Type
Select Product Type
3Select {MODEL} Type
Select {MODEL} Type
Sample Model Number Tags
Model numbers can be made up of numbers (1005400, for example) or a combination of letters and numbers (LAT1000AAE). The model number will most likely appear on either a paper sticker or a metal plate. Your appliance's model number tag may look similar to the sample model number tags shown here (model number highlighted in yellow):
Model has been saved to My Models. If you're not signed in, your lists are available on this device and will expire within 30 days.
Model has been saved to My Models.
This an authentic OEM 40-Watt replacement light bulb, used in a number of household appliances. It is specially designed to withstand extreme temperatures, which is why these replacement bulbs are mos...
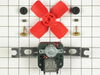
The Defrost Timer (Defrost control) acts like a clock by switching on the defrost heater circuit after a predetermined amount of compressor run time. This allows the defrost circuit to clear the evapo...
The evaporator is found in the back of the freezer. This kit comes with two mounting grommets, two sleeves (not to be used on porcelain models), two #8 mounting screws, and a push-on fan blade. If you...
First I removed the racks in the freezer. The rack supports on the sides lift off without tools. The evaporator cover is at the back of the freezer. 4 phillips head screws. The cover lifts up then forward to expose the evaporator, evaporator fan and duct. The duct is held by 3 hex head screws. The evaporator fan is attached to the duct wi
... Read moreth a wiring pigtail to a plug. Unplug the fan and remove the duct. The fan is held by 2 hexhead screws. The new fan is put in place and assembly is simply the reverse of disassembly. The unit is quiet and cools properly now. The new part fit perfectly.
Trouble shot the electrical circuit per the electrical schematic and zeroed in when I noted the Defrost Timer circuit was open. When I tapped on the bottom of the timer it began functioning normally (for a few days). Ordered a new Defrost Timer Kit and along with the installation instruction, I watched the on-line video. It was very help
... Read moreful!! After installation was complete, I plugged the Refrigerator into the electrical outlet and.......nothing happened! Hmmm!
Removed the Defrost Time Kit and inspected it for any damage and found none. Then I placed a flathead screwdriver to the manual advance knob and slightly rotate the gear mechanism. I heard a distance "click”. I believe the Timer was in the ‘defrost’ mode when received.
I reinstalled the timer, verified the wiring connections and this time plugged the Refrigerator into the electrical outlet and ….. it worked!!!
I unplugged the refrigerator, finished the installation per the instructions, plugged the unit in and monitored it for a few hours (just in case). That was a week ago and the Refrigerator is working like new.
The instructions were written in a manner which required re-reading a few times as they could be a bit vague. The video was what really helped and I appreciate PartSelect adding it to the instructions.
De-iced the refrigerator. Removed two screws from the thermostat panel on the upper refrigerator section. Tilted it down, removed two speed nuts holding the timer, unplugged the timer plug. Determined from the instruction sheet (easy to follow) what time delay function is used, based on wire colors, placed the jumper on the correct ter
... Read moreminal on the new timer. Plugged it in, replaced the speed nuts and screws. The timer fit perfect, works just like it is supposed to, quick easy job.