Your coupon for will be reflected when you check out!
✖
Your coupon for
✖
Hello!
You're visiting the PartSelect site in U.S.
Would you like to shop on the Canadian site?
Stay on this site
Go to Canadian site
✖
Model Number Locations
1Select Category Type
Select Category Type
2Select Product Type
Select Product Type
3Select {MODEL} Type
Select {MODEL} Type
Sample Model Number Tags
Model numbers can be made up of numbers (1005400, for example) or a combination of letters and numbers (LAT1000AAE). The model number will most likely appear on either a paper sticker or a metal plate. Your appliance's model number tag may look similar to the sample model number tags shown here (model number highlighted in yellow):
GDF510PGM0WW General Electric Dishwasher - Overview
Save your modelModel Saved!
Save your model for later to make things easier.
Model has been saved to My Models. If you're not signed in, your lists are available on this device and will expire within 30 days.
Model has been saved to My Models.
This lower rack roller is a genuine replacement component designed to support the smooth and stable movement of the dishwasher’s bottom rack. Measuring approximately 1.5 inches in diameter and finishe...
This part is a replacement gasket for your dishwasher. The gasket creates a seal at the bottom of the dishwasher tub, so water does not leak out while the dishwasher is running. If you notice water le...
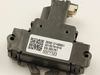
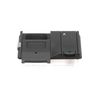
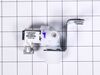
This dishwasher door latch is designed to secure the door during operation by connecting to the door strike and ensuring a tight seal. Mounted to the tub frame, it plays a critical role in enabling th...
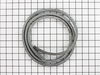
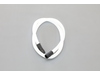
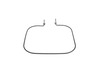
The tub gasket, also known as the door gasket runs along the perimeter of your dishwasher basin and creates a seal that prevents water from leaking out when the tub is full. If you notice water on the...
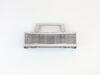
This upper rack assembly is a genuine replacement part designed for select GE, Hotpoint, and Haier dishwashers. Engineered to securely hold dishes, cups, and glassware during the wash cycle, it helps ...
This is an authentic lower dishrack with wheels. Please note that the manufacturer has made a design change, which requires the silverware basket to be relocated from the door to the inside of the rac...
- Includes: 4 brackets, 4 roller wheel brackets, and 8 wheels part # WD12X26146
Dishwasher Lower Dishrack Carrier and Roller Kit (Set of 4). This kit will replace all four one piece roller carriers w...
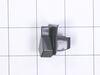
This is an end cap for a dishwasher rack. This part is about 2.5 inches long, is black, and is made of plastic. You may need to replaced this part if it is broken, or if your dishwasher rack continuou...
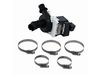
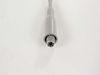
This is a washer inlet valve assembly for your dishwasher. This valve allows water to flow into your dishwasher at the proper rate. If your dishwasher tub is not filling with water or filling when the...
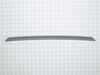
This mounting bracket is manufactured to secure your dishwasher to your countertop. Mounting brackets should be installed so the dishwasher doesn’t tip forward. You can fit the bracket to either the c...
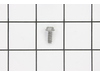
This OEM-compatible screw is designed for use with many GE dishwashers. Measuring 8-16 HXW and 1/2" in length, this stainless steel screw secures the middle spray arm hub to the upper rack assembly, e...
$16.05
In Stock
Order now and your part arrives by May 28
Questions And Answers for GDF510PGM0WW
Ask our experts a question about this model and we'll get back to you as soon as possible!
1 question answered by our experts.
Sort by:
< Prev
1
Next >
Search filter:
Clear Filter
Your search term must have 3 or more characters.
Keep searches simple. Use keywords, e.g. "leaking", "pump", "broken" or "fit".
Sorry, we couldn't find any existing answers that matched.Try using some different or simpler keywords, or submit your new question by using the "Ask a Question" button above!
Mike
July 30, 2023
Our grandson was pushing the buttons on dishwasher and now the start button keeps blinking and will not start.
Tried turning power off for 30 seconds and holing start button down for 2 minutes. Did not work
For model number GDF510PGM0WW
Hello Mike, thank you for getting in touch. According to our research, the start light flashing indicates that the door was opened or the cycle was interrupted. Press the Start pad once and close the door within 4 seconds to start the dishwasher. Press the Start pad a second time when the dishwasher is running only if you wish to cancel the cycle. If this does not fix the issue, replace the UI control board, part number PS12703046, to fix the issue. We hope this helps!
Took off the kickplate, diconnected the wires and removed the whole door by lifting straight up, removing spring wires from hinges. Once door is disconnected from the machine, removed one hinge by removing bolt. Slid gasket into place, secured hinge back in place, then reconnected wires at bottom, replaced hinge spring wires and slid d
... Read moreoor back down onto hinges. Now that we know how to do it, could do it in 15 min to half hour.
1. Turn off breaker supplying power to dishwasher in electrical panel 2. Open dishwasher door 3. Unscrew the screws that secure the dishwasher to the counter. 4. Tip dishwasher forward. Identify the non-functioning door latch. It looks exactly like the replacement. Unclip the wire harness from the door latch. 5.
... Read more On the inside of the dishwasher, there are 2 screws directly under the door latch. Unscrew them and carefully set aside. 6. Remove old door latch. 7. Set new door latch in place. Holding securely, replace screws removed in step 5. Toward the end they get a little tougher to screw in. 8. Plug wire harness into new door latch. 9. Re-align dishwasher and re-secure to counter in previous position. 10. Test latch to make sure it closes properly. 11. Turn on breaker in electrical panel. The dishwasher should now function properly.
repair under warranty for Home Depot. Ordered new controller, new sump manifold, new piranh clamp kit, new diverter passive main assy, installation took 6 months. Could not finish as GE had changed the diverter to a new design with the same part number that the repairman had no knowledge of and there is no part available for the same conf
... Read moreiguration of the one that went bad, after I called GE tech line they were not aware of updates. Giving me the same numbers. The new design works if you order a new conduit main. As the old one in the dishwasher will not connect to the new Diverter. New deverter no. WD19X25278 and the new main conduit is the same as the old configuration no.WD12X21681 . The repair people and parts people are not yet aware of the design change and availability of parts, as most are out of stock and no updated pictures of the new design. Repair warranty washed their hands of this and Home Depot after 6 months gave me credit of my full price I bought this for 3 yrs ago. Repairing myself and sell.