


Models
>
FCM7HDNAWH
FCM7HDNAWH General Electric Freezer - Overview
Sections of the FCM7HDNAWH
[Viewing 1 of 1]
Manuals & Care Guides for FCM7HDNAWH
Click to downloadKeep searches simple, eg. "belt" or "pump".

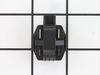
Compressor Start Relay
PartSelect #: PS11766700
Manufacturer #: WR07X26748
This part is the replacement compressor start relay for your refrigerator. It is made of black plastic and is approximately 1 ¼ inches long and 1 inch wide. The compressor start relay attaches to the ...
$16.90
In Stock

Power Cord
PartSelect #: PS759476
Manufacturer #: WR23X10300
This heavy-duty cord has a three-pronged plug (2 electrical, 1 grounding). The power cord supplies power to your refrigerator, allowing it to keep the contents inside cool. There could be an issue wit...
$29.54
In Stock


Questions And Answers for FCM7HDNAWH
We're sorry, but our Q&A experts are temporarily unavailable.
Please check back later if you still haven't found the answer you need.
Common Symptoms of the FCM7HDNAWH
[Viewing 5 of 5]Will Not Start
Fixed by
these parts
these parts

Show All
Fridge too warm
Fixed by
these parts
these parts
Show All
Freezer section too warm
Fixed by
these parts
these parts
Show All
Won’t start
Fixed by
these parts
these parts
Show All
Clicking sound
Fixed by
these parts
these parts
Show All
Keep searches simple. Use keywords, e.g. "leaking", "pump", "broken" or "fit".
Freezer & Frig Were Not Cold
First I removed the rear cover, located at the bottom of the refrigerator. Then I cleaned out the dirt & dust on and around the compressor. The relay has a cover, that is secured with a spring loaded clip. To release the clip, push in with your fingers, while disengaging the end clip with a screwdriver. Once one side is off the ot
... Read more
her lifts off. Remove cove exposing the relay. There is one wire terminated, with a spade clip, remove it. With a strait blade screwdriver, pry the relay off the 2 post it slides on to. (Don't be surprised if it breaks into pieces, as they are sometimes brittle. ) Slide the new relay onto the 2 posts, replace the wire onto the right terminal, and replace the relay cover & clip. Replace the rear cover. Plug in and test.
Read less
Parts Used:
-
Sam from Cooper City, AL
-
Difficulty Level:Really Easy
-
Total Repair Time:15 - 30 mins
-
Tools:Nutdriver, Screw drivers
74 of 101 people
found this instruction helpful.
Was this instruction helpful to you?
Thank you for voting!
Does not start , trips breaker
I pried the relay from compressor with small screwdriver, cut and replaced burnt wire going to relay,pushed new relay on compressor and wires unfortunately it did not fix the problem.
Parts Used:
-
Paul from RNCHO CORDOVA, CA
-
Difficulty Level:Really Easy
-
Total Repair Time:30 - 60 mins
-
Tools:Nutdriver, Screw drivers
3 of 3 people
found this instruction helpful.
Was this instruction helpful to you?
Thank you for voting!
Freezer ran constantly
removed 2 phillips screws for side panel and one for cold control faceplate. Pulled control away from chassis, disconnected wires with pliers, pulled out long sensor wire going into freezer. Installed new part in reverse order. Works like a charm, should save energy and money.
Parts Used:
-
scott from Painesville, OH
-
Difficulty Level:Easy
-
Total Repair Time:30 - 60 mins
-
Tools:Pliers, Screw drivers
3 of 4 people
found this instruction helpful.
Was this instruction helpful to you?
Thank you for voting!