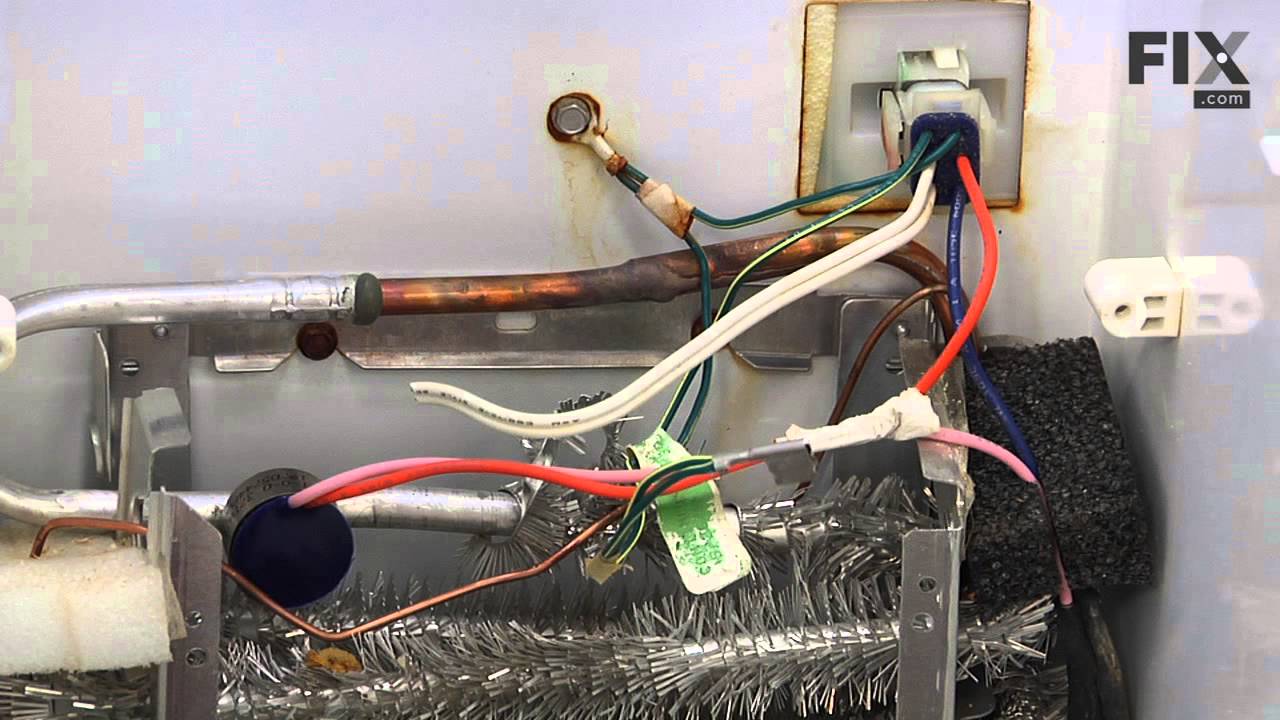
This sensor (Temperature Sensor, Thermistor, Refrigerator Temperature Sensor) sends the temperature reading of the compartment to the control board. If you notice your refrigerator is too warm, too cold, or not defrosting properly, then there may be a problem with your sensor. The temperature sensor can break from material fatigue or thro...Read moreugh normal use, and should be replaced. It is attached to the evaporator and control housing in your appliance. It measures approximately 1.25 inches long with 18 inch wire leads, and is constructed out of plastic. This part comes in white, beige. It includes the sensor, with wire leads.
This NSF-certified water filter helps to improve the taste, quality, and health of your water by removing a number of contaminants including mercury, lead, and trace pharmaceuticals. The filter should be replaced every six month or after 300 gallons of water have been filtered. If you are unsure if your filter is due for replacement, anot...Read moreher indicator is if the water flow from the dispenser has slowed down considerably. Replacing this part is a simple task that does not require any tools or shutting off the water or power supply to your fridge. Once the new filter has been installed, be sure to run at least two gallons of water through before consuming.
The interior light of your refrigerator is controlled by a switch that is activated when the door is opened and closed. If your refrigerator light will not turn on, there could be an issue with the switch. The switch is spring loaded and is a generally closed type of switch meaning there should be no continuity when the button is depresse...Read mored, and continuity through the switch when the button is not depressed. This plastic, white, OEM switch is sourced directly from the manufacturer, is sold individually and is easy to replace. The repair usually takes less than 15 minutes and requires a flat blade screwdriver and needle nose pliers.
This gallon-sized refrigerator door shelf bin is a genuine OEM replacement designed for select General Electric (GE) models, including compatible units from Hotpoint and Café. Constructed from durable, food-grade clear plastic with a white band along the top, it offers a transparent view of stored items and supports efficient organization...Read more of beverages, condiments, and jars. Designed for installation on the right-side door, this bin replaces several previous part numbers and is intended for tool-free installation. Some versions may include a bonus soda can organizer. Always verify your refrigerator’s model number to ensure compatibility before purchase.
This evaporator fan motor is a critical component in GE refrigerators, designed to circulate cold air over the evaporator coils and distribute it evenly throughout the fresh food and freezer compartments. Operating as a DC motor, it ensures consistent internal temperatures by drawing air across the cooling coils and pushing it through the...Read more unit. Engineered with high-quality materials, it delivers long-lasting performance and quiet operation. While primarily used in GE models, it is also compatible with select units from Hotpoint, Café, and Monogram. Replacing a faulty motor can resolve issues such as poor cooling, frost buildup, or unusual noises, restoring optimal airflow and refrigeration efficiency.
This OEM-compatible screw is designed for use with many GE dishwashers. Measuring 8-16 HXW and 1/2" in length, this stainless steel screw secures the middle spray arm hub to the upper rack assembly, ensuring stable and effective spray arm performance.
Sold individually, this durable metal fastener requires a nutdriver for proper installation.
Designed for use in the fresh food section of compatible refrigerators, this LED light and cover assembly offers reliable, energy-efficient lighting using advanced LED technology. The clear, impact-resistant cover shields the internal components while allowing full illumination of the compartment. If your refrigerator’s lighting is dim or...Read more non-functional, replacing the entire assembly ensures consistent performance and a clean appearance. This genuine replacement part is compatible with a range of models and is engineered for a precise fit and long-lasting durability.
This is a replacement set screw for your refrigerator door. The set screw attaches the door handle to the stud on the refrigerator door. The screw is approximately ¼ of an inch in length and unlike some other screws, it does not have a screw head. It is made of stainless steel and is sold individually. This is an OEM part sourced directly from the manufacturer.
This is the glass drawer cover insert for models of refrigerator. This glass pane is used as a shelf and cover that lays on top of the drawer below it. If this glass is missing or damaged in any way, it will need to be replaced. To replace this glass drawer cover, simply lift the old one out from underneath, and lay the new one in. This g...Read morelass pane measures 30-inches long by 10-inches wide, and is an OEM part for your fridge, so it is not sold with any other parts or accessories.
This is a door gasket for the freezer compartment of your refrigerator. Door gaskets are made of rubber and plastic and are designed to seal the cold interior of the freezer compartment from the ambient temperature of your home. If the door gasket for your refrigerator is damaged, moldy, or warped, it must be replaced immediately. This ga...Read moresket is a dark gray color, and measures approximately 36 inches wide and 27 inches tall. Replacing this gasket is simple, and only requires you to carefully remove the old gasket, and then wrap this new one around the perimeter of the compartment door. This gasket is sold individually and does not include any other parts.
Ask our experts a question about this model and we'll get back to you as soon as possible!
We may have answered a similar question already! Search questions and answers left by others using simple keywords like "fit", "broken", "easy", or "quality" to find questions that match.
Search filter:
Clear Filter
Your search term must have 3 or more characters.
Sort by:
Prev
1
Next
Sorry, we couldn't find any existing answers that matched.Try using some different or simpler keywords, or submit your new question by using the "Ask a Question" button above!
Vince - For model number CYE23TSDCSS
September 8, 2022
How to get the spots off the doors?
Hey Vince, thank you for your inquiry. If you want to clean the doors of your refrigerator, we recommend you use Stainless Steel Cleaner & Polisher, part number PM10X311. We hope this helps! If you need help placing an order, customer service is open 7 days a week. Thanks again for your great question.
Refrigerator is making a humming noise. I unplugged both fans and still is making the noise
Hello Craig, thank you for contacting us. We have concluded that the issue is either with the water inlet valve, part number PS6883668, the tri-water valve, part number PS8758695 or the compressor inverter board, part number PS12345457. Checking out these three parts and replacing the faulty one may help you fix your problem. We hope this information helps!
My refridgerator not cold enough at 53...freezer works great general electric profile
Hi Chata, thank you for reaching out. Based on our understanding of the issue, we would suggest you check the damper control assembly, part number PS10059622, as it is the most likely cause of this issue. The air damper control opens and closes to let the proper amount of cold air into the refrigerator compartment. If the damper does not open properly, it will not let enough cold air into the refrigerator. Check the damper control to determine if it is broken or stuck closed. If this part is faulty, you may need to replace it. We hope this helps!
Is it difficult to install part # WR32X10910 a lower shelf for above model and would someone be available if I have a problem to walk me thru it
Hello Frank, thank you for the question. Start by clearing everything out of the crisper drawers and removing any food items sitting on the shelf above them. Once that's done, carefully lift the glass panel out of the existing frame and set it somewhere safe, since you'll be reusing it in the new frame. To remove the frame, tilt the front edge up slightly, then lift the back end and pull the whole frame toward you. It will slide right out along its rails. Don't force it; if it feels stuck, just double-check that nothing is catching on the sides. You will need to transfer the hardware from your old frame to the new one. This includes the roller wheels, the center support piece, the small temperature control panel on the front edge, and its knob. A Torx screwdriver will be needed to remove the screws. Once everything is mounted on the new frame, slide it back into the refrigerator along the same rails it came out on, pushing it gently but firmly until it seats all the way in. You'll feel it settle into place. Finally, lower the glass panel back down into the frame grooves, it simply drops in and rests there, no clips or fasteners needed. We hope this is what you were looking for!
Was this helpful?
Thank you for voting!
Prev
1
Next
✖
Ask a Question
Ask our experts a question on this model and we'll respond as soon as we can.
See how others fixed this model. Time, tools, difficulty, and steps that lead to victory!View More
Search repair tips from other customers using simple keywords like "replace", "fit", "remove", "inspect". DIY doesn't mean you have to do it alone!
Search filter:
Clear Filter
Your search term must have 3 or more characters.
my refigerator was warm but the freezer was cold and working correcttly
305 of 404 peoplefound this instruction helpful.
michele from North Smithfield, RI
Really Easy
15 - 30 mins
Pliers
I went to a GE repair center to explain my problem, the service center reccomended that I have a techinician come out o look at it. $75.00 for the visit and what ever labor and materials wuld cost.
I went on line to see if there were others having this same problem and found that there were many with the same problem.
... Read more />After reading some of the ways that people found out what was wrong ...it became a matter of three components, the timer, heater or thermostat.
I tried the most common component and the less expensive one first , the thermostat switch I installed it very easily snipping two wires and attaching the news using wire nuts I used the diagram on this website to pinpoint the component and there has not been a problem since.
Read less
Was this helpful?
Thank you for voting!
refrigerator was getting too cold
149 of 218 peoplefound this instruction helpful.
Larry from Menomonie, WI
A Bit Difficult
15 - 30 mins
I removed the old temperature sensor by cutting the wires. I attached the wires of the new sensor with wire nuts and mounted it in the same bracket.
Was this helpful?
Thank you for voting!
Sticking Light Switch
122 of 178 peoplefound this instruction helpful.
Jonathan from Lilburn, GA
Really Easy
Less than 15 mins
Pliers, Screw drivers
I applied some tips learned by reading other reviews. So before I started I grabbed my trusty vise grip pliers and a small screw driver. I locked onto the switch actuator, the part that the refrigerator door pushes in, with the vise grips and pulled on it just hard enough to get the screw driver inserted in the right side to push in the c
... Read moreatch clip so the switch could be pulled out further each time the catch clip was depressed to the next detent. Then I used the screw driver on the left site to encourage the switch past the detents on the left and very quickly the switch was out of the mount. The wires from the refrigerator pulled out with the old switch. I unplugged the old switch from the wires and plugged in the new switch and shoved the new switch back into the mount, wiggled it a couple of times to make sure it was secure and the job was done. Once I applied the vise gripes at first, the whole job took less than a minute.



 My Orders