The interior light of your refrigerator is controlled by a switch that is activated when the door is opened and closed. If your refrigerator light will not turn on, there could be an issue with the sw...
This 40-Watt light bulb is sold individually and is a genuine OEM replacement option for your home appliances. It is specially designed to withstand extreme temperatures, so this bulb is compatible wi...
This defrost timer will cycle for 25 minutes after every six hours of run time. The timer itself is made of plastic, and its terminals are bent, the leads are internal, and the label is orange. If you...
This is a package of twelve Phillips-head screws. They can be used as replacement screws in refrigerators, ice makers, or freezers. Be sure to check that your appliance model is compatible with these ...
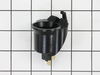
This part is a replacement light socket for your refrigerator. It connects to the power source, and holds the light bulb. If the light in your refrigerator is not working, you could have a faulty sock...
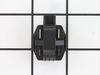
This part is the replacement compressor start relay for your refrigerator. It is made of black plastic and is approximately 1 ¼ inches long and 1 inch wide. The compressor start relay attaches to the ...
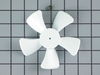
This kit features a 5-blade plastic evaporator fan blade that rotates CCW and measures 4.5-inches in diameter and has a 3/8-inch-tall shaft. This kit also has a metal compression ring that secures the...
This is a replacement pack of sheet metal screws for your refrigerator. These are Phillips-head screws, and are approximately ¾ of an inch long. This package contains 12 screws. These screws are typic...
This evaporator fan motor operates in a counter clockwise fashion. This motor's shaft is 3/8 of an inch and the motor has two right side terminals. NOTE: Harness wires NO longer come with the part.
$53.42
In Stock
Questions And Answers for CTX18EKGR
Be the first to ask our experts a question about this model!
✖
Ask a Question
Ask our experts a question on this model and we'll respond as soon as we can.
I applied some tips learned by reading other reviews. So before I started I grabbed my trusty vise grip pliers and a small screw driver. I locked onto the switch actuator, the part that the refrigerator door pushes in, with the vise grips and pulled on it just hard enough to get the screw driver inserted in the right side to push in the c
... Read moreatch clip so the switch could be pulled out further each time the catch clip was depressed to the next detent. Then I used the screw driver on the left site to encourage the switch past the detents on the left and very quickly the switch was out of the mount. The wires from the refrigerator pulled out with the old switch. I unplugged the old switch from the wires and plugged in the new switch and shoved the new switch back into the mount, wiggled it a couple of times to make sure it was secure and the job was done. Once I applied the vise gripes at first, the whole job took less than a minute.
My husband put on the defrost timer. At first I thought the part was not going to fix the problem. After about 5 hours my refrigerator was still warm. I went to work and when I got home that evening my refrigerator was cooling and down to 28 degrees. So if you replace this part wait at least 12-24 hours. Give it time to stablize.
... Read moreMy husband says it has to go through its cycle. It works on a 24 hour timer. My refrigerator is working fine and this has saved me alot of money. My husband says, once you put on the timer you may have to use a flat screwdriver and turn the small dial clockwise one click to start it. He removed the kick grill and replaced the part. Dont forget to shut breaker off to replace this part. Turn power back on and start the timer. We are so happy that we now have a working refrigerator.
First I removed the rear cover, located at the bottom of the refrigerator. Then I cleaned out the dirt & dust on and around the compressor. The relay has a cover, that is secured with a spring loaded clip. To release the clip, push in with your fingers, while disengaging the end clip with a screwdriver. Once one side is off the ot
... Read moreher lifts off. Remove cove exposing the relay. There is one wire terminated, with a spade clip, remove it. With a strait blade screwdriver, pry the relay off the 2 post it slides on to. (Don't be surprised if it breaks into pieces, as they are sometimes brittle. ) Slide the new relay onto the 2 posts, replace the wire onto the right terminal, and replace the relay cover & clip. Replace the rear cover. Plug in and test.