


Models
>
AB2526PEKS
AB2526PEKS Amana Refrigerator - Overview
Sections of the AB2526PEKS
[Viewing 1 of 1]
Manuals & Care Guides for AB2526PEKS
Click to downloadKeep searches simple, eg. "belt" or "pump".

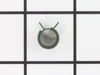
Screw, 8/18 x 3/8
PartSelect #: PS11746840
Manufacturer #: WP90767
This screw is sold individually.
$5.42
In Stock

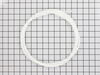
Water Fill Cup and Bearing
PartSelect #: PS11743318
Manufacturer #: WP628356
This refrigerator ice maker fill cup dispenses the water into the ice cube mold during the fill cycle. Replacing the water fill cup is a possible solution if you notice that the ice maker is leaking, ...
$40.40
In Stock

Water Tube Kit
PartSelect #: PS11730901
Manufacturer #: W10823511
This is the replacement water tube kit for your refrigerator. This tubing is made of plastic, is 1/4 inch in diameter, and comes with 2 inserts. This tube may be longer than the original tube, and may...
$36.12
In Stock

Ice Maker Shut-Off Arm
PartSelect #: PS11743571
Manufacturer #: WP67004028
The icemaker shut off arm, used in a refrigerator, gives the icemaker a signal to stop making ice once the bin has a reached a certain limit. This helps monitor ice production. If your icemaker is not...
$55.76
In Stock

Ice Bucket
PartSelect #: PS11743447
Manufacturer #: WP67001255
The ice bucket in your freezer catches and holds the ice when it is released by the icemaker. If your ice bucket is cracked or damaged, you may need to replace it to prevent a potential leak. This par...
$121.29
In Stock

Compression Nut
PartSelect #: PS11743305
Manufacturer #: WP627018
The compression nut is used as a connection between the water supply line and other components in your refrigerator such as your ice maker and your water dispenser. Tools required for this repair incl...
$13.13
In Stock


Ice Stripper
PartSelect #: PS11739041
Manufacturer #: WP2182124
This is an authentic appliance part that is sourced directly from the genuine manufacturer. This ice stripper functions by stripping the ice maker mold of ice during the ejection cycle, after the wate...
$63.68
In Stock

Screw
PartSelect #: PS11747542
Manufacturer #: WP98165
This screw is a little under an inch long and is made of metal. It is used with a refrigerator's ice maker assembly. Sold individually.
$7.76
In Stock

Speed Clamp Clip
PartSelect #: PS11747913
Manufacturer #: WPM0114003
This is a speed lamp clip, and may also be known as the water line spring clamp. It is used in conjunction with your refrigerator. If you have a leak at your fill tub, this part may be the reason. The...
$13.50
In Stock

Refrigerator Ice Maker Fill Tube
PartSelect #: PS12727858
Manufacturer #: W11176463
This fill tube elbow is almost eleven inches long. It is all white in color and is made of plastic. It is used with the icemakers of some refrigerators.
$59.03
In Stock

Questions And Answers for AB2526PEKS
We're sorry, but our Q&A experts are temporarily unavailable.
Please check back later if you still haven't found the answer you need.
Common Symptoms of the AB2526PEKS
[Viewing 5 of 5]Leaking
Fixed by
these parts
these parts

Show All
Ice maker not making ice
Fixed by
these parts
these parts


Show All
Ice maker dispenses too much ice
Fixed by
these parts
these parts
Show All
Ice maker won’t dispense ice
Fixed by
these parts
these parts

Show All
Not dispensing water
Fixed by
these parts
these parts
Show All


Keep searches simple. Use keywords, e.g. "leaking", "pump", "broken" or "fit".
The Bearing Cup Assembly was broken and ice would jamb against it during the ice making cycle.
I removed the ice maker from the refrigerator, by removing one screw on the underside bracket and loosening the two screws at the top side, then lifting the ice maker off the loosened screws. I then unplugged the electrical harness that supplies power from the refrigerator to the ice maker. I then disassembled the ice maker by removing
... Read more
the front cover which is snapped in place, then removing two recessed screws at the front. I removed the broken part, I then reassembled the ice maker with the new part. I replaced the two recessed screws at the front and snapped on the cover. Then I reinstalled the ice maker in the refrigator by plugging in the harness, slipping the ice maker over the loosened screws in the refrigerator and replacing the screw that was removed from the underside bracket. Tightening all the screws completed the project.
Read less
Parts Used:

-
David from Chester, CA
-
Difficulty Level:Really Easy
-
Total Repair Time:Less than 15 mins
-
Tools:Nutdriver, Screw drivers
107 of 133 people
found this instruction helpful.
Was this instruction helpful to you?
Thank you for voting!
Leak at fill tube
Removed two screws that held cover plate. remove cover plate. Remove water hose, and clamp, by compressing clamp with pliers. Remove fill tube by pulling HARD, from back.
Replace fill tube, check to be sure that it entered ice maker properly. Replace hose and clamp.
Replace cover and screws.
Replace fill tube, check to be sure that it entered ice maker properly. Replace hose and clamp.
Replace cover and screws.
Parts Used:


-
Richard from Yarmouth, ME
-
Difficulty Level:Really Easy
-
Total Repair Time:15 - 30 mins
-
Tools:Nutdriver, Pliers
59 of 74 people
found this instruction helpful.
Was this instruction helpful to you?
Thank you for voting!
Icemaker arm was broken
The tiny piece of plastic that holds the wire that shuts off the icemaker, broke early on with our fridge (after just a few months.) We superglued it, but last week it bit the dust for good.
Once I got this part, I removed the freezer door and trays, and pulled the icemaker out by removing 3 flathead screws and unplugging the c ... Read more ables. Laying in the freezer on the floor was a bit unconfortable, but not too bad.
Then I inspected the icemaker. There was no obvious way to remove the part without disassembling the front of the unit (where the motor is) to release the spindle and free the part, so I did that - 3 or 4 nuts was all that held it together. Once that was out, I removed the spindle, swapped out the part, and put it all back together and back in the freezer. Plugged it in and waited.
It took a while to start making ice. Like 5 hours. Now it's going pretty slow (much slower than before.) Haven't had time to look into it, but my suspicion is the rubber hose that feeds water into the icemaker is blocked with ice or kinked. In any case, we have ice now (but not a lot), and the unit shuts itself off properly. However, we went from having too much ice (thing never shut off) to too little (thing makes ice too slow), so I need to shoot for somewhere in the middle ;)
Read less
Parts Used:
-
Jason from Austin, TX
-
Difficulty Level:A Bit Difficult
-
Total Repair Time:30 - 60 mins
-
Tools:Nutdriver, Screw drivers
32 of 44 people
found this instruction helpful.
Was this instruction helpful to you?
Thank you for voting!