


Models
>
7MMHW7000YG0
7MMHW7000YG0 Maytag Washer - Overview
Sections of the 7MMHW7000YG0
[Viewing 7 of 7]


Keep searches simple, eg. "belt" or "pump".

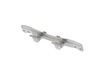
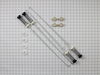
Washing Machine Suspension Rod Kit
PartSelect #: PS11703290
Manufacturer #: W10780048
$76.22
In Stock

Hose Clamp
PartSelect #: PS11743008
Manufacturer #: WP596669
This hose clamp is used in a wide variety of household appliances. Most often it is found in washers, dishwashers, refrigerators, freezers, dehumidifiers, garbage disposals, or air conditioners. This ...
$7.76
In Stock

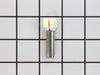
Foot, Front - Single
PartSelect #: PS11747965
Manufacturer #: WPW10001130
The front facing foot is sold individually. It is used on your washing machine and can also be known as an adjustable leveling leg. This specific front facing leveling leg has a rubber foot. It is imp...
$7.45
In Stock

Touch-Up Paint - White
PartSelect #: PS385132
Manufacturer #: 72017
This touch-up paint can be used on a wide variety of household appliances. It is most often used on washers, dryer, refrigerators, dishwashers, ranges, freezers, trash compactors, or microwaves. It is...
$8.00
In Stock


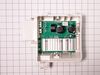
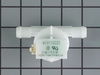
Flowmeter
PartSelect #: PS11748313
Manufacturer #: WPW10110225
This part continually measures the amount of water entering the tub. It will make adjustments if too much or too little water is present.
$105.05
In Stock

Pump Hose
PartSelect #: PS11755212
Manufacturer #: WPW10467168
This hose attaches to water pump assembly.
NOTE: As per the manufacture if the washer has an Eco Ball, it's no longer needed when the new hose is installed.
$37.52
In Stock


Leveling Leg Locking Nut
PartSelect #: PS11741219
Manufacturer #: WP3359452
The leveling leg locking nut is an OEM replacement fastener for use in dryers and washers. It has a head diameter of 3/8 inches and a thread pitch of 16 threads per inch. The nut secures the leveling ...
$7.76
In Stock

Inlet Hose - 5 FT
PartSelect #: PS11746820
Manufacturer #: WP89503
This hose can handle hot or cold water and is five feet long.
$21.53
In Stock

Spray Paint - 12 oz. - White
PartSelect #: PS347819
Manufacturer #: 350930
Appliance spray paint is a great way to cover up any chips and scratches that have appeared on your appliances. Instead of replacing the part entirely, this is an easy fix. This is also a great way to...
$22.68
In Stock

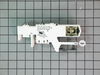
Temperature Sensor
PartSelect #: PS11755214
Manufacturer #: WPW10467289
This part regulates the temperature of the water in the tub. The sensor is located in the heating element.
$37.33
In Stock
Questions And Answers for 7MMHW7000YG0
We're sorry, but our Q&A experts are temporarily unavailable.
Please check back later if you still haven't found the answer you need.
Common Symptoms of the 7MMHW7000YG0
[Viewing 8 of 8]Leaking
Fixed by
these parts
these parts


Show All
Lid or door won’t close
Fixed by
these parts
these parts

Show All
Door won’t close
Fixed by
these parts
these parts

Show All
Will Not Start
Fixed by
these parts
these parts
Show All
Shaking and Moving
Fixed by
these parts
these parts
Show All
Will not drain
Fixed by
these parts
these parts
Show All
Does not dispense fabric softener or detergent
Fixed by
these parts
these parts

Show All
No hot or cold water
Fixed by
these parts
these parts
Show All


Keep searches simple. Use keywords, e.g. "leaking", "pump", "broken" or "fit".
Violent shacking in spin mode.

-
Terry from Homosassa, FL
-
Difficulty Level:Really Easy
-
Total Repair Time:30 - 60 mins
-
Tools:Pliers, Screw drivers, Wrench (Adjustable)
181 of 219 people
found this instruction helpful.
Was this instruction helpful to you?
Thank you for voting!
The washer kept giving a 'suds' error or an F35 error and would not progress through any of the wash cycles. It would partially fill with water, just enough to dampen some of the clothes, and then show the error message.
I removed the 3 screws toward the top of the back of the washer to remove the top. After that, I located the water pressure level switch, slid it out of the slot into which it is secured, removed the narrow black tubing from the bottom of it, and draped the newly-unattached end of the tube so that it would be easy to find. Then I remov
... Read more
ed the set of wires and discarded the old switch.
Next I attached the wires to the new switch, attached the black tubing and put the switch back into the slot. I tested the washer and it worked. Next, I put the top back on using the 3 screws. That was it!
Next I attached the wires to the new switch, attached the black tubing and put the switch back into the slot. I tested the washer and it worked. Next, I put the top back on using the 3 screws. That was it!
Read less
Parts Used:

-
Susan from Hatfield, PA
-
Difficulty Level:Really Easy
-
Total Repair Time:15 - 30 mins
-
Tools:Screw drivers
82 of 87 people
found this instruction helpful.
Was this instruction helpful to you?
Thank you for voting!
F/H error code.
Removed the top (3-4 screws at back). Flowmeter has 2 hoses with hose clamps. Removed with plyers. Simple electrical connector removed.
Reversed procedure. Running perfect now.
How did I know it was the flow-meter? Read the service manual as possible causes to narrow it down. Disassembled old flowmeter and cleaned ... Read more . That fixed for awhile. Problem came back, could 'tap' on flowmeter to temporarily fix. This convinced me that was indeed the problem.
The flowmeter is just a simple vane that moves as water flows across it, and sends pulses each time it rotates. If it 'sticks' then the computer doesn't think any water is coming in - hence the error. Tapping on it would 'unstick' long enough to confirm problem.
Read less
Parts Used:

-
Jeff from Naples, FL
-
Difficulty Level:Easy
-
Total Repair Time:Less than 15 mins
-
Tools:Nutdriver, Pliers
58 of 64 people
found this instruction helpful.
Was this instruction helpful to you?
Thank you for voting!