Your coupon for will be reflected when you check out!
✖
Your coupon for
✖
Hello!
You're visiting the PartSelect site in U.S.
Would you like to shop on the Canadian site?
Stay on this site
Go to Canadian site
✖
Model Number Locations
1Select Category Type
Select Category Type
2Select Product Type
Select Product Type
3Select {MODEL} Type
Select {MODEL} Type
Sample Model Number Tags
Model numbers can be made up of numbers (1005400, for example) or a combination of letters and numbers (LAT1000AAE). The model number will most likely appear on either a paper sticker or a metal plate. Your appliance's model number tag may look similar to the sample model number tags shown here (model number highlighted in yellow):
Model has been saved to My Models. If you're not signed in, your lists are available on this device and will expire within 30 days.
Model has been saved to My Models.
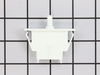
The interior light in your refrigerator is controlled by a switch that is activated when the door is opened and closed. If your refrigerator light will not turn on, or stays on when the door is closed...
This refrigerator water filter replacement is for 2010 LG refrigerators that have either forward French doors or are the four-door dispensing models. This filter is designed to minimize impurities tha...
This front plate assembly, also known as a mullion or flipper, is a genuine replacement part designed for select LG and Kenmore French-door refrigerators. It serves a critical function by sealing the ...
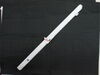
This water tube, or plastic tube, is used in refrigerators and freezers. The tube ensures water is directed to parts of the refrigerator that need it, such as the water dispenser and ice maker. If you...
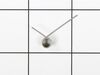
This handle screw, also known as a mounting bolt, is a mounting screw to help secure the door handle to your refrigerator door. If your handle is loose, you may just need to tighten the screw. If your...
This is a drawer roller for the freezer compartment of your LG refrigerator. This roller is made of white plastic, and acts as a wheel to allow the drawer to glide smoothly back and forth when you ope...
This is a manufacturer-approved refrigerator door closure for your refrigerator. It is made of white plastic and measures approximately 3 inches by 2 inches. If your old closure is damaged, your refri...
This part is the replacement water line or tube for your refrigerator. It is made of white plastic and is sold individually. This tube supplies water to the ice maker and water dispenser If your refri...
This is a genuine OEM evaporator motor that directly powers the evaporator mechanism within your refrigerator. This mechanism is responsible for pulling air over the evaporator coils, which are cold, ...
Upgrade your LG refrigerator with this genuine OEM Retractable Glass Shelf. Specifically designed to suit certain models of LG refrigerators, the crisp, clear, and durable glass provides an efficient ...
Ask our experts a question about this model and we'll get back to you as soon as possible!
7 questions answered by our experts.
Sort by:
< Prev
1
2
Next >
Search filter:
Clear Filter
Your search term must have 3 or more characters.
Keep searches simple. Use keywords, e.g. "leaking", "pump", "broken" or "fit".
Sorry, we couldn't find any existing answers that matched.Try using some different or simpler keywords, or submit your new question by using the "Ask a Question" button above!
Wilton
October 31, 2023
does this model have an air filter and if so where would it be located?
For model number 79571033010
Hi Wilton, thank you for the question. Based on our research, your model does not come with an air filter. We hope this information helps!
2 people found this helpful.
Did this question help you?
Thank you for voting!
Don
January 22, 2025
Some years ago the ice maker on this KENMORE ELITE refrigerator ice maker failed. I googled to find DYI and found
excellent instructions and purchased a complete replacement kit. The Icetray has twisted out and now fails to function. Can you offer some help?
For model number 79571033010
Hello Don, thank you for your inquiry. Based on our understanding of the issue, we would suggest checking the ice bucket assembly, part number PS3640455, to solve the problem. A malfunctioning ice bucket assembly could most probably cause this issue. We hope this solves your problem!
What are the actual dimensions of this refrigerator ?
For model number 79571033010
Hi Phyllis,
Thank you for your question. The refrigerator has a total capacity of 27.6 cubic feet. It measures 32-3/4 inches wide by 35-3/8 inches deep by 69-3/4 inches high. We hope this helps!
1 person found this helpful.
Did this question help you?
Thank you for voting!
David
July 19, 2023
What is the voltage supply of the evaporator fans?
For model number 79571033010
Hi David, thank you for contacting us. Based on our research, the evaporator fan motors for your model, part numbers PS3523323 and PS3523325, are 13.5 volt and 13 volt, respectively. We hope this information is useful!
Hi, I am looking for the part number for the mullion on the left door. The spring is not broken, but the plastic piece that it fits into is broken, and won't stay where it is supposed to. Thank you!
For model number 79571033010
Hi Cindy, thank you for your inquiry. The mullion door for your refrigerator is part number PS12374439. We hope this helps, good luck with this repair! We hope this is helpful!
Remove water filter and water filter holder. Removed cover on back of frig. Removed clip where water line connects to back of water filter. Took half inch wrench pushed in on water line lock to release line. Repeat at other end. Reverse steps to put on new line. Easy repair.
1. Shut off water to refrigerator. 2. Removed bottom sheet metal cover (6 screws). 3. Removed leaking water inlet valve assembly from refrigerator (1 screw). 4. Remove water inlet tube (loosen nut) and tube back to refrigerator (pull from water valve after remove cotter pin washer). 5. Detach two electrical wire harnesses. 6. Install new
... Read morewater inlet valve assembly to refrigerator (1 screw). 7. Replace both water tubes to water inlet assembly. 8. Re-attach both wiring harnesses. 9. Turn water to refrigerator on. 10. Check for leaks. 11. Re-attach bottom sheet cover (6 screws).
Video makes it look easy. Kenmore refrigerator does not have "groove" along the right hand side of switch that allows for pushing down on release. Used a thin screwdriver to get under to push while holding switch edge with pliers. Kept slipping. Tape sides to avoid scratching inside of refrigerator.