Your coupon for will be reflected when you check out!
✖
Your coupon for
✖
Hello!
You're visiting the PartSelect site in U.S.
Would you like to shop on the Canadian site?
Stay on this site
Go to Canadian site
✖
Model Number Locations
1Select Category Type
Select Category Type
2Select Product Type
Select Product Type
3Select {MODEL} Type
Select {MODEL} Type
Sample Model Number Tags
Model numbers can be made up of numbers (1005400, for example) or a combination of letters and numbers (LAT1000AAE). The model number will most likely appear on either a paper sticker or a metal plate. Your appliance's model number tag may look similar to the sample model number tags shown here (model number highlighted in yellow):
Model has been saved to My Models. If you're not signed in, your lists are available on this device and will expire within 30 days.
Model has been saved to My Models.
This an authentic OEM 40-Watt replacement light bulb, used in a number of household appliances. It is specially designed to withstand extreme temperatures, which is why these replacement bulbs are mos...
The flat style oven igniter kit is used in gas ovens and ranges. It is what provides the heat needed to open the gas valve, and it ignites fuel for the burner assembly. This part can be used for both ...
This is a surface burner igniter, also known as a top burner ignitor and stove top spark electrode. It is used to generate the spark that lights the surface burner. If your stove will not start, eleme...
This is a leveling leg for your oven, range, or stove. The leveling legs on your oven allow your appliance to sit perfectly flat. The new one may be longer in length than your original, but will work...
This burner cap assembly is sold with the spark electrode igniter and has a 7-inch outer diameter. This manufacturer-approved surface burner is for gas ranges. The surface burner supplies the heat to ...
This is a multi-use and multi-appliance screw. It can be used on a microwave, refrigerator, range/oven, air conditioner, dehumidifier, washer, or dryer. The measurements of this screw are 8 x 1/2 inch...
This door seal is used for ranges and ovens. The seal prevents hot air escaping from the oven to maintain a certain temperature when baking. The clips sticking out of the seal help secure it to the ra...
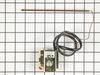
This part may differ in appearance, but functions same as original part. : This part sends enough current to the igniter to create a spark to the bottom of the burner cap.
This thermostat knob is two inches in diameter. It is made of plastic, and will accept a 'D' shaped shaft. This white knob has gray lettering along the perimeter denoting the temperature level as well...
This burner valve knob is two inches in diameter. It is all white in color and it is made entirely of plastic. This knob will accept a 'D' shaped shaft. There is dark gray lettering along the perimete...
$26.82
Special Order
Questions And Answers for 31213WAV
Ask our experts a question about this model and we'll get back to you as soon as possible!
3 questions answered by our experts.
Sort by:
< Prev
1
Next >
Search filter:
Clear Filter
Your search term must have 3 or more characters.
Keep searches simple. Use keywords, e.g. "leaking", "pump", "broken" or "fit".
Sorry, we couldn't find any existing answers that matched.Try using some different or simpler keywords, or submit your new question by using the "Ask a Question" button above!
Ken
July 19, 2021
Can this stove convert from natural gas to propane?
For model number 31213WAV
Hi Ken,
Thank you for your question. The stove can be converted from natural gas to liquid propane. You do not need a conversion kit for this stove as you can make adjustments to the burners and the regulator. For information on the burners, please consult your owner's manual. To convert your oven from natural gas to propane you will need to adjust the plastic plug on the cap on the regulator. Take a wrench and unscrew the cap. Under the cap, you will find a plug. The gas type that the regulator is set for is closest to the cap which would be natural has. Take the plug out, rotate and place the opposite end inside the cap and snap it in. The plug will have the gas type molded into it. We hope this helps! Good luck with the repair!
Both igniters quit working at the same time. Is that possible? Could the problem be something other than the igniters?
For model number 31213WAV
Hi Brian, thank you for reaching out. Based on the description that you have provided, the issue seems to be with the spark module, part number PS2094592, and you may need to replace it. It sends enough current to the igniter to create a spark. We hope this solves your problem!
Oven stopped working after I “gently” scraped bottom with a wooden spatula and maybe a metal spoon. It was working great before.
For model number 31213WAV
Hi Cecile, thank you for reaching out. The spoon might have accidentally pulled or bent a wire connected to the oven's heating elements or control panel, causing a short circuit or interruption of power. Carefully inspect the inside of the oven, especially around the heating elements, control panel, and any visible wiring. Look for any wires that are loose, disconnected, or bent. You may need to reconnect the wires to fix the issue. We hope this information helps!
Did this question help you?
Thank you for voting!
< Prev
1
Next >
✖
Ask a Question
Ask our experts a question on this model and we'll respond as soon as we can.
The oven had been working intermittently for a while and after repeated threats of starvation from my spouse I finally took a look even though it was summer and the grill was working fine. The Igniter would glow red when the oven was turned on but the gas would not flow to it no matter what the temperature setting. I searched online and f
... Read moreound this site that explained it was possible for the igniter to glow but if it was not drawing the correct amperage (because its resistance was too high) then the main brain would not allow the gas valve to open. So I took a look at the broiler and it had the same igniter. I measure the resistance of both of them and the oven igniters resistance was higher (don't rememeber the reading) then I moved the Igniter from the broiler to the oven and the oven worked from there it was just a matter of ordering the part. End of story except for I am still doing all the cooking on the barbecue outside.
Replacement of these burners is very easy. You just twist the burner counterclockwise a quarter turn and pull it out. (You may need a big wrench if the range is very old.) Once out, just pull the two wires off and push them onto the new burner. Crimp them on with pliers if they're loose -- mine were. Twist the burner back on. If the
... Read more gasket under the burner has disintegrated, don't worry about it. They don't offer replacements for them because they're not necessary as a safety feature. They were designed to keep overspills from running under the cooktop, but the ridge around the hole is likely higher than you'd ever need.
Lift out sealed burner assembly rear of stove first while careully sliding to rear to disengage ignitor probes.Remove philips head screws from bottom sheet metal housing to expose bottom of burners Remove gas tube assembly screws and move tube away carefully.Unplug wires from ignitor.Remove screws for ignitor .Remove ignitor, I noticed t
... Read morehat rust and dirt had built up around burner to pan connection.I used my oil filter wrench to turn slightly the burner to remove it from the pan to clean.Reassembled in reverse order.


 – Part Number: W11665456")


")
