Models > 1068311651

1068311651 Kenmore Freezer - Overview

Sections of the 1068311651

[Viewing 5 of 5]
Keep searches simple, eg. "belt" or "pump".
Light Bulb - 40W – Part Number: 8009
Light Bulb - 40W
★★★★★
★★★★★
(66)
PartSelect #: PS884734
Manufacturer #: 8009
This an authentic OEM 40-Watt replacement light bulb, used in a number of household appliances. It is specially designed to withstand extreme temperatures, which is why these replacement bulbs are mos...
$11.73
  In Stock
Door Cam - Black – Part Number: WPW10329686
Door Cam - Black
★★★★★
★★★★★
(63)
PartSelect #: PS11752991
Manufacturer #: WPW10329686
The Door Cam is a black plastic part which helps the door pivot shut while keeping the door and hinge in proper alignment. Lubricating this part upon installation may help it move easier. It attaches...
$10.56
  In Stock
Defrost Timer – Part Number: W10822278
Defrost Timer
★★★★★
★★★★★
(35)
PartSelect #: PS11723171
Manufacturer #: W10822278
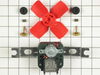
The Defrost Timer (Defrost control) acts like a clock by switching on the defrost heater circuit after a predetermined amount of compressor run time. This allows the defrost circuit to clear the evapo...
$34.61
  In Stock
Door Closing Cam Kit – Part Number: 4318165
Door Closing Cam Kit
★★★★★
★★★★★
(23)
PartSelect #: PS358690
Manufacturer #: 4318165
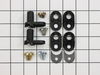
This door closing cam kit is intended for use with the bottom of refrigerator and freezer door hinges. The cam helps with the closing of the doors and to keep them slightly in position when opened.
$13.52
  In Stock
Condenser Fan Motor Kit – Part Number: 833697
Condenser Fan Motor Kit
★★★★★
★★★★★
(34)
PartSelect #: PS395284
Manufacturer #: 833697
This condenser fan motor kit is designed for use with refrigerators. This fan draws air through the condenser coils and over the compressor. It does this with the goal of cooling the warm refrigerant ...
$63.18
  In Stock
Evaporator Fan Motor Kit – Part Number: 482731
Evaporator Fan Motor Kit
★★★★★
★★★★★
(20)
PartSelect #: PS376645
Manufacturer #: 482731
The evaporator is found in the back of the freezer. This kit comes with two mounting grommets, two sleeves (not to be used on porcelain models), two #8 mounting screws, and a push-on fan blade. If you...
$74.11
  In Stock
Touch-Up Paint - White – Part Number: 72017
Touch-Up Paint - White
★★★★★
★★★★★
(1)
PartSelect #: PS385132
Manufacturer #: 72017
This touch-up paint can be used on a wide variety of household appliances. It is most often used on washers, dryer, refrigerators, dishwashers, ranges, freezers, trash compactors, or microwaves. It is...
$8.00
  In Stock
Screw – Part Number: WP488729
Screw
★★★★★
★★★★★
(1)
PartSelect #: PS11742721
Manufacturer #: WP488729
Metallic screw that is less than an inch long. Does not include the plastic washer.
$7.91
  In Stock
Light Socket Kit – Part Number: 4387478
Light Socket Kit
★★★★★
★★★★★
(6)
PartSelect #: PS371236
Manufacturer #: 4387478
The light socket in your refrigerator houses the light bulb and connects it to the power source. If your refrigerator light is not coming on when you open the door, you may need to replace the light s...
$70.72
  In Stock
Spray Paint - 12 oz. - White – Part Number: 350930
Spray Paint - 12 oz. - White
★★★★★
★★★★★
(2)
PartSelect #: PS347819
Manufacturer #: 350930
Appliance spray paint is a great way to cover up any chips and scratches that have appeared on your appliances. Instead of replacing the part entirely, this is an easy fix. This is also a great way to...
$22.68
  In Stock
Kickplate Support Clip – Part Number: WP944224
Kickplate Support Clip
★★★★★
★★★★★
(5)
PartSelect #: PS11746875
Manufacturer #: WP944224
Sold individually.
$11.14
  In Stock
Screw – Part Number: WP999367
Screw
PartSelect #: PS11747799
Manufacturer #: WP999367
Sold individually.
$7.95
  In Stock

Questions And Answers for 1068311651

Be the first to ask our experts a question about this model!

Common Symptoms of the 1068311651

[Viewing 17 of 17]
Door won’t open or close
Fixed by
these parts
Fixing Fixing
Show All
Fridge too warm
Fixed by
these parts
Fixing Fixing Fixing
Show All
Noisy
Fixed by
these parts
Fixing Fixing Fixing
Show All
Freezer section too warm
Fixed by
these parts
Fixing Fixing Fixing
Show All
Freezer not defrosting
Fixed by
these parts
Fixing
Show All
Leaking
Fixed by
these parts
Fixing Fixing Fixing
Show All
Will Not Start
Fixed by
these parts
Fixing Fixing
Show All
Clicking sound
Fixed by
these parts
Fixing Fixing
Show All
Fridge runs too long
Fixed by
these parts
Fixing Fixing Fixing
Show All
Light not working
Fixed by
these parts
Fixing
Show All
Fridge and Freezer are too warm
Fixed by
these parts
Fixing Fixing Fixing
Show All
Door Sweating
Fixed by
these parts
Fixing Fixing
Show All
Frost buildup
Fixed by
these parts
Fixing
Show All
Freezer too cold
Fixed by
these parts
Fixing
Show All
Too warm
Fixed by
these parts
Fixing Fixing
Show All
Fridge too cold
Fixed by
these parts
Fixing
Show All
Won’t start
Fixed by
these parts
Fixing
Show All
Keep searches simple. Use keywords, e.g. "leaking", "pump", "broken" or "fit".
Sometimes the condenser fan would start causing the refrigerator to overheat.
Unplug the appliance.
Removed the screws holding the back panel.
Removed the fan blade.
removed 3 screws holding the condenser fan.
Remove the 3 metal brackets attached to the fan.
(First note which studs the brackets are attached to. Attach the 3 metal brackets to the new fan. (New screws were supplied)
Cut and strip the wire about two inches from the fan.
Cut and strip the new wire. I cut the new wire in half (about 6 inches.) Connect the two wires, twist and used 2 wire nuts. Tie wrap the wire to the wire harness. Mount the new fan (three screws)
Screw the back panel back on.
Mount the new
Parts Used:
Condenser Fan Motor Kit
  • Tom from Franklin, WI
  • Difficulty Level:
    A Bit Difficult
  • Total Repair Time:
    15 - 30 mins
  • Tools:
    Nutdriver, Pliers
180 of 204 people found this instruction helpful.
Was this instruction helpful to you?
Thank you for voting!
The door would not close properly. The CAM had broken.
The repair was very simple.

1. Remove the food from the door shelves.

2.Remove the door by first removing the three screws holding the hinge at the top of the refrigerator.

3. Lift door off of the bottom hinge.

4.Replace bottom CAM on bottom hinge (one screw)

5. Replace top CAM and shim on door (one screw)

6. I put a little grease on the cam to make it slide better.

7. Place door on bottom hinge. Remount top hinge.

8. Done and works better than new.
Parts Used:
Door Closing Cam Kit
  • Thomas from San Clemente, CA
  • Difficulty Level:
    Really Easy
  • Total Repair Time:
    Less than 15 mins
  • Tools:
    Nutdriver, Screw drivers
143 of 147 people found this instruction helpful.
Was this instruction helpful to you?
Thank you for voting!
Unit very noisy and freezer too warm
First I removed the racks in the freezer. The rack supports on the sides lift off without tools. The evaporator cover is at the back of the freezer. 4 phillips head screws. The cover lifts up then forward to expose the evaporator, evaporator fan and duct. The duct is held by 3 hex head screws. The evaporator fan is attached to the duct with a wiring pigtail to a plug. Unplug the fan and remove the duct. The fan is held by 2 hexhead screws. The new fan is put in place and assembly is simply the reverse of disassembly. The unit is quiet and cools properly now. The new part fit perfectly.
Parts Used:
Evaporator Fan Motor Kit
  • Michael from Churchville, NY
  • Difficulty Level:
    Easy
  • Total Repair Time:
    15 - 30 mins
  • Tools:
    Nutdriver, Screw drivers
86 of 91 people found this instruction helpful.
Was this instruction helpful to you?
Thank you for voting!