


Models
>
LA7500
LA7500 Washer - Overview
Models starting with LA7500
Click on the best match to narrow your results.
Keep searches simple, eg. "belt" or "pump".

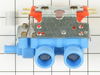
Water Inlet Valve
PartSelect #: PS1583805
Manufacturer #: 205613
This is a water inlet valve which is used in washing machines. The valve controls and monitors the flow of water into the washer. It has a multi-mount bracket and outlet adaptor. The tools needed for ...
$98.44
In Stock

Screw, 8/18 x 3/8
PartSelect #: PS11746840
Manufacturer #: WP90767
This screw is sold individually.
$5.42
In Stock

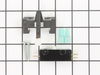
Lid Switch
PartSelect #: PS11723153
Manufacturer #: W10820036
This 3 prong lid switch is used for washing machines that do not have a tub light.
$23.69
In Stock

Hose Clamp
PartSelect #: PS11743008
Manufacturer #: WP596669
This hose clamp is used in a wide variety of household appliances. Most often it is found in washers, dishwashers, refrigerators, freezers, dehumidifiers, garbage disposals, or air conditioners. This ...
$11.80
In Stock

Centerpost Gasket
PartSelect #: PS11723081
Manufacturer #: W10814296
This part may also be referred to as a main outer tub seal. This part prevents leaking from the bottom of the tub. The gasket is approximately 2 inches in diameter to the outer edge, black in color, a...
$5.76
In Stock

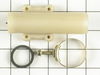
Syphon Break Elbow Kit with Clamp
PartSelect #: PS2017573
Manufacturer #: 208847
For drain hose 7/8".
$26.53
In Stock

Touch-Up Paint - White
PartSelect #: PS385132
Manufacturer #: 72017
This touch-up paint can be used on a wide variety of household appliances. It is most often used on washers, dryer, refrigerators, dishwashers, ranges, freezers, trash compactors, or microwaves. It is...
$8.00
In Stock

Spring Retaining Clip
PartSelect #: PS11739294
Manufacturer #: WP22001650
This spring retaining clip is just under 1 inch long. The clip is made entirely of metal and is attached to the back wall of the washer, under the console. If your washer is vibrating and louder than ...
$11.10
In Stock

Siphon Break Connector Kit
PartSelect #: PS2017342
Manufacturer #: 206638
This plastic siphon break comes with a metallic clamp and gasket. It is used with many washing machines.
$73.04
In Stock

Hose Clamp
PartSelect #: PS11740613
Manufacturer #: WP285655
The hose clamp is used to hold the water hose in place which will prevent the hose from leaking water. Sometimes the clamp may lose its ability to latch on, causing a leaking washer. For the installat...
$11.10
In Stock

Lid Hinge Mounting Screw
PartSelect #: PS11748588
Manufacturer #: WPW10119828
Sold individually. NOTE: The color on the screw may not be the same as the image, but will still function the same.
$11.80
In Stock

Drive Block - 2 5/16 Inch High
PartSelect #: PS11741977
Manufacturer #: WP389140
This part is for large capacity belt drive and direct drive appliances.
$23.77
In Stock
Common Symptoms of models starting with LA7500
[Viewing 10 of 10]Leaking
Fixed by
these parts
these parts

Show All
No hot or cold water
Fixed by
these parts
these parts

Show All
Will Not Start
Fixed by
these parts
these parts

Show All
Will not drain
Fixed by
these parts
these parts


Show All
Will not agitate
Fixed by
these parts
these parts


Show All
Burning smell
Fixed by
these parts
these parts

Show All
Won’t Start
Fixed by
these parts
these parts
Show All
Spins slowly
Fixed by
these parts
these parts
Show All
Lid or door won’t close
Fixed by
these parts
these parts

Show All
Water Filling Issues
Fixed by
these parts
these parts
Show All


Keep searches simple. Use keywords, e.g. "leaking", "pump", "broken" or "fit".
Cold water valve only opened to a trickle
I started by unplugging the appliance and then shut off the hot and cold water faucets then I disconnected and drained the hoses. Next, I removed the two screws that held the valve assembly in place. I then pulled the assembly out about 3 inches and disconnected the two wire plugs. The last step was to loosen the hose clamp on the outl
... Read more
et hose and pull off the outlet hose. I reversed the steps to install the new assembly and the total repair took about 10 minutes.
Read less
Parts Used:

-
Brian from El Cajon, CA
-
Difficulty Level:Really Easy
-
Total Repair Time:Less than 15 mins
-
Tools:Nutdriver, Wrench (Adjustable)
593 of 606 people
found this instruction helpful.
Was this instruction helpful to you?
Thank you for voting!
Water leak noted on floor at front of washer and at sides
Occasional noted leak became worse and I had a repair service out. Incorrect detection of outer tub seal made so cancelled them and read comments about raising the top. Did so just at start of a rinse cycle to see soapy water shoot from top of syphon break then continue to dribble out through tub empty process--this is what had cause th
... Read more
e water to flow down the interior drain hose and out through the side and bottom near the pump.
Ordered all the parts shown here and they arrived just in time for planned work. Did not need or use the clamp and gasket purchased as the gasket was included in the break package and I really like the old-style clamps much better.
Replaced the break and the elbow and put it back together. Things went south on a rinse as water shot out the back hose at the new elbow. I had not realized the size of the new elbow was smaller than the original. Went back to the old elbow but it bothered me that it would still move when the 4 assembly bolt-screws were completely tight.
So far this seems to have worked. There does not seem to be any leaking at all. For those who read this, the job could be done in about and hour for less than I spent if you observe and diagnose properly. It appears that the washer at the end of the Syphon Break wore out and that is what caused the leak.
Thanks much to PartSelect for being in business and to all the posters on this site for helping everyone to get these things done right!
Read less
Parts Used:


-
Jeff from Moorpark, CA
-
Difficulty Level:Difficult
-
Total Repair Time:More than 2 hours
-
Tools:Screw drivers, Socket set
57 of 65 people
found this instruction helpful.
Was this instruction helpful to you?
Thank you for voting!
Cycle didn't advance
Placed a towel on top of the washer.
Using a flat screwdriver, carefully removed black plastic cap from inside the dial. Gently lifted and slid out the small gizmo that held the timer knob onto the front of the washer. Laid the black cap, timer knob, and small gizmo on the towel.
Using a phillips screwdriver, unscr ... Read more ewed the 4 screws holding the front panel. Set the screws on the towel. Placed the front panel face down on the towel.
Removed the old timer by sliding out the three flat pieces that were part of the black coated wires that were attached to the old timer(two top and one underneath). They were hard to detach. Unscrewed the two screws that held the old timer in place. Set the old timer aside.
Replaced the new timer in the same manner as the old one came off. Slid on the three flat pieces, then screwed the timer on. Lifted the front panel and screwed it tightly. Put the timer knob back on and clipped the gizmo to hold it in place. Replaced the black plastic cap.
Discarded the old timer and kept the instructions for future replacements.
Read less
Parts Used:

-
Glenda from Seaside, CA
-
Difficulty Level:Really Easy
-
Total Repair Time:Less than 15 mins
-
Tools:Screw drivers
57 of 70 people
found this instruction helpful.
Was this instruction helpful to you?
Thank you for voting!