This door closing cam kit is intended for use on the bottom of your refrigerator and freezer door hinges. The cam helps close the doors and to lifts them slightly when opened. If your door will not open or close, or will not stay closed, there could be an issue with the door close cam. Other common symptoms associated with the door close cam are: the door is sweating, the fridge is too warm, or a clicking sound can be heard coming from the door. If your refrigerator has an ice and water dispenser, you will need to disconnect the power and water to the unit before you begin the repair.
How Buying OEM Parts Can Save You Time and Money
Part Videos
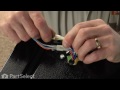
Replacing your Amana Refrigerator Door Closure Cam Kit
Troubleshooting
This part fixes the following symptoms:
Door won’t open or close | Clicking sound | Door Sweating | Fridge too warm
Keep searches simple. Use keywords, e.g. "leaking", "pump", "broken" or "fit".
Sorry, we couldn't find any existing reviews that matched. Try using some different or simpler keywords.
★★★★★
★★★★★
John H - June 2, 2023
Verified Purchase
Great Part
The part was easy to install and did a great job on our 25 year old Amana Refrigerator Freezer.
★★★★★
★★★★★
Walter D - May 26, 2023
Verified Purchase
Did not fit
Part did not fit. I had to bore out the part to use. One side was too loose to use - had to us old part.
If I could I would rate it “0” stars
May 27, 2023
Thank you for your review. We're sorry to hear that happened, we will be in touch soon to help fix this issue.
★★★★★
★★★★★
Jeff E - April 19, 2023
Verified Purchase
Fixed the fridge
Parts were easy to work with very clean easy to install
★★★★★
★★★★★
Michael M - September 14, 2021
Verified Purchase
Just what I needed
Had a 20+ year old side by side. Door would often not close all the way. This part fixed the problem and was super easy to install.
★★★★★
★★★★★
Janel B - May 5, 2020
Verified Purchase
easy to use and repair.
Very helpful video .
★★★★★
★★★★★
JOHN H - November 23, 2019
Verified Purchase
Worked perfect
Easy Fix refer back working properly
★★★★★
★★★★★
Lou Ann B - August 6, 2019
Verified Purchase
Easiest repair ever
We ordered this part for an old refrigerator. The hardest thing about the repair was the weight of the door! Everything fit perfectly and it works beautifully now.
★★★★★
★★★★★
Josh F - June 21, 2019
Verified Purchase
Exactly the part I needed
Was an exact replacement for what I needed, and following the video on the site made the repair a breeze!
★★★★★
★★★★★
Shawnta W - June 19, 2019
Verified Purchase
Disappointed
I was very thrilled at the thought that I’d be able to fix my fridge. Purchasing was easy, shipping came sooner than I expected, open the package WRONG PART!
★★★★★
★★★★★
David S - January 16, 2019
Verified Purchase
Did the trick
Works well.
< Prev
1
2
Next >
Customer Repair Stories
Average Repair Rating: 3.8 / 5.0, 32 reviews.
What's this?
Sort by:
< Prev
1
2
3
Next >
Search filter:
Clear Filter
Your search term must have 3 or more characters.
Keep searches simple. Use keywords, e.g. "leaking", "pump", "broken" or "fit".
Sorry, we couldn't find any existing installation instruction that matched.
Uneven doors, freezer door had to be pushed to be sure it was shut
Followed video and used vaseline to lube as suggested by other review.
door closure part broken. door wouldn't remained closed
removed door.examined problem,. installed part. super easy
Patricia from JACKSON, WY
Difficulty Level:
Really Easy
Total Repair Time:
Less than 15 mins
Tools:
Socket set
2 of 2 peoplefound this instruction helpful.
Was this instruction helpful to you?
Thank you for voting!
door snapping when opening and closing
removed top hinge, lifted door off bottom hinge, replaced cam, installed door.
robert from saint cloud, FL
Difficulty Level:
Really Easy
Total Repair Time:
Less than 15 mins
Tools:
Socket set
0 of 1 peoplefound this instruction helpful.
Was this instruction helpful to you?
Thank you for voting!
The door clicked when opened or closed.
I followed the other web notes with one change .Since I too forgot the lube , I used a pry bar and block of wood to lift the door and a tooth pick to glob some lube in the lower hinge.
Donald from Mundelein, IL
Difficulty Level:
Easy
Total Repair Time:
15 - 30 mins
Tools:
Screw drivers
0 of 1 peoplefound this instruction helpful.
Was this instruction helpful to you?
Thank you for voting!
Refrigerator would work for 2 weeks then start freezing up
First let me say the appliance guy said I needed to replace the whole freezer coils within the freezer part but the unit after using a hair dryer would work fine for two weeks then freeze up again. His conclusion of leaking refrigerant did not make sense, nor the noting of uneven freezing, so I figured I would take a chance on logic. Th
... Read moree worst part was unloading the refrig and throwing away a boat load of food. Anyway once I removed the back panel that reveals where the defrost thermostat is I simply followed the wires by disconnecting the old and attaching the new until I got to the last two - brown and orange which actually go behind the defrost heater element and disappear below the fan. I cut both & used the adapter peice did a crimp - done. The timer took 5 minutes. Its working fine and cooling fabulously! I wanted to get past the two week point it is now in its 4th and doing fine. By he way the cams, thanks to your video took 10 minutes. Very satisfied and will recommend DIY because everyone else seems to want to retire on my dime!
Main door was making a thunping noise when opened.
Took the door off, and replaced the plastic shim on the bottom that was the cause of the problem. The shim had broken into pieces and was no longer holding the door in height and alignment. I was proud of myself that I could repair it myself and avoid a $125.00 service call from a repairman. Total cost of repair including shipping and ha
... Read morendling was just south of $12.00.
Read less
Don from Granbury, TX
Difficulty Level:
A Bit Difficult
Total Repair Time:
30 - 60 mins
Tools:
Nutdriver, Screw drivers
0 of 1 peoplefound this instruction helpful.
Was this instruction helpful to you?
Thank you for voting!
Door wouldn't stay closed.
Removed old parts and replace parts ordered from you. Works great.
Laid the gasket flat for several days with heat applicaton. The replacement was pretty easy. Since the door cams had to be replaced I only had to take the door off once. Easy as one two three. Thanks
Took everything off the door then removed the door from the refrigerator. The old cam unit was completely gone and the shaft for the cam was digging into the door. Installed the new cam and shim and put the door back on. Worked perfect. Much easier than my wife and I thought it would be. We're both in our sixties and have never don
... Read moree anything like this before. Thank you.
Replaced the part-- Door snaps loudly everytime it's opened or closed. Correct replacement part and lubed with vaseline,
Ronald from Cumming, GA
Difficulty Level:
Easy
Total Repair Time:
15 - 30 mins
Tools:
Nutdriver
7 of 7 peoplefound this instruction helpful.
Was this instruction helpful to you?
Thank you for voting!
< Prev
1
2
3
Next >
Questions and Answers
Ask our experts a question about this part and we'll get back to you as soon as possible!
13 questions answered by our experts.
Sort by:
< Prev
1
2
Next >
Search filter:
Clear Filter
Your search term must have 3 or more characters.
Keep searches simple. Use keywords, e.g. "leaking", "pump", "broken" or "fit".
Sorry, we couldn't find any existing answers that matched.Try using some different or simpler keywords, or submit your new question by using the "Ask a Question" button above!
Harry
March 31, 2018
Will this work with Amana refrigerator model # sxd25al mfg # p1162436wl?
For model number SXD25AL
Hello Harry,
Thanks for your question. Yes, this part is compatible with your model.
I hope this helps.
5 people found this helpful.
Was this helpful?
Thank you for voting!
Howard
November 6, 2018
Does this door cam (ps 2168612) fit my refridgerator?
For model number GX5FHDXVT
Hello Howard, Thank you for contacting us. I have researched the model you have provided and have found the part you’re looking for is Part Number: PS11743548 for the Black, Part Number: PS11743547 for white and Part Number: PS11738468 for Apollo Grey. Hope this helps, good luck with this repair!
The cam on the door hinge is worn. The instructions say to remove the door to replace it. But...inspection shows that the bottom hinge support is an external mount, and it appears that if i support the door from the bottom, with something like a stack of books or scrap lumber, i can remove the fasteners, drop out the hinge, replace the cam on the door and hinge, and bolt it back in place. lying on the floor to remove the remove the door section of the cam with a stubby phillips screwdriver seems a lot easier than taking everything out of the fridge, then taking the door off and having to re-allign the top hinge afterward. am i missing something?
Hi Jay,
Thank you for contacting us. You can install the part in any way that you would like. It is recommended by the manufacturer that the door be removed. I hope that helps. Good luck with your repair.
2 people found this helpful.
Was this helpful?
Thank you for voting!
Ken
September 5, 2017
The door cam kit, is it also for the top hinge ?
For model number ssd25te
Hi Ken,
That is a great question. This door closing cam kit is intended for use on the bottom of your refrigerator and freezer door hinges. I hope this helps.
1 person found this helpful.
Was this helpful?
Thank you for voting!
Peter
May 1, 2023
will this work on my model wrt518szfm00? the bottom door is off alignment and is leaking. if not what parts do i need to fix it ? thank you inadvance for the help.
For model number WRT518SZFM00
Hello Peter, Thank you for writing. This Kit is not listed as a compatible part for this appliance. We suggest checking the Bottom Door Hinge, Pin, Door Stop and Shim. We hope this helps!
If the door hinge cam kit you show is for the bottom of the door, what cam do you have for the top hinge of the door?
For model number ssd25te
Hi Ken,
Thank you for your inquiry. The top hinge of your appliance does not have cams. You have a little plastic insert inside the door called a bushing. I have listed the part in a link down below for your. I hope this helps. Good luck with your repair!
I need this part for model #WRT518SZFM00 if it will not fit is there a comparable part? Door won't stay open and keeps hitting me in the head!
For model number WRT518SZFM00
Hello Vince, thank you for writing. The door closure cam is not available for your model. We suggest checking the Bottom Door Hinge, part number PS11740472, Bottom Hinge Pin, part number PS11740473, Door Stop Bracket, part number PS5136041, and Door Stop Shim, part number PS11739952. We hope this helps!
Will this part work on my whirlpool fridge model WRF560SEYM04? The assembly at the bottom of the right hand door is not functioning properly.
For model number Whirlpool model WRF 560SEYM04
Hello Tamera, thank you for reaching out to PartSelect Canada. The part that you are referring to is not compatible with your model. The compatible door closing cam for your model is part number PS11755285. If you require assistance to place an order, please contact customer service!
Hello Joe, Thank you for contacting us. I have researched the model you have provided and have found the part you’re looking for is PartSelect Number: PS11752991 for the cam and PartSelect Number: PS11739042 for the lower cam. Hope this helps, good luck with this repair!