This genuine OEM washer has a 3/4 inch outside diameter. This thrust washer can be used on most makes and models of dryers. A complete list of compatible dryers is available below. The washer is found...
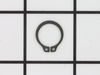
The metal retaining ring, which is under an inch long, holds the rear wheels on the axels of the dryer. The main reason why it would need to replaced is if the retaining ring has sprung out of place o...
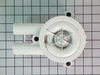
This pump is attached to the motor and helps expel water from the washing machine. It is activated after the spin speed is maintained for a specific period of time.
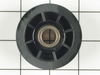
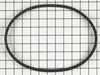
This v-shaped spin belt helps transfer power from the motor to the transmission to help pump the water in and out of the washer. It also helps runs the spin cycle in the washer.
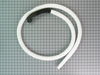
This hose clamp is used in a wide variety of household appliances. Most often it is found in washers, dishwashers, refrigerators, freezers, dehumidifiers, garbage disposals, or air conditioners. This ...
If your washer shakes or vibrates loudly when it reaches its max speed, make sure the 4 levelling legs are even. Adjust the legs so that the machine is level, and tighten the locking nuts on the legs ...
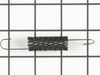
This spring retaining clip is just under 1 inch long. The clip is made entirely of metal and is attached to the back wall of the washer, under the console. If your washer is vibrating and louder than ...
The hose clamp is used to hold the water hose in place which will prevent the hose from leaking water. Sometimes the clamp may lose its ability to latch on, causing a leaking washer. For the installat...
Had to remove pump-not easy. Nothing wrong with pump, but had to trash it to get it off the motor shaft, so I had to replace it, too.
Pop up top of cabinet and remove front panel. (I leaned unit back against a wall to facilitate internal access once panel was removed.)
Remove motor assy - 4 screws & connector
... Read more.
Remove 3 pump screws (torx) and 2 hoses. Pry pump off motor shaft (not easy). I used a heat gun to help expand the plastic fitting on the motor shaft.
Remove old belt, put on new belt. (Do not use automotive belt-this belt is designed to slip because it also spins the tub. The tub will not spin when it's full of water, and the pump will not pump the water if the tub is bogging down the pump. Plus, you will probably overheat the motor.)
Press new pump back on motor shaft (advise not to re-use old pump as seals were probably damaged by removal process.)
Caution: Pressing pump onto motor shaft may cause pump rotor to bind in housing. Try to press it on a little too far so you back off slightly.
Replace pump screws.
Replace motor, giving attention to belt alignment.
Replace motor screws and connector.
Re-attach hoses on pump.
Button up cabinet.
Done.
The hardest part was removing the pump. If not for that, it would have been a 15-min, $20 repair.
Because I felt it wise to replace the pump also, it was a $70 repair.
Spin cycle sounded like freight train, bad bearing, apparently they all fail the same way, this revised parts kit should prevent premature failure in future.
The following is easy for an experienced mechanic of any type, fully doable by an accomplished DYI'er, between this writeup and the kit instructions (which I do not fully
... Read morefollow) you should be fine. Probably avoid this task if you aren't either of the aforementioned.
Remove lower pannel, top pannel, lift top back. Remove fill hose to outer tub, clear tube to outer tub. Remove entire outer cabinet from base, exposing base and tub. Remove augur assy by popping off cap removing inner bolt, lifting augur out. Remove top of outer tub cap assy by pressing down where each latch is and gently prying latch open with screwdriver. Remove bolts holding in inner tub and remove inner tub. Unscrew the pastic nut on transmission shaft using channel locks (counterclockwise from top), don't worry about destroying this part since a new one is in the kit. Remove (pry off with your hands, don't worry about breaking it) the 'lint filter' (looks like a frisbee) and trash it. Remove the large (about 8")aluminum hub (that the inner tub bolts to) by unscrewing counterclockwise. No special tool needed, just use air hammer if available against one of the T shaped castings to get it loose, otherwise use a drift and hammer same way. Don't worry about messing up the part since a new one is in the kit. Remove the outer tub drain hose, remove six screws holding outer tub, lift outer tub out. Turn outer tub upside down and use a wide crowbar/nail puller to CAREFULLY pry out the bearing/seal assy from the bottom of the tub. Take your time working your way completely around the bearing/seal several times so it doesn't get too crooked while removing it. Clean everything thoroughly. Inspect the area of the bottom of outer tub where you removed the bearing/seal. If all is well and there are no gouges, get it wet with clean water and then carefully press the new bearing/seal assy in with the heal of the palm of your hand, working your way around it so it doesn't get crooked while pressing in. Do not use sealer (unless there are gouges) and do not hammer this. Make sure it is fully seated in the outer tub. Do reverse to put everything back together. I tightened the aluminum hub the same way I loosened it, no problem. There are some rubber plugs in the kit to install in some holes in the tub, scrape or clean any gunk off the inner tub around these holes so the rubber plugs will seat properly. Carefully snug the plastic nut with channelocks by gripping it from the top as opposed to the side (so the fins don't break). Note there is a small o-ring on the transmission shaft to change before replacing the augur. Nice and quiet after the repair, hopefully the new kit (and trashing the 'lint filter') makes it last longer... LOL, it's a bit disturbing seeing the gunk under the augur knowing that has been there all this time while 'cleaning' the laundry! I'll probably start removing the augur every so often to clean under there.
It took some trial and error but overall not a difficult project. 1. Take the front covers off. 2. Undo the pully spring to loosen belt 3. Remove belt off idler pulley wheel and free up belt from the large wheel. 4. Disconect the wiring harness and the hoses. 5. Undo the motor mounting bolts (4) 6. Take motor out of washer an
... Read mored remove the 3 screws holding the pump to the motor. 7. The pump had melted to the shaft and required I chisel the pump off of the shaft. 8. Attach new pump paying attention to where the belt is positioned. 9. Reattach the motor bolts, hoses, and wiring harnes. 10. Attach the belt and test the pump. 11. Put the front back on.


 Diagram and Parts List for Maytag Washer")


 Diagram and Parts List for Maytag Washer")
 Diagram and Parts List for Maytag Washer")
.gif "SUPPLEMENTAL INFORMATION Diagram and Parts List for Maytag Washer")


 Diagram and Parts List for Maytag Washer")