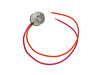
This sensor (Temperature Sensor, Thermistor, Refrigerator Temperature Sensor) sends the temperature reading of the compartment to the control board. If you notice your refrigerator is too warm, too co...
$27.00
In Stock
Order within the next 11 hrs and your part ships today!
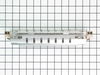
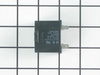
This defrost termination thermostat (Defrost Limiter Thermostat, High Limit Thermostat, Refrigerator Defrost Bi-Metal Thermostat) acts as a safety device to stop the evaporator coil from overheating, ...
$29.26
In Stock
Order within the next 11 hrs and your part ships today!
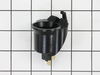
This water inlet valve (Refrigerator Water Inlet Valve Assembly) supplies water to the ice maker and the water dispenser in your refrigerator. It is located at the back of the fridge, beneath the bott...
$93.82
In Stock
Order within the next 11 hrs and your part ships today!
This 10 by 5 inch ice maker (Electromechanical Icemaker Kit, Ice Maker Assembly) produces ice. This particular model will produce seven crescent shaped cubes every cycle. It is constructed of plastic ...
$216.23
In Stock
Order within the next 11 hrs and your part ships today!
This “Dispenser Door Assembly” (Door Recess Assembly, Ice Door Assembly, Dispenser Door, Refrigerator Dispenser Ice Chute Door Kit, Dispenser Door Flap, Ice Chute Door, Flapper) keeps the room air fro...
$15.58
In Stock
Order within the next 11 hrs and your part ships today!
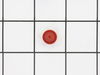
If you notice that your refrigerator or freezer is noisy or too warm, you may need to replace the evaporator fan grommet. This part is red in color, and is about 1 inch in diameter. The evaporator fan...
$13.21
In Stock
Order within the next 11 hrs and your part ships today!
This shelf insert is a genuine OEM replacement part for your refrigerator. The shelf insert can be installed without any tools. Simply pull out the existing shelf and insert the new one.
$34.61
In Stock
Order within the next 11 hrs and your part ships today!
This door recess spring or dispenser lever spring in your refrigerator is used to return the ice door to the closed position or the dispenser lever to the home position once released. You will find th...
$9.17
In Stock
Order within the next 11 hrs and your part ships today!
The very first symptom here is important! The door water dispenser is not working but the ice macine is working. You may only have a frozen water tube in the door so do the following before diagnosing that your solenoid valve is bad: 1) the tube usually runs under the front of the refrigerator and usually has a quick disconnect. Undo t
... Read morehe connection and press the dispenser. If water comes out of the tube you have a frozen or blocked tube in the door. 2) Immediately adjust the temperature in the freezer and warm the freezer compartment as much as you can without destroying the freezer contents. Wait 24 hours. This will usually unfreeze the line. Do not waste your time with a hair dryer. NOW, if this doesn't work and you are convinced you need to order and replace the solenoid, follow these steps. Assemble your tools first. I needed a good ratchet set and a screwdriver. A shop towel is helpful for spilled water. A light is handy. Pull out the refreigerator to gain access to the rear of the unit. Unplug the power and close the water valve (older homes, you may need to actually shut the house water supply). Remove the screws which hold the cover over the lower half of the refrigerator. On the left you will see the solenoid. It's always good to see that your new part matches the one you feel needs replaced. They may not match perfectly due to changing design but they should be very similar. One screw holds this part in place and access is very simple. Now simply unplug the electrical connections. In my case, one blue "blade" type connection (powering the water) and one red "blade" type connection powering the ice maker. They are not the same size and this coupled with the coloring means you will not accidently switch them. pull the tubes clear of the solenoid. This is simple and needs no explantion. Grab your new solenoid and reattach both the electrical and water lines (two, remember, ice maker and drink dispencer). Replace the single screw. Re-attach the rear, lower refrigerator cover and go to the front of the unit to check the water. You can listen carefully and hear the power engage from the new part bringing you water. Clean up, replace the refrigerator back to its place and look really tired when your wife sees that you worked "so hard"! You probably saved at least $50-$80 from a service call which can now be used to take the family to dinner after your "exhausting" 15 minute workout of removing about 10 screws and wheeling the unit in and out of place. Writing this article took longer! My 4 year old worked harder holding the flash light!
After replacing the defrost heater, main board and thermistor I still had the same problem. Called a repair guy and he (with the help of GE on the phone) diagnosed that the temperature sensor was bad. So I ordered from partselect and installed it and it fixed the problem. Been good for a couple months (knocking on wood). To install I
... Read morehad to cut the 2 wires to the old sensor, crimp the 2 new wires on and snap the new sensor to the clip on the evaporator. Very easy. Make sure you seal the ends of the wire crimps so moisture doesn't get in and corrode the connection.
The freezer in my side-by-side kept warming up -- often 20 degrees or more, which of course caused the fresh food side to warm up also. I do a lot of jump-in-with-both-feet home repairs, but never on a large appliance. Not having an ohmmeter, which cost about $100 for a reliable one, I took the symptoms to the internet. Countless self-hel
... Read morep sites and U-Tube videos later, I was positive it was one of two possible problems, either the defrost thermostat was broken and the defroster wasn't coming out of its cycle or the temperature sensor wasn't reading the correct temp and thus kicking in the fan motor when needed. Fortunately I found both parts easily on PartSelect.com and the total cost for both, including shipping, was $30, less than 1/3 of the cost of an ohmmeter. Not knowing for sure which part it was that was bad, I ordered both, figuring, since I had to pull out the panel anyway, I might just as well replace them both ... the price was right. (In retrospect I should have order 4 Temperature Sensors as my fridge has two in both the freezer side and the Fresh Food side. Any one of them being bad could have caused the same problem. Fortunately, I was lucky because it was either ONLY the Defrost Thermostat or I just happened to pick the right Sensor, but the repair worked.)
The repair was easy: Unplug the power. A Nut Driver removed the four screws holding on the panel in the back of the freezer. A screw driver removes the one screw holding the lamp cover in place. Remove the light bulbs, pull off the panel and right above the freezer coils you'll see both parts -- plain as day. (If your coils are clogged with ice, you will probably need de-ice first.) Cut the wires to both parts as close to the parts as you can to leave as much wire exposed as possible. Strip the ends of all four wires about 1/2 inch and also on the new parts. Match up the wires in the fridge to the wires on the parts and twist the ends together (Note: both wires on the Sensor are white so they match up either way, but the two wire on the thermostat will need to match up orange to orange and pink to pink.) I used silicone filled wire nuts, which you can buy at any hardware store or use your own wing nuts and fill them with silicone or shoe goo which works just as well ... anything to keep the moisture out and prevent the wires ends from corroding. Tuck the wires up and replace the panel, light bulbs and light cover That's it. Very easy. By far the hardest part was wedging my wide body into the narrow freezer compartment. Some one-handed work added a little extra time to the project.
In my case the freezer fan didn't kick in for about twenty minutes after I plugged it back in, but I assume that it either begins in the defrost mode or it takes that long for it to reset itself ... either way the repair worked great.