


Models
>
MAT25MNAGW
MAT25MNAGW Maytag Washer - Overview
Sections of the MAT25MNAGW
[Viewing 9 of 9]


Keep searches simple, eg. "belt" or "pump".

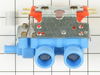
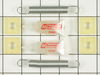
Water Inlet Valve
PartSelect #: PS1583805
Manufacturer #: 205613
This is a water inlet valve which is used in washing machines. The valve controls and monitors the flow of water into the washer. It has a multi-mount bracket and outlet adaptor. The tools needed for ...
$98.44
In Stock

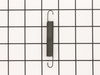
Rubber Injector Valve
PartSelect #: PS11738945
Manufacturer #: WP216201
This part is commonly known to cause a leak at the top left corner of the outer tub. It fits over the injector nozzle. It is black in color and measures approximately 2 inches in length. To access thi...
$21.32
In Stock

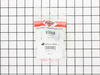
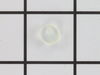
Mounting Stem/Tub Seal Kit
PartSelect #: PS2351899
Manufacturer #: 6-2095720
This kit comes with a hub assembly, agitator seal, and spanner nut. If your washer leaks once it is full (with or without clothes in it) or leaks during agitation, then you should replace the seal. Th...
No Longer Available

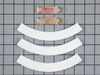
Plastic Injector Nozzle
PartSelect #: PS11738878
Manufacturer #: WP213015
The plastic injector nozzle is used in washers and dryers. It is 3 inches long and is white in color. If your washer is leaking water, replacing the nozzle could solve your problem. For this repair pr...
$10.35
In Stock

Screw, 8/18 x 3/8
PartSelect #: PS11746840
Manufacturer #: WP90767
This screw is sold individually.
$5.42
In Stock

Hose Clamp
PartSelect #: PS11743008
Manufacturer #: WP596669
This hose clamp is used in a wide variety of household appliances. Most often it is found in washers, dishwashers, refrigerators, freezers, dehumidifiers, garbage disposals, or air conditioners. This ...
$11.80
In Stock

Screw
PartSelect #: PS12349731
Manufacturer #: W11233072
This is a multi-use and multi-appliance screw. It can be used on a microwave, refrigerator, range/oven, air conditioner, dehumidifier, washer, or dryer. The measurements of this screw are 8 x 1/2 inch...
$20.79
In Stock

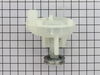
Drain Pump
PartSelect #: PS11743017
Manufacturer #: WP6-2022030
This washing machine drain pump is intended for use with automatic washers that have been manufactured since 1958. The pump itself is made of plastic, though it does come with a metallic belt pulley.
$200.68
In Stock

Rubber Foot Pad
PartSelect #: PS11738859
Manufacturer #: WP210684
The leveling leg pad or foot pad fits over the leveling leg on your washing machine. The foot pad is designed to protect your floor and keep the washing machine level and in place. This foot pad is ju...
$15.28
In Stock

Washing Machine Lid Hinge Ball
PartSelect #: PS11738871
Manufacturer #: WP211726
This washing machine lid hinge ball is well under an inch in diameter. These hinge balls are sold separately, though two are required per lid. This lid hinge ball is made of plastic and is used for Ma...
$11.14
In Stock

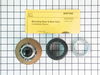
Tub Bearing Kit
PartSelect #: PS2347235
Manufacturer #: 6-2040130
This kit is used on 2-belt washers. It is recommended to change the seal kit at the same time. The tub bearing kit fixes issues with leaking, loud noise, excessive shaking/moving or if your pump is no...
$55.59
In Stock

Adjustable Leveling Leg
PartSelect #: PS2021026
Manufacturer #: 22003428
If your washer shakes or vibrates loudly when it reaches its max speed, make sure the 4 levelling legs are even. Adjust the legs so that the machine is level, and tighten the locking nuts on the legs ...
$18.47
In Stock
Questions And Answers for MAT25MNAGW
We're sorry, but our Q&A experts are temporarily unavailable.
Please check back later if you still haven't found the answer you need.
Common Symptoms of the MAT25MNAGW
[Viewing 10 of 10]Leaking
Fixed by
these parts
these parts

Show All
No hot or cold water
Fixed by
these parts
these parts
Show All
Will not drain
Fixed by
these parts
these parts

Show All
Burning smell
Fixed by
these parts
these parts
Show All
Will not agitate
Fixed by
these parts
these parts
Show All
Will Not Start
Fixed by
these parts
these parts


Show All
Spins slowly
Fixed by
these parts
these parts
Show All
Lid or door won’t close
Fixed by
these parts
these parts
Show All
Shaking and Moving
Fixed by
these parts
these parts
Show All
Water Filling Issues
Fixed by
these parts
these parts
Show All


Keep searches simple. Use keywords, e.g. "leaking", "pump", "broken" or "fit".
Cold water valve only opened to a trickle
I started by unplugging the appliance and then shut off the hot and cold water faucets then I disconnected and drained the hoses. Next, I removed the two screws that held the valve assembly in place. I then pulled the assembly out about 3 inches and disconnected the two wire plugs. The last step was to loosen the hose clamp on the outl
... Read more
et hose and pull off the outlet hose. I reversed the steps to install the new assembly and the total repair took about 10 minutes.
Read less
Parts Used:

-
Brian from El Cajon, CA
-
Difficulty Level:Really Easy
-
Total Repair Time:Less than 15 mins
-
Tools:Nutdriver, Wrench (Adjustable)
593 of 606 people
found this instruction helpful.
Was this instruction helpful to you?
Thank you for voting!
water leaking from around center shaft below fixed tub
My washer is 5 years old and water began to leak on the floor. I took off the front panel and filled the tub. Water did not leak immediately, but after the tub filled with about 3-4 inches of water, the water began to leak from a rubber washer between the fixed tub and the drive shaft. I looked online for exploded diagrams of Maytag wa
... Read more
shers, when I came across your site. By looking at your diagrams, I determined what parts I needed and ordered them. The parts arrived in 2 days, and I installed them. There were no leaks and it cost me under $70 (a repairman would have cost at least $250). The only thing I would recommend to those in similar situations, is to purchase a spanner wrench (your site does not sell, but others do). The stem seal and hub assembly is reverse threaded (clockwise to loosen) and is difficult to remove due to tight quarters in the tub.
Read less
Parts Used:

-
douglas from bonita springs, FL
-
Difficulty Level:A Bit Difficult
-
Total Repair Time:1- 2 hours
-
Tools:Nutdriver, Pliers, Socket set
523 of 544 people
found this instruction helpful.
Was this instruction helpful to you?
Thank you for voting!
Front load washing machine leaking on floor while in fill mode.
Removed two screws at bottom of front panel and then removed front panel. Then removed two self-tapping bolts (one on each side) holding top panel in place and swung the panel up, out of the way, to expose top of tub and water injection components. Cut off one pinch clamp and loosened screw clamp holding two injector hoses to the inject
... Read more
or sleeve. Removed these water injector hoses from injector sleeve assembly which is mounted on top of left side panel upper flange. Replaced deteriorated rubber injector valve, nozzle and the sleeve for the injector (plastic housing containing the injector valve and nozzle). Also replaced deteriorated injector tube seal where injector tube elbow mounts to top of tub assembly. Reinstalled injector hoses with a replacement screw clamp to replace the one cut off. tightened the new clamp and the other, original, screw clamp and checked for leaks. This solved the leakage problem. Secured top panel and re-installed front panel. Hardest part of the task was determining where the leak emanated from but once found and parts ordered, it was a relative snap to fix.
Read less
Parts Used:


-
Catherine from Wyandotte, MI
-
Difficulty Level:Easy
-
Total Repair Time:15 - 30 mins
-
Tools:Screw drivers, Socket set
175 of 185 people
found this instruction helpful.
Was this instruction helpful to you?
Thank you for voting!