Models > CMV

CMV Maytag Microwave - Overview

Models starting with CMV

Keep searches simple, eg. "belt" or "pump".
Light Bulb - 40W – Part Number: 8206232A
Light Bulb - 40W
★★★★★
★★★★★
(157)
PartSelect #: PS2376034
Manufacturer #: 8206232A
This 40w light bulb is a replacement bulb constructed of glass and metal. It is an easy-to-install electrical part which produces 40w of light. If the bulb won't light up then it may be broken and sho...
$8.87
  In Stock
Light Bulb - 120V 25W – Part Number: WPA3073101
Light Bulb - 120V 25W
★★★★★
★★★★★
(10)
PartSelect #: PS11747806
Manufacturer #: WPA3073101
This light bulb is a 120 volt, 25 watt incandescent appliance light bulb with a small base screw-in that fits in a variety of appliances such as microwaves, refrigerators, freezers, cooktops, or stove...
$17.11
  In Stock
Screw – Part Number: W11233072
Screw
★★★★★
★★★★★
(6)
PartSelect #: PS12349731
Manufacturer #: W11233072
This is a multi-use and multi-appliance screw. It can be used on a microwave, refrigerator, range/oven, air conditioner, dehumidifier, washer, or dryer. The measurements of this screw are 8 x 1/2 inch...
$20.79
  In Stock
Air Filter – Part Number: WP56001069
Air Filter
★★★★★
★★★★★
(10)
PartSelect #: PS11742845
Manufacturer #: WP56001069
This is a microwave air filter that is located on the bottom side of an over-the-range appliance. No tools are needed for this repair, simply pull back on the tab to lift the existing filter out, and ...
$25.34
  In Stock
Turntable Guide with Rollers – Part Number: 56001369
Turntable Guide with Rollers
PartSelect #: PS2052786
Manufacturer #: 56001369
This roller guide sits underneath the glass turntable tray.
  No Longer Available
Ceramic Fuse - 20 amp – Part Number: WPM0805101
Ceramic Fuse - 20 amp
★★★★★
★★★★★
(3)
PartSelect #: PS11747931
Manufacturer #: WPM0805101
This microwave fuse is just over an inch in length. It has a white ceramic center, and metal on either end. This is a twenty amp 250-volt fuse, and is used to power your microwave. If your microwave w...
$10.19
  In Stock
Black Sleeve Diode – Part Number: WPR9800486
Black Sleeve Diode
★★★★★
★★★★★
(3)
PartSelect #: PS11747959
Manufacturer #: WPR9800486
In your microwave, the diode allows current to flow one-way only, converting alternating current to direct current. If you notice that your microwave does not heat properly, you may need to replace th...
$31.50
  In Stock
Outer Door Handle of Two Piece Door Handle – Part Number: WP56001139
Outer Door Handle of Two Piece Door Handle
★★★★★
★★★★★
(1)
PartSelect #: PS11742849
Manufacturer #: WP56001139
This outer door handle is half of a two piece door handle assembly. It is all white in color and is made entirely of plastic.
$117.30
  In Stock
Screw – Part Number: WPY706189
Screw
★★★★★
★★★★★
(1)
PartSelect #: PS11757587
Manufacturer #: WPY706189
$8.04
  In Stock
Glass Carousel Tray – Part Number: WP56001043
Glass Carousel Tray
PartSelect #: PS11742844
Manufacturer #: WP56001043
This turntable tray is thirteen inches in diameter, and is made of glass.
$53.60
  Special Order
Charcoal Filter – Part Number: WP56001084
Charcoal Filter
PartSelect #: PS11742846
Manufacturer #: WP56001084
This charcoal air and grease filter is a little over ten inches long. It has a metal perimeter, a metal mesh exterior, and a black charcoal interior.
$19.63
  In Stock
Glass Turntable Tray – Part Number: 56001082
Glass Turntable Tray
PartSelect #: PS2052555
Manufacturer #: 56001082
This turntable tray is eleven inches in diameter. It is made entirely of glass.
  No Longer Available

Common Symptoms of models starting with CMV

[Viewing 3 of 3]
No heat
Fixed by
these parts
Fixing
Show All
Won’t turn on
Fixed by
these parts
Fixing Fixing
Show All
Tray won’t turn
Fixed by
these parts
Fixing Fixing
Show All
Keep searches simple. Use keywords, e.g. "leaking", "pump", "broken" or "fit".
light bult needed to be replaced
The nightmare was that this microwave is installed under the cabinet....in order to get to the light bulb I had to pull out my stove then squeeze into the space between the stove and counter....my old microwave light bult was much easier to change.....Shame on Whirlpool for making this so difficult.....must be a better way to cover the light bulb so that we do not need a screwdriver to remove the door to get to the light bulb
Parts Used:
Light Bulb - 40W
  • Deborah from Millersville, MD
  • Difficulty Level:
    Difficult
  • Total Repair Time:
    Less than 15 mins
  • Tools:
    Screw drivers
202 of 295 people found this instruction helpful.
Was this instruction helpful to you?
Thank you for voting!
Bulb "burnt out"
Removed 1 screw, removed "burnt out" bulb and replaced it with new bulb.
Parts Used:
Light Bulb - 40W
  • Joseph from Pembroke, MA
  • Difficulty Level:
    Really Easy
  • Total Repair Time:
    Less than 15 mins
  • Tools:
    Screw drivers
93 of 146 people found this instruction helpful.
Was this instruction helpful to you?
Thank you for voting!
Turntable on Maytag MMV5100AAW Stopped Turning
Symptom: Turntable stopped turning. Was able to remove the glass tray in the microwave and the little cam that drives the glass tray was barely turning. Control on microwave to turn the turntable on/off was working as evidenced by the cam not turning when I turned off the turntable. When I turned the cam manually, I could feel the motor turn so I knew the CAM and motor shaft were not stripped.

Repair Procedure:
1) Unplug the microwave.
2) Remove the 4 screws from the bottom of the microwave while holding the bottom cover so that it does not suddenly drop. It is not very heavy so you are fine to hold it with one hand and unscrew the screws with the other. Don't drop it as it has a glass lens for your lights and two light bulbs that light up the cooktop below.
3) Swing the front of the cover down slowly. You wil notice that the back is held in by tabs that slide into the back of the microwave. The bottom cover comes off very easily with some forward motion to dislodge the tabs.
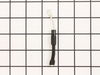
4) Now look up under the bottom of the microwave(assuming your microwave is mounted over the range like mine) and you will see the turntable motor (GEAR MOTOR) in the center.
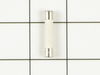
5) Carfully remove the two wires from the motor by gently working the connectors off of the motor using neegle nose or regular pliers. Don't grab the wires as you may pull them out of the connectors. Work with the connectors on the motor terminals. You will find the job much easier to do if you also remove the wires from the light housing. This will allow you to set the bottom cover aside and will give you greater access to do the job.

NOTE: Now is a great time for you to clean the filters, filter slots, bottom cover, and the light lens. A lot of grease can accumulate on the bottom of the microwave if it is mounted over a range (like mine). If you remove the light assembly, you can clean the cover, filters, and and light lens in the sink. Make sure that you dry all components thoroughly before re-assembling.
6) Make a note of which wires go to which terminals on the motor and the lights.
7) Remove the two screws from the motor and remove it. Note that there is a little plastic insulator film, a very thin washer and a bushing associated with the motor. You will want to re-install these with the new motor. Replace the motor with the new one being careful to put the other pieces back in place as well. Note that the little black turntable cam has a tab on one side so if you want to put it out of the top, you will need to tilt it slightly.
8) With the motor and associated parts back in and secured with the two screws previously removed, re-attach the wires to the lights and motor.
9) Replace the cover and screws and you are done!

This repair is much easier than these steps would suggest but I wanted to be thorough.

I called Maytag and they refused to sell me the part because they said it was dangerous for the user to replace it - rubbish. As long as you kill the power to the microwave and confine your work to the bottom of the unit as described, you will be fine. Maytag wanted to send out a repairman at $80 just to show up. I did the entire repair myself in about 15 minutes for about $40.
Parts Used:
Turntable Drive Motor
  • Tim from Oviedo, FL
  • Difficulty Level:
    Easy
  • Total Repair Time:
    Less than 15 mins
  • Tools:
    Pliers, Screw drivers
46 of 47 people found this instruction helpful.
Was this instruction helpful to you?
Thank you for voting!