


Models
>
253963
253963 Kenmore Refrigerator - Overview
Models starting with 253963
Click on the best match to narrow your results.
- 2539631000 Kenmore Refrigerator
- 2539631001 Kenmore Refrigerator
- 2539631002 Kenmore Refrigerator
- 2539631010 Kenmore Refrigerator
- 2539631011 Kenmore Refrigerator
- 2539631012 Kenmore Refrigerator
- 2539631060 Kenmore Refrigerator
- 2539631080 Kenmore Refrigerator
- 2539631081 Kenmore Refrigerator
- 2539631082 Kenmore Refrigerator
- 2539631090 Kenmore Refrigerator
- 2539631091 Kenmore Refrigerator
- 2539631092 Kenmore Refrigerator
- 2539639000 Kenmore Refrigerator
- 2539639001 Kenmore Refrigerator
- 2539639002 Kenmore Refrigerator
- 2539639003 Kenmore Refrigerator
- 2539639010 Kenmore Refrigerator
- 2539639011 Kenmore Refrigerator
- 2539639012 Kenmore Refrigerator
- 2539639013 Kenmore Refrigerator
- 2539639060 Kenmore Refrigerator
- 2539639080 Kenmore Refrigerator
- 2539639081 Kenmore Refrigerator
- 2539639082 Kenmore Refrigerator
- 2539639083 Kenmore Refrigerator
- 2539639090 Kenmore Refrigerator
- 2539639091 Kenmore Refrigerator
- 2539639092 Kenmore Refrigerator
- 2539639093 Kenmore Refrigerator
Keep searches simple, eg. "belt" or "pump".

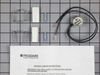
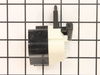
Defrost Timer - 60Hz 120V
PartSelect #: PS423801
Manufacturer #: 215846602
This Defrost Timer works like a clock by switching on the defrost heater circuit after a predetermined amount of compressor run time. This allows the defrost circuit to clear the evaporator of ice or ...
$38.64
In Stock

Run Capacitor
PartSelect #: PS2333670
Manufacturer #: 5304464438
The run capacitor helps the compressor kick on and off while maintaining a constant temperature in your fridge and freezer. You may need to replace your run capacitor if your refrigerator or freezer s...
$53.53
In Stock

Light Bulb
PartSelect #: PS12751166
Manufacturer #: 316538904
This OEM 40 watt appliance light bulb is used for some ranges, refrigerators, freezers, and microwaves. Simply locate the existing bulb, unscrew it from its socket, and replace with new light bulb. If...
$19.73
In Stock

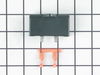
Defrost Thermostat
PartSelect #: PS469269
Manufacturer #: 5303917954
This limiter thermostat cuts out when the temperature inside your refrigerator reaches 55 degrees Fahrenheit and kicks back in when the internal temperature drops to 20 degrees Fahrenheit. If you disc...
$22.68
In Stock

Crisper Drawer Cover Support
PartSelect #: PS461210
Manufacturer #: 5303288973
This is the replacement crisper drawer cover support for your refrigerator. The crisper shelf rests on the support, which keeps it level. If your drawer cover or shelf will not stay level, or will not...
$28.21
On Order

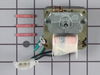
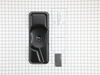
Evaporator Fan Motor Kit
PartSelect #: PS450319
Manufacturer #: 5300158289
The evaporator fan motor kit is specifically made for your refrigerator to run the evaporator fan in your refrigerator. It is mounted on the center hub and has three lead wire terminals; its shaft has...
$101.85
In Stock

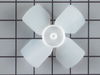
Evaporator Fan Blade
PartSelect #: PS473177
Manufacturer #: 5308000010
This evaporator fan blade is a genuine OEM part that is sourced directly from the manufacturer. The evaporator fan blade circulates air through the refrigerator to control the amount of cold air goes ...
$47.83
In Stock

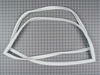
Fresh Food Door Gasket
PartSelect #: PS428570
Manufacturer #: 218730609
This white fresh food door gasket is used to seal the refrigerator door when closed to keep the cool air inside and the room air out.
$146.58
In Stock

Hexagonal Screw
PartSelect #: PS1526503
Manufacturer #: 241710601
Sold individually.
$11.21
In Stock

Table-Type Freezer Wire Shelf
PartSelect #: PS460028
Manufacturer #: 5303282284
Sold individually. NOTE: For 18 cubic feet refrigerator model order part # 240358005 for the shelf and part# 3201150 end caps, quantity 4.
$77.35
In Stock

Ice Cube Tray
PartSelect #: PS423293
Manufacturer #: 215667501
The ice cube tray is made of plastic, is white in color, and is sold individually. This is a part for your freezer. The ice cube tray is sturdy but flexible to allow you to easily release the ice once...
$7.75
In Stock

Common Symptoms of models starting with 253963
[Viewing 18 of 18]Fridge too warm
Fixed by
these parts
these parts

Show All
Freezer section too warm
Fixed by
these parts
these parts
Show All
Freezer not defrosting
Fixed by
these parts
these parts
Show All
Noisy
Fixed by
these parts
these parts
Show All
Will Not Start
Fixed by
these parts
these parts
Show All
Fridge and Freezer are too warm
Fixed by
these parts
these parts
Show All
Fridge runs too long
Fixed by
these parts
these parts
Show All
Too warm
Fixed by
these parts
these parts
Show All
Leaking
Fixed by
these parts
these parts
Show All
Won’t start
Fixed by
these parts
these parts
Show All
Freezer too cold
Fixed by
these parts
these parts
Show All
Fridge too cold
Fixed by
these parts
these parts
Show All
Light not working
Fixed by
these parts
these parts

Show All
Frost buildup
Fixed by
these parts
these parts
Show All
Door Sweating
Fixed by
these parts
these parts

Show All
Doesn’t stop running
Fixed by
these parts
these parts
Show All
Door won’t open or close
Fixed by
these parts
these parts
Show All
Clicking sound
Fixed by
these parts
these parts
Show All


Keep searches simple. Use keywords, e.g. "leaking", "pump", "broken" or "fit".
Fridge got warm and freezer coils were frosted
Fridge is a side by side. The freezer is pretty narrow for a guy with wide shoulders.
Pulled plug.
Had to remove bottom drawers then used nut driver to remove screws closest to back wall in drawer runners. Once the back screws were removed the runners could be swung up or down out of way so back cover could be re ... Read more moved.
Once back cover was removed thermostat was located attached to top pipe going into coil using a spring clamp.
Cut the wires just outside the crimp connectors going into thermostat. Released the spring clamp buy squeezing botton together.
Removed old badly corroded thermostat.
I wish I had attached the crimp connectors to the new thermostat wires before mounting it. Reaching way in the back, while turning shoulders verticly and trying to get the wire connectors set from both sides was awkward and uncomfortable...The biggest PIA of the whole task.
Once connected I let the fridge (thermostat) cool for 10 min. Turned the dial defrost timer to get it into defrost mode. Stupidly touched the heating element to see if it was getting warm...it was very hot.
Coils steamed...every looked like it was working. Unplugged, put back cover back on and retattached drawer mounts.
Plugged back in and everying is working great!
Read less
Parts Used:
-
Stephen from Warrington, PA
-
Difficulty Level:Easy
-
Total Repair Time:30 - 60 mins
-
Tools:Nutdriver, Pliers, Screw drivers
337 of 401 people
found this instruction helpful.
Was this instruction helpful to you?
Thank you for voting!
Noisy fan
1. Removed the 7 nuts using the nut driver from the freezer back panel inside the freezer.
2. Remove the back panel. The evaporator motor and fan are located above the coils.
3. Unplug the wiring harness.
4. Remove the two gold mounting screws holding the motor and fan in place.
5. Remove the motor and fan including th ... Read more e brackets.
6. Install the new motor and fan onto the mounting bracket.
6a. Attach the green ground to the mounting bracket.
7. Screw the two gold screws back into the freezer.
8. Attach the new wiring harness. Note, the old harness had a mounting hole/space for it to connect to the wiring harness of the freezer. The new motor's harness was not long enough for this, so it is connected freely to the freezer harness.
9. Use the hair dryer to melt any ice that may have formed on the coils and hole where the fan goes.
10. Turn the freezer on to see if the fan turns on.
11. Reinstall the back panel.
All done!
Read less
Parts Used:

-
Jordan from Maumee, OH
-
Difficulty Level:Easy
-
Total Repair Time:1- 2 hours
-
Tools:Nutdriver
153 of 179 people
found this instruction helpful.
Was this instruction helpful to you?
Thank you for voting!
Clicking sound then within a minute clicking again, not cooling.
UNPLUG REFRIGERATOR. Carefully remove relay from the side of the compressor. You shouldn't need a tool to do this, if it is hard you can gently pry the edge with a flat head screw driver just to loosen. Unplug white and red wires from relay, noting that the white wire goes in the hole with a #2 stamped beside it. Shake old relay, if it r
... Read more
attles like a baby rattler then it's most likely the problem. Replace wires into the new relay and plug back into the compressor.
Read less
Parts Used:
-
Melvin from Semmes, AL
-
Difficulty Level:Easy
-
Total Repair Time:Less than 15 mins
79 of 93 people
found this instruction helpful.
Was this instruction helpful to you?
Thank you for voting!