This 10 by 5 inch ice maker (Electromechanical Icemaker Kit, Ice Maker Assembly) produces ice. This particular model will produce seven crescent shaped cubes every cycle. It is constructed of plastic ...
$216.23
In Stock
Order within the next 12 hrs and your part ships today!
This “Dispenser Door Assembly” (Door Recess Assembly, Ice Door Assembly, Dispenser Door, Refrigerator Dispenser Ice Chute Door Kit, Dispenser Door Flap, Ice Chute Door, Flapper) keeps the room air fro...
$15.58
In Stock
Order within the next 12 hrs and your part ships today!
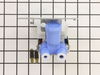
This valve comes with 1/4" compression inlet.
NOTE: This part comes with new quick connections. To install - cut retaining nuts off of existing plastic water lines and gently push them into new valv...
$61.57
In Stock
Order within the next 12 hrs and your part ships today!
The interior light of your refrigerator is controlled by a switch that is activated when the door is opened and closed. If your refrigerator light will not turn on, there could be an issue with the sw...
$8.56
In Stock
Order within the next 12 hrs and your part ships today!
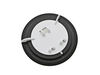
This defrost timer will cycle for 25 minutes after every six hours of run time. The timer itself is made of plastic, and its terminals are bent, the leads are internal, and the label is orange. If you...
$93.29
In Stock
Order within the next 12 hrs and your part ships today!
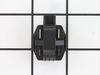
This part is the replacement compressor start relay for your refrigerator. It is made of black plastic and is approximately 1 ¼ inches long and 1 inch wide. The compressor start relay attaches to the ...
$16.90
In Stock
Order within the next 12 hrs and your part ships today!
Questions And Answers for ZISW42DWA
Ask our experts a question about this model and we'll get back to you as soon as possible!
2 questions answered by our experts.
Sort by:
< Prev
1
Next >
Search filter:
Clear Filter
Your search term must have 3 or more characters.
Keep searches simple. Use keywords, e.g. "leaking", "pump", "broken" or "fit".
Sorry, we couldn't find any existing answers that matched.Try using some different or simpler keywords, or submit your new question by using the "Ask a Question" button above!
John
January 8, 2020
The water dispenser in the door is dripping water from the tube
For model number ZISW42DWA
Hello John, thank you for your question. This usually means there is an issue with the dispenser crank, micro switch or water valve. We would recommend testing/replacing those parts. I hope this help!
1 person found this helpful.
Was this helpful?
Thank you for voting!
Mick
February 16, 2023
I replaced the ice maker several years ago with the unit purchased from you. The ice maker fills too full causing the ice cubes to freeze together and jamming the dispenser. Is there a repair or setting?
For model number ZISW42DWA
Hi Mick, thank you for reaching out. According to our research, you may need to check the water pressure and the water line, it should not be freezing. If it is fine then you may need to check the following parts to fix the issue: water inlet valve, part number PS901314, ice fill tube, part number PS299175, and ice maker assembly, part number PS1993870. We hope this solves your problem!
1. Turn off water supply, and electrical ( unplug it) to fridge. 2. Remove water line to valve. Watch for water to pour out of the line. Have a towel handy. 3. Remove the cardboard cover on the bottom of the fridge. 4. Remove the screws that hold the valve in place. 5. Remove the valve, be careful the waterlines ar
... Read moree still attached. 6. Place a towel under valve to catch any water that leaks out from water lines. 7. Remove electrical lines, make sure to mark which went where. One is for the ice, and one is for the water. Make sure the power is off, there is 120 volts present at those connections. - now my waterlines attached using a compression type fitting. The new valve I got used just a push in type of attachment. But, easy enough I just removed the pieces for the compression and the waterlines pushed right in and worked fine. - the mounting harness for the valve was alittle different but the parts I need were in the right location and she fit in fine. 8. Attach water lines. They are different sizes so you can't get those mixed up. 9. Attach electrical lines. - the new valve came with adaptors for my electrical connection. Just snapped them on and kept on going. 10. turn on watersupply for fridge. Plug it back in. 11. Test for leaks, and proper operation. ie. When you push the water does the water valve open? 12. Unplug fridge 13. Now is a good time to clean out any dust or dirt that has accumallated in under around your fridge. 14. reassemble, valve, then cover. move fridge back into place. 15. Plug fridge back in. 16. Take a clean glass. 17. Fill with water from the front. 18. Take full glass of water and go watch tv. You've earned it, and saved yourself probably $100.00 in labor costs. Good Job.
I applied some tips learned by reading other reviews. So before I started I grabbed my trusty vise grip pliers and a small screw driver. I locked onto the switch actuator, the part that the refrigerator door pushes in, with the vise grips and pulled on it just hard enough to get the screw driver inserted in the right side to push in the c
... Read moreatch clip so the switch could be pulled out further each time the catch clip was depressed to the next detent. Then I used the screw driver on the left site to encourage the switch past the detents on the left and very quickly the switch was out of the mount. The wires from the refrigerator pulled out with the old switch. I unplugged the old switch from the wires and plugged in the new switch and shoved the new switch back into the mount, wiggled it a couple of times to make sure it was secure and the job was done. Once I applied the vise gripes at first, the whole job took less than a minute.
1) Turn off water line and unplug power. 2) Pop off front panel plate at ice cube select switch area. 3) Unscrew 4 screws that holds control panel housing in place. 4) Remove panel assembly by disconnecting two different wiring plugs. 5) Unscrew 2 screws that allows access to control circuit board at end cap. 6) R
... Read moreemove circuit board by sliding it out of the assembly housing. 7) Install new circuit control board in assemble housing and screw on end cap retainer. 8) Attach two electrical wiring plugs. 9) Install control board assemble housing into frig opening and secure with 4 screws. 10) Install front panel plate (pops on). 11) Plug in power and turn on water line.