


Appliance Parts
- Accessories
- Dishwasher
- Dryer
- Stove / Oven
- Microwave
- Refrigerator
- Washer
- See more... See less...
Lawn Equipment Parts
- Lawn Mower
- Chainsaw
- Blower
- Generator
- Air Compressor
- Lawn Tractor
- Pressure Washer
- See more... See less...
Shop With Confidence


How To Fix A Dryer That's Not Producing Heat

Click a Part Below to Start Your Repair:
Heating Element High Limit Thermostat Cycling Thermostat Igniter Radiant Flame Sensor Gas Control Valve Coils Temperature Sensor Timer Thermal FuseAbout this repair:
- Rated as EASY
- 3049 repair stories
- 43 step by step videos
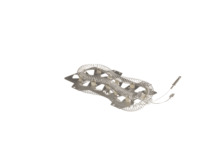
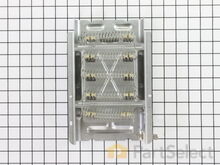
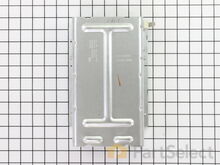
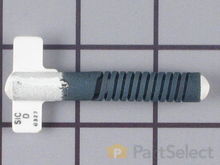
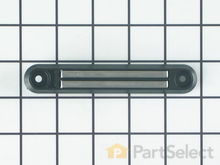
Heating Element
In electric dryers, heat is generated by the heating element. The element is a coil of heating wire enclosed in a metal chamber. Electric current flowing through the coil creates heat and the air being pulled through the chamber absorbs this heat. If the element is defective, then it will not heat.
How to test a dryer’s heating element with a multi-meter:
- Disconnect your dryer from the power source and locate the heating element. Depending on your model, you may need to open your dryer’s cabinet to access the heating element.
- Remove the heating element from the dryer and visually inspect it for signs of damage or burning.
- Set your multi-meter to the Rx1 setting and touch the probes to element terminals to test for continuity.
- If you receive a reading of infinity, you need a replacement heating element.
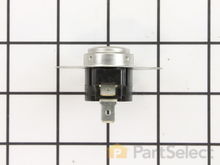
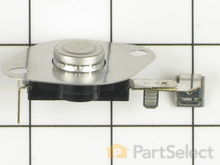
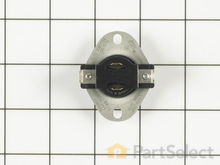
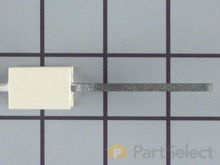
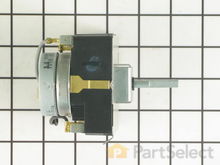
High Limit Thermostat
The high limit thermostat is a safety device mounted on the heating chamber and is designed to prevent the dryer from overheating when the exhaust vent is restricted. A restricted vent will cause the high limit thermostat to trip or activate, interrupting the circuit to the heating element or gas valve. The high limit thermostat is not designed to activate repeatedly like a cycling thermostat and will eventually fail causing a no heat symptom.
How to test a dryer’s high limit thermostat with a multi-meter:
- Unplug your dryer and open your dryer’s cabinet to locate the high limit thermostat. It will be found somewhere in the path of air leaving the drum, often on the blower wheel housing or inside the exhaust system.
- Carefully remove the thermostat from the dryer to test it.
- With your multi-meter on the Rx1 setting, test for continuity by touching the probes to each terminal. You should receive a reading of zero or infinity.
- If your test does not produce either of those readings, you need a replacement high limit thermostat.
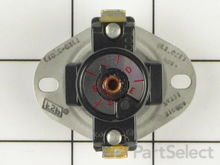
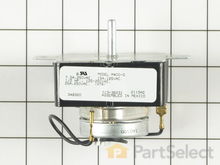
Cycling Thermostat
Cycling thermostats control the temperature inside the dryer drum. They are designed to "cycle" the heating element on and off to maintain the correct amount of heat. Cycling thermostats are normally located on the blower housing or elsewhere in the internal airflow ducting. Over time, the cycling thermostat can become defective.
How to test a dryer’s cycling thermostat with a multi-meter:
- After disconnecting your dryer from the power source, locate your cycling thermostat. It is often found on the blower housing or elsewhere in the internal airflow ducting. You will need to open your dryer’s cabinet to locate it.
- Using pliers to gently pull on the metal connectors and not the wires, remove the cycling thermostat.
- Set your multi-meter to the Rx1 setting.
- Touch the probes to the thermostat’s terminals. You are testing for continuity and should receive a reading of infinity or zero.
- If your reading is anything other than infinity or zero, you need a replacement cycling thermostat.
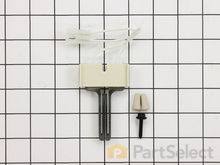
Igniter
Newer gas dryers have an igniter or glow bar, which ignites the gas released by the gas valve. When the dryer is calling for heat, the igniter will begin to glow as it heats up. When maximum temperature is reached, the gas valve will open and the gas will be ignited.
How to test a dryer’s ignitor with a multi-meter:
- Disconnect your dryer from the power source as well as the gas source prior to starting.
- After opening your dryer’s cabinet, locate your igniter. It is usually located next to the gas valve burner tube and will be coil-shaped or flat, depending on your model.
- Very carefully remove the igniter to test it. Igniters are very fragile and should be handled accordingly.
- With your multi-meter on the lowest setting for resistance, test your igniter for continuity by touching the probes to the terminals.
- If you receive a reading of 50-400 ohms, your igniter has continuity. If your test produces any other reading, you need a replacement igniter.
Radiant Flame Sensor
The radiant sensor or flame sensor is designed to sense heat from either the igniter or the burner flame in gas dryers. The sensor detects heat from the igniter to open the gas valve, also detects heat from the burner flame to keep the valve open. If the sensor is defective, either the igniter won’t glow, or the gas valve won’t open. If the igniter does not glow, then you should check the radiant sensor for continuity with a multi-meter. If the igniter glows continuously and the gas valve does not open to light a flame, then the electrical contacts inside the sensor may be stuck closed and the sensor will need to be replaced.
How to test your dryer’s radiant flame sensor with a multi-meter:
- After unplugging your dryer and disconnecting the gas hose, open your dryer’s cabinet to locate the radiant flame sensor. It will be found next to the igniter.
- Carefully remove the radiant flame sensor from the dryer in order to test it.
- Touching each of the probes to the terminals, with your multi-meter on the Rx1 setting, you are looking for a reading of zero.
- If you do not receive a reading of zero, you need a replacement radiant flame sensor.


Gas Control Valve
In gas dryers, an integral part of the gas burner system is the gas valve. The flame sensor and igniter circuit provide power to the gas valve. When this circuit is complete, the coils will be energized, and the valve will open releasing gas into the burner where it ignites. A symptom of a defective valve is an igniter that glows but then shuts off without a flame being produced. The valve may also function correctly at the beginning of the drying cycle but can fail later into the drying cycle resulting in not enough heat being produced to dry clothing properly.
How to test your dryer’s gas control valve with a multi-meter:
- Disconnect the gas hose and power source from the dryer.
- Remove the lower access panel from the dryer to access the gas control valve.
- After removing the gas control valve, remove the coils from the valve.
- With your multi-meter on the Rx1 setting, touch the probes to the coil’s terminals. You are testing for continuity and should receive a reading of 1000-2000 ohms.
- If you receive the reading above, your coils are not defective, and you may need a replacement gas control valve.


Coils
Modern gas dryers have electric coils that operate the gas valve. They are located on top of the gas valve and are controlled by the heat circuit. If one or more of the coils are not working, then the gas valve won’t open, and you will have a no heat symptom. The coils may function normally at the beginning of a cycle but may fail later on as they heat up internally.
How to test dryer coils with a multi-meter:
- After disconnecting the gas hose and unplugging the dryer, remove the lower access panel to locate the gas control valve.
- Remove the coils from the gas control valve.
- Set your multi-meter to the Rx1 setting and test for continuity by touching the coil’s terminals with the probes.
- If you receive any reading other than 1000-2000 ohms of resistance, you need replacement coils.


Temperature Sensor
Temperature sensors are devices that change resistance depending on the temperature. The internal temperature of gas and electric dryers is managed by cycling thermostats on most dryers and by temperature sensors on some electronic controlled dryers. Depending on the dryer it may use multiple sensors to regulate the temperature.
How to check your dryer’s temperature sensor with a multi-meter:
- Disconnect your dryer from the power source.
- Open your dryer’s cabinet in order to locate the temperature sensor(s). It will be found somewhere along the path of airflow from the drum.
- Carefully remove the temperature sensor and allow it to rest to ensure it is at room temperature, as you need to test the resistance at room temperature.
- Using a multi-meter on the Rx1 setting, touch the probes to the terminals. If you receive a reading of anything other than zero, you need a replacement temperature sensor(s).


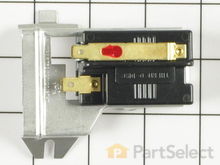
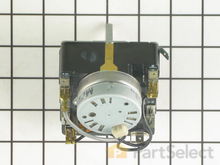
Timer
Located in the control console of the dryer the timer consists of a small motor connected to a series of gears that rotate cams, which turn electric contacts off and on inside the timer. The timer contacts control the dryer motor as well as the heat circuit. A defect in the timer’s electrical contacts can cause the dryer to stop producing heat and the timer will need to be replaced.
How to test a dryer’s timers with a multi-meter:
- After unplugging your dryer, remove the control console in order to locate the timer. Depending on your model, you may be able to remove it at this stage, but on some models, you will also need to remove the rear panel.
- After removing the timer from your dryer, use a multi-meter on the Rx1 setting to test for continuity by placing the probes on the timer’s terminals.
- If you receive a reading of anything other than 2000-3000 ohms of resistance, you need a replacement timer.
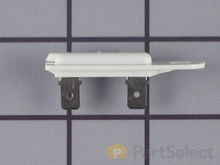
Thermal Fuse
The thermal fuse is designed to prevent the dryer from overheating. Once a dryer's thermal fuse has blown, it is no longer of any use. If your dryer's fuse is blown, you will have to replace it.
How to test if a dryer’s thermal fuse has blown:
- Unplug your dryer and remove the back panel to access the thermal fuse(s).
- Remove the thermal fuse(s) from the dryer to test it. It is usually found on the heating element and/or blower housing.
- Using a multi-meter on the Rx1 setting, touch the terminals with the probes to test for continuity.
- If you receive a reading other than zero or infinity, there is no continuity and you need a replacement thermal fuse(s).


More Repair Parts
Still not sure which part is broken? We can offer you custom troubleshooting help if you search with your model number.
