


Appliance Parts
- Accessories
- Dishwasher
- Dryer
- Stove / Oven
- Microwave
- Refrigerator
- Washer
- See more... See less...
Lawn Equipment Parts
- Lawn Mower
- Chainsaw
- Blower
- Generator
- Air Compressor
- Lawn Tractor
- Pressure Washer
- See more... See less...
Shop With Confidence


How To Repair A Leaking Dishwasher

Click a Part Below to Start Your Repair:
Pump Door Gasket Water Inlet Valve Dispensers & Grommets Spray Arm Float & Float Switch Hose Clamps & HosesAbout this repair:
- Rated as EASY
- 1324 repair stories
- 6 step by step videos
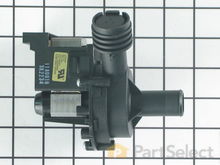
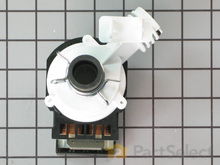
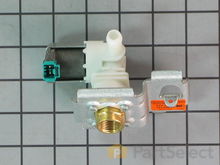
Pump
A defective pump and/or pump seal may be the cause of a dishwasher leak. The function of the pump is to circulate water in the dishwasher and in some models, to drain the water as well. The pump typically consists of two separate compartments; one for wash or circulation and the other for draining. The circulation part of the pump will typically consist of the wash impeller and the filter components while the drain portion will consist of a drain impeller and a chopper blade or in some cases, a solenoid operated diverter.
How to test a dishwasher pump with a multimeter:
- Disconnect the power from your appliance before beginning.
- On most models, the pump will be found behind the lower access panel. Locate and remove your dishwasher pump in order to test it.
- To test for continuity, set your multimeter to Rx1 and touch the terminals with the probes. This test should produce a reading of exactly or nearly zero. You should also check the ground connection of the pump. To do this, leave one probe on the terminal and touch the other to the bare metal housing of the pump. This test should not produce any reading.
- If your readings differ from the results above, you will need a replacement pump.

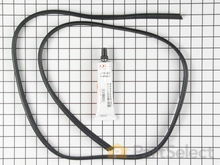
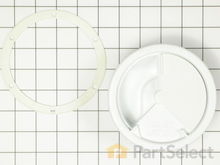
Door Gasket
If water appears to be leaking around the front of the dishwasher, the problem may be with the door gasket. The dishwasher door gasket or seal is normally made of soft rubber or vinyl and goes around the door or tub opening of the dishwasher, creating a watertight seal. Some dishwasher models have rubber baffles located at the bottom corners of the tub opening that prevent water leaking in that area. When vinyl or rubber ages, it can become less flexible or even brittle and may damage easily or not seal properly.
How to inspect a door gasket on a dishwasher:
- Open your dishwasher door to locate the door gasket, and baffles if applicable.
- Visually inspect the gasket for any signs of wearing, damage, missing pieces, or misalignment.
- If you find any of the above, you will need a replacement door gasket.


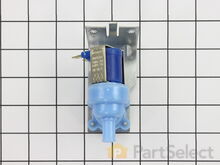
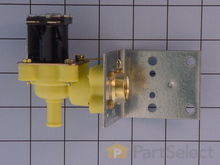
Water Inlet Valve
The water inlet valve feeds the water from your home’s main water line into the dishwasher and could be the source of a leak. The inlet valve can be found behind the lower kick plate. The hot water inlet supply to the valve may be copper tubing, rubber hose or braided hose.
How to test a dishwasher water inlet valve:
- Similar to most other inspections, begin by disconnecting your appliance from both the power and the water source.
- In order to access the water inlet valve, you will need to remove the lower access panel of your appliance. The valve will likely be located on the left side.
- Begin by inspecting the body of the valve. You are looking for any signs of cracking, damage, wear, or any other indication of a leak.
- If you find any of the above, you will need a replacement water inlet valve.
Dispensers & Grommets
The detergent dispenser and the rinse aid dispenser are normally located on the inner door panel of the dishwasher. Some models use a dispenser assembly that is attached to the panel with screws and a gasket to seal against water leaks. Other models may use a dispenser that is molded into the door panel but uses a dispenser latch assembly that is attached to the back of the inner panel and use a rubber grommet to seal around the dispenser latch where it protrudes through the door panel. If you have a water leak that appears to come from the front of your dishwasher, the dispenser gasket or the dispenser latch grommet may be the cause.
How to inspect a dishwasher detergent/rinse aid dispenser & grommets:
- For safety, unplug your dishwasher before beginning.
- Open the dishwasher door to visually inspect the dispenser.
- First, inspect the lever for cracking or damage, a broken lever would prevent the dispenser from opening or closing properly. Next, inspect the dispenser cover for any wear or damage. Finally, inspect the container itself for cracks or other damage.
- If you find any issues while performing the inspections above, you will need a replacement dispenser.


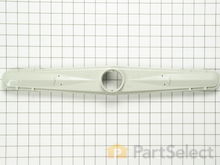
Spray Arm
Water is forced through the dishwasher spray arms to spray water and detergent around the dishwasher. All dishwashers have a lower spray arm located at the bottom of the dishwasher, and some dishwashers also have middle or upper spray arms located below the top dish rack or at the top of the dishwasher tub. Most spray arms are made of plastic which can crack or warp enough to change the spray pattern significantly. Metal spray arms can become damaged or separate at the seams which can also alter the spray pattern. These conditions can cause water to be directed at the bottom of the door where there is no gasket and therefore creating a water leak.
How to inspect dishwasher spray arms:
- While not crucial, we recommend you unplug your dishwasher before starting this inspection.
- Begin by inspecting the arms for any signs of cracking, wear, or any other damage.
- Next, manually spin the spray arms. You should be feeling to see if there is any resistance, if they are wobbling, or if they hit the dish racks. Additionally, inspect to see if any of the holes in the arms are clogged, clear out anything you may find.
- If you find any of the issues described above, you will need replacement spray arms.

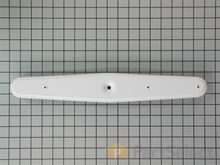
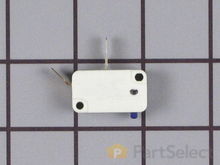
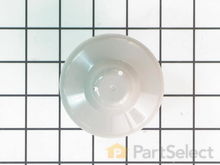
Float & Float Switch
The float and float switch are used as a safety device to prevent the dishwasher from overfilling with water. The float is located inside of the tub at the bottom of the dishwasher and the float switch is located beneath the tub directly below the float. The float lifts as the water level in the dishwasher rises, and when the proper water level is reached, the stem of the float activates the float switch to turn off the water inlet valve. A malfunctioning float or float switch could cause the water level to be too high and create a leak. The proper water level is normally just to the heating element on the bottom of the tub. If the water level in your dishwasher is too high, then you should suspect that the float or float switch may be the cause of the problem.
How to test a dishwasher float switch with a multimeter:
- Disconnect your dishwasher from the power source as well as the water supply.
- The float switch will be found inside your dishwasher’s tub; you will need to remove the lower access panel to access it. The switch is usually located directly below the float assembly, once you have located it, remove it in order to test it.
- Using a multimeter set to Rx1, touch the switch’s terminals with the probes to test for continuity. You should receive a reading of zero or infinity. With the probes still touching the terminals, press in on the switch’s button, this should change it to the opposite extreme (from zero to infinity, or infinity to zero).
- If your test results differ from those above, you will need a replacement float switch.

Hose Clamps & Hoses
The hose clamps secure the drain hose and the circulating hose to the dishwasher pump. These hoses and clamps can be found by removing the kickplate at the bottom of the dishwasher. If the clamps have come loose or the hoses have cracks in them, it could be the cause of a leak. Be sure to check the clamps on both the drain hose and the circulating hose.
How to inspect dishwasher hoses:
- Disconnect the water supply as well as the power source from your appliance before beginning.
- The hoses are usually found behind the lower access panel (or kickplate). You will need to remove this in order to locate them.
- You will be checking two hoses, both of which are connected to a pump below the lower spray arm: The drain hose and the recirculation hose. Remove both hoses in order to inspect them.
- Visually inspect the hoses for any signs or wear, cracking, or damage. Attempt to run water through each to identify if there is a blockage inside the hose.
- If you find any issues while performing the inspection above, you will need a replacement hose.


More Repair Parts
Still not sure which part is broken? We can offer you custom troubleshooting help if you search with your model number.
