


Appliance Parts
- Accessories
- Dishwasher
- Dryer
- Stove / Oven
- Microwave
- Refrigerator
- Washer
- See more... See less...
Lawn Equipment Parts
- Lawn Mower
- Chainsaw
- Blower
- Generator
- Air Compressor
- Lawn Tractor
- Pressure Washer
- See more... See less...
Shop With Confidence


Instant Repairman
Enter your model number and our Instant Repairman will help diagnose and fix your appliance
Checking dishwasher spray arms for leaks:
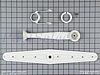 | Checking a spray arm for blockage
To check a dishwasher spray arm as a possible cause for leaks you will first need to open the dishwasher door and remove the lower dish rack. Rotate the lower spray arm and check the seams for any signs of cracks and also look for any blocked holes. The spray arms should rotate freely and not contact the racks or the tub. The lower spray arm rotates on the spray arm bearing and can normally be removed for closer inspection by removing the retainer nut or center spray nozzle first. Some lower spray arms simply snap onto the plastic bearing assembly while other models may use the cover of the filter housing as a retainer for the lower spray arm. Middle spray arms are normally attached to the bottom of the upper rack and you may need to remove the rack stops and the rack to properly inspect the spray arm. Upper spray arms are normally attached to a bearing and retainer affixed to the top of the dishwasher tub by either a plastic nut or a single screw. With the spray arms removed, inspect the holes for any signs of wear or blockage. Carefully remove any foreign objects by pulling them out through the holes if possible rather than pushing them back into the spray arm and then flush any remaining debris with water. Look carefully at the seams where the top and bottom are joined together for any signs of separation or cracks and replace if necessary. Dishwasher spray arms are removeable. You can take them out and clean them, or you can take them out to replace with new ones. | ||
