


Models
>
TFX27FHD
TFX27FHD General Electric Refrigerator - Overview
Sections of the TFX27FHD
[Viewing 5 of 5]


Keep searches simple, eg. "belt" or "pump".

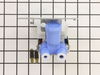
Dual Inlet Water Valve
PartSelect #: PS901314
Manufacturer #: WR57X10051
This valve comes with 1/4" compression inlet.
NOTE: This part comes with new quick connections. To install - cut retaining nuts off of existing plastic water lines and gently push them into new valv...
$61.57
In Stock

Union Connector - 5/16 Inch to 5/16 Inch
PartSelect #: PS758446
Manufacturer #: WR02X11330
Quick connector for plastic water line - 5/16" to 5/16"
$9.03
In Stock

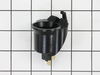
Light Switch
PartSelect #: PS8758429
Manufacturer #: WR23X10725
The interior light of your refrigerator is controlled by a switch that is activated when the door is opened and closed. If your refrigerator light will not turn on, there could be an issue with the sw...
$8.56
In Stock

Light Bulb - 40W
PartSelect #: PS217532
Manufacturer #: 40A15
This 40-Watt light bulb is sold individually and is a genuine OEM replacement option for your home appliances. It is specially designed to withstand extreme temperatures, so this bulb is compatible wi...
$11.02
In Stock

Package of 12 Screws
PartSelect #: PS312573
Manufacturer #: WZ4X244D
This is a package of twelve Phillips-head screws. They can be used as replacement screws in refrigerators, ice makers, or freezers. Be sure to check that your appliance model is compatible with these ...
No Longer Available

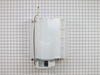
Light Socket
PartSelect #: PS299782
Manufacturer #: WR2X9391
This part is a replacement light socket for your refrigerator. It connects to the power source, and holds the light bulb. If the light in your refrigerator is not working, you could have a faulty sock...
$10.76
In Stock

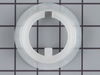
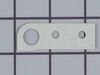
Door Hinge Shim
PartSelect #: PS298522
Manufacturer #: WR2X7491
This is the replacement door hinge shim, or riser cam shim for your refrigerator. It is made of metal and is approximately 2 inches in length, and 1 inch in width. Your refrigerator will have a door h...
$16.87
On Order

Auger and Ice Bucket Assembly
PartSelect #: PS294039
Manufacturer #: WR17X4312
This auger and bucket assembly is used on 25 cubic feet and 27 cubic feet side by side models.
$279.30
In Stock

Ice Dispensing Drive Cup
PartSelect #: PS297895
Manufacturer #: WR2X4550
Found at the end of the auger in the ice container - replace when the icemaker doesn't dispense ice.
$25.98
In Stock

Ice Dispenser Solenoid Service Kit
PartSelect #: PS11699580
Manufacturer #: WR62X23154
This kit includes 1 cube solenoid, 1 armature, 2 tooth washers and 2 1/4 hex head screws.
$112.24
In Stock

Ice Bucket Auger Kit
PartSelect #: PS292776
Manufacturer #: WR17X2740
This ice bucket auger kit come with an auger and a blade. Please note: As per manufacture the part shown in the picture is no longer available. The updated helix coil is now approximately 5". If you c...
No Longer Available

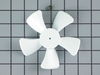
Evaporator Fan Blade Kit
PartSelect #: PS304684
Manufacturer #: WR60X114
This kit features a 5-blade plastic evaporator fan blade that rotates CCW and measures 4.5-inches in diameter and has a 3/8-inch-tall shaft. This kit also has a metal compression ring that secures the...
$26.55
In Stock
Questions And Answers for TFX27FHD
We're sorry, but our Q&A experts are temporarily unavailable.
Please check back later if you still haven't found the answer you need.
Common Symptoms of the TFX27FHD
[Viewing 11 of 11]Leaking
Fixed by
these parts
these parts


Show All
Light not working
Fixed by
these parts
these parts

Show All
Ice maker not making ice
Fixed by
these parts
these parts
Show All
Not dispensing water
Fixed by
these parts
these parts
Show All
Noisy
Fixed by
these parts
these parts


Show All
Ice maker won’t dispense ice
Fixed by
these parts
these parts
Show All
Fridge too warm
Fixed by
these parts
these parts

Show All
Door won’t open or close
Fixed by
these parts
these parts


Show All
Freezer section too warm
Fixed by
these parts
these parts
Show All
Freezer not defrosting
Fixed by
these parts
these parts
Show All
Will Not Start
Fixed by
these parts
these parts

Show All


Keep searches simple. Use keywords, e.g. "leaking", "pump", "broken" or "fit".
Cracked housing on the vaave
1. Turn off water supply, and electrical ( unplug it) to fridge.
2. Remove water line to valve. Watch for water to pour out of the line. Have a towel handy.
3. Remove the cardboard cover on the bottom of the fridge.
4. Remove the screws that hold the valve in place.
5. Remove the valve, be careful the waterlines ar ... Read more e still attached.
6. Place a towel under valve to catch any water that leaks out from water lines.
7. Remove electrical lines, make sure to mark which went where. One is for the ice, and one is for the water. Make sure the power is off, there is 120 volts present at those connections.
- now my waterlines attached using a compression type fitting. The new valve I got used just a push in type of attachment. But, easy enough I just removed the pieces for the compression and the waterlines pushed right in and worked fine.
- the mounting harness for the valve was alittle different but the parts I need were in the right location and she fit in fine.
8. Attach water lines. They are different sizes so you can't get those mixed up.
9. Attach electrical lines.
- the new valve came with adaptors for my electrical connection. Just snapped them on and kept on going.
10. turn on watersupply for fridge. Plug it back in.
11. Test for leaks, and proper operation. ie. When you push the water does the water valve open?
12. Unplug fridge
13. Now is a good time to clean out any dust or dirt that has accumallated in under around your fridge.
14. reassemble, valve, then cover. move fridge back into place.
15. Plug fridge back in.
16. Take a clean glass.
17. Fill with water from the front.
18. Take full glass of water and go watch tv. You've earned it, and saved yourself probably $100.00 in labor costs. Good Job.
Read less
Parts Used:
-
anthony from thornton, CO
-
Difficulty Level:Really Easy
-
Total Repair Time:15 - 30 mins
-
Tools:Screw drivers, Wrench (Adjustable)
286 of 306 people
found this instruction helpful.
Was this instruction helpful to you?
Thank you for voting!
Sticking Light Switch
I applied some tips learned by reading other reviews. So before I started I grabbed my trusty vise grip pliers and a small screw driver. I locked onto the switch actuator, the part that the refrigerator door pushes in, with the vise grips and pulled on it just hard enough to get the screw driver inserted in the right side to push in the c
... Read more
atch clip so the switch could be pulled out further each time the catch clip was depressed to the next detent. Then I used the screw driver on the left site to encourage the switch past the detents on the left and very quickly the switch was out of the mount. The wires from the refrigerator pulled out with the old switch. I unplugged the old switch from the wires and plugged in the new switch and shoved the new switch back into the mount, wiggled it a couple of times to make sure it was secure and the job was done. Once I applied the vise gripes at first, the whole job took less than a minute.
Read less
Parts Used:
-
Jonathan from Lilburn, GA
-
Difficulty Level:Really Easy
-
Total Repair Time:Less than 15 mins
-
Tools:Pliers, Screw drivers
117 of 145 people
found this instruction helpful.
Was this instruction helpful to you?
Thank you for voting!
The oiginal Ice Bucket auger became rusty and discoloered the ice.
I went on line to find the part. Luckily I found PartSelect.com. All I had to do was enter the model number into the search box and scroll through the list of parts.
I ordered the part over the weekend and recieved it on Tuesday!
All I had to do was remove 4 screws from the original Ice Bucket and attach the new one.
Perfec ... Read more t fit in under 15 minutes!
Awesome place to do business with! I hope I never have to do another repair, but if I do I will go to PartSelect first!
Read less
Parts Used:
-
Michael from Antioch, CA
-
Difficulty Level:Really Easy
-
Total Repair Time:Less than 15 mins
-
Tools:Screw drivers
66 of 72 people
found this instruction helpful.
Was this instruction helpful to you?
Thank you for voting!