


RN1337FS LG Dryer - Overview
Sections of the RN1337FS
[Viewing 1 of 1]
Keep searches simple, eg. "belt" or "pump".

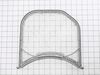
Dryer Lint Filter
PartSelect #: PS3531962
Manufacturer #: ADQ56656401
The Dryer's Lint Filter is used to collect lint during the dryer cycle as it passes through the dryer vent, in order to prevent damage to the machine. This manufacturer-approved part comes in gray, me...
$36.85
In Stock

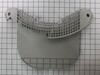
Lint Screen Housing
PartSelect #: PS3534930
Manufacturer #: MCK49049101
This dryer lint filter cover is an OEM replacement part designed to protect the lint filter from damage and prevent lint from escaping into the drum and mixing with clothing during the drying cycle. M...
$46.34
In Stock

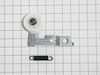
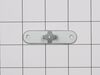
Moisture Sensor
PartSelect #: PS3529161
Manufacturer #: 6500EL3001A
The sensor controls the temperature in your dryer and will turn off once your clothes have reached the desired dryness level. If you notice that your dryer is not giving off enough heat to dry the clo...
$21.45
In Stock

Dryer Thermistor
PartSelect #: PS3529026
Manufacturer #: 6323EL2001B
This dryer thermistor temperature sensor helps monitor and regulate the temperature inside a dryer. This part includes the wire harness. If your dryer overheats, does not produce enough heat, or takes...
$53.20
Special Order

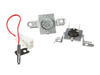
High Limit Thermostat and Thermistor Kit
PartSelect #: PS16878105
Manufacturer #: AGM30045804
This dryer thermistor temperature sensor helps monitor and regulate the temperature inside a dryer. This part includes the wire harness. If your dryer overheats, does not produce enough heat, or takes...
$96.17
In Stock

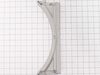
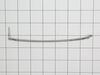
Filter Guide
PartSelect #: PS3535278
Manufacturer #: MEA49050001
This is a replacement lint screen guide for your dryer. The lint screen guide attaches to the front bulkhead and supports the lint screen. If your lint screen will not stay in place, or if you are not...
$31.58
In Stock

Gas Igniter
PartSelect #: PS3527801
Manufacturer #: 5318EL3001A
This spiral-style gas burner igniter is designed for use in select gas dryers and plays a crucial role in generating the heat needed to dry clothes. Operating at 120 volts, the igniter glows red hot d...
$125.62
In Stock

PARTS ASSEMBLY
PartSelect #: PS16661200
Manufacturer #: 383EEL3002R
This genuine OEM conversion kit allows your dryer to be converted from using natural gas to liquid propane. It caters to homes that rely on propane for their energy needs. This kit comes with an orifi...
$20.37
In Stock

Felt Seal
PartSelect #: PS3522851
Manufacturer #: 4036EL3001A
This genuine OEM felt gasket provides a cushioned seal between the inner tub of your electric dryer and the rear panel. It prevents your clothes from getting snagged and helps in heat retention. You w...
$45.29
In Stock

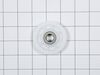
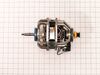
Pulley Idle
PartSelect #: PS3523032
Manufacturer #: 4560EL3001A
This genuine LG product is an Idle Pulley meticulously designed for LG electric dryers. It plays a crucial role in maintaining the correct tension on the drive belt, enabling it to spin the drum effec...
$30.53
In Stock

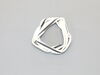
Baffle
PartSelect #: PS3522961
Manufacturer #: 4432EL1002A
Designed exclusively for your LG dryer, the Drum Baffle - Lifter is a premium, OEM (Original Equipment Manufacturer) component guaranteed for an exact fit and superior performance. This drum baffle li...
$47.40
Special Order

Conversion Kit - Liquid Propane to Natural Gas
PartSelect #: PS3524507
Manufacturer #: 4948EL4001B
This is a genuine LG Electronics Dryer Conversion Kit that helps in changing your appliance from Liquid Propane to Natural Gas. It is essential for controlling the flow of gas to the burner assembly i...
$36.85
On Order
Questions And Answers for RN1337FS
We're sorry, but our Q&A experts are temporarily unavailable.
Please check back later if you still haven't found the answer you need.
Common Symptoms of the RN1337FS
[Viewing 7 of 7]Marks left on clothes
Fixed by
these parts
these parts
Show All
Not Heating
Fixed by
these parts
these parts

Show All
Noisy
Fixed by
these parts
these parts
Show All
Door won’t close
Fixed by
these parts
these parts
Show All
Won’t Start
Fixed by
these parts
these parts
Show All
Clothes Still Wrinkled
Fixed by
these parts
these parts
Show All
Drum Not Spinning
Fixed by
these parts
these parts
Show All


Keep searches simple. Use keywords, e.g. "leaking", "pump", "broken" or "fit".
Filter parts chipped - replaced
Removed existing parts using screwdriver, positioned new parts in dryer and re-inserted screws, tightened - done. Piece of cake, even for someone who cannot saw a straight line with a chop saw.
Parts Used:
-
David from Annapolis, MD
-
Difficulty Level:Really Easy
-
Total Repair Time:Less than 15 mins
-
Tools:Screw drivers
51 of 91 people
found this instruction helpful.
Was this instruction helpful to you?
Thank you for voting!
The lint dryer filter was not fitting in correctly so it sticks out a bit and while clothes are drying it was catching it and ripping/twisting and damaging all my clothes
I bought the whole dryer filter kit, but turns out I only needed the dryer filter and am very happy about that. No tools necessary I just slid it right in. It fit perfectly and I no longer have anxiety about my clothes coming out ripped.
Parts Used:
-
Luciana from PRT WASHINGTN, NY
-
Difficulty Level:Very Easy
-
Total Repair Time:Less than 15 mins
31 of 38 people
found this instruction helpful.
Was this instruction helpful to you?
Thank you for voting!
We have ruined hundreds and thousands of dollars the past decade on our LG typical detective lint filter!
I watched a You Tube Video. It instructed me to take the top, front, and door off. Not necessary!!! But definitely unplug it as there is a moisture sensor attached inside this housing. Remove current Filter. Remove all screws holding the two key pieces in (Filter Cover and Guide). Disconnect the moisture sensor (mine is white wires connec
... Read more
ted to two metal prongs). Remove the Filter Cover and Filter Guide and discard. Get a long vaccum hose and remove all visible lint in the area below where the Filter Guide resides. Replace the Filter Guide and reconnect the moisture sensor, replace the Filter Cover. You may find it easier to snap these two pieces together before installing. Make sure the small plastic guides on the inside of the drum snap in tightly to the tei guide holes, then replace all screws. Note- Part Select does not send screws, so save your screws from the old parts and take note which are longer and go where. Tighten, but do not over tighten. If you were successful, the Filter Cover and Guide should be smooth with the edge of the drum and door. Install your new Filter, plug back in, and enjoy! I can FINALLY dry tank tops, open shoulder, and key hole tops, as well as sheets without my dryer eating them. Only problem is that I wish I had done it sooner. Note, I'm a female with no electrical or appliance repair experience. I did this on my lunch break and surprised my husband when he got home! Easy peasy!
Read less
Parts Used:
-
Stephanie from CLINTON, NY
-
Difficulty Level:Really Easy
-
Total Repair Time:30 - 60 mins
-
Tools:Screw drivers
23 of 24 people
found this instruction helpful.
Was this instruction helpful to you?
Thank you for voting!