Enter the code DIYDAD10 at checkout to apply your discount. Discount will be applied at checkout when the code is entered & applies to all parts. Cannot be combined with any other coupon or special offer & cannot be applied to a previously placed order. Not valid toward tax or shipping & handling. Discount has no cash value. Discount expires on June 17 at 11:59pm EST.
You've Got 10% Off Your First Order!Save 10% with code at checkout *click to copy coupon code
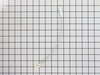
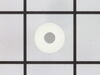
This slotted wheel is sold individually. It is white in color and does not come with the attaching axle. This part has been redesigned, and may be wider than the original.
This end cap is sold individually. It is the same end cap used on the right and left side, for both front and back. It attaches to the end of the upper rack slide rail, and prevents the rack from fall...
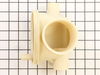
This detergent dispenser assembly is attached to the inner door panel of a dishwasher. This part holds detergent and dishwasher rinse products in a covered container. If your dispenser will not open, ...
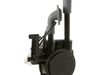
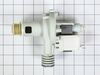
This water inlet valve should be located behind the lower kickplate panel in either the right or left corner. The attaching solenoid on the valve open and close according to the desired amount of water needed.
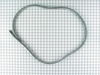
The hinge link on your dishwasher connects the spring to the dishwasher door hinge. If the hinge link becomes cracked or damaged, you may not be able to shut or lock your dishwasher door properly. In ...
Remove the front coverfrom the machine. This is done by removing the 3 screws at the bottom of the panel. The panel then drops down and pulls straight off. The pump is located on the front right wall of the of the machine. You will notice a 2-3 inch diamete threaded cap on the right side of the front wall of the machine. This is the f
... Read moreront of the pump and access to the filter. Place a large bucket under this cap and slowly loosen the cap. All of the water remaining in the machine will begin to drain (this could be a lot of water. Do not remove the cap completely so that you can quickly stop the flow of water if needed). Once all water is drained from the appliance, Disconnect the two hoses from the pump using a pair of pliers to looses the presure clamps, sliding the clamps back an then pulling off the hoses (be careful of any remaining water in the hoses). Then remove the two screws from the rear base of the pump that secure it to the bottom floor panel of the washer. Slide the pump slightly to the rear to free it from the fittings on the front wall of the machine and the lift the pump up. At this point, firmly pull out the wiring harness plugged into the top right side of the pump. Install the new pump by plugging in the wiring harness and resecuring the pump. Plug in the machine and run on the rinse and spin cycle to test.
Turned off power to unit, 'cuz it has a solenoid lead to open the soap door. Removed the phillips head screws that held the door together. The screw are located on the inside edge of the door, there are 10-12 of them. Spearated the door shells carefully, trying not to disturb the location of the wiring in the middle of the doo
... Read morer.
Found the 4 screws that hold the module assembly to the door from the inside, and removed them. Popped the assembly out, cleaned the gasket-seat area and placed the new one in place. Carefully tightened the 4 screws. It is easy to over-tighten them, so only turn them until you feel they are snug. Let the gasket do the work. Attached the two solenoid control wires in the same positions they were in before they were removed from the old assembly. Re-assembled the door halves, again taking care to not over-tighten the phillips-head screws. One got "spun" and I removed it and re-set it into some epoxy. Returned power to the dishwasher, and stopped washing dishes by hand. Note: the latch is now made with a plastic that is more dense, and likely will not fail as soon as the original one did. I think GE learned something about the durability of their component plastics since this was originally built.
The hardest part for me was pulling the dishwasher out from under the countertop. Once it is out all you have to do is disconnect the power (or power off the fuse going to the dishwasher) then look underneath the dishwasher and you will see where the two ends of the heating element come through. Disconnect the wires connected to the ends
... Read moreby simply sliding off the connector. Then remove the plastic "nuts" that screw onto the ends of the heating element by turning them counterclockwise counterclockwise. Once the nuts are removed you can reach inside the dishwasher and remove the old heating element and replace it with the new one. Then simply replace the plastic nuts and reconnect the wires and you are good to go.