Your coupon for will be reflected when you check out!
✖
Your coupon for
✖
Hello!
You're visiting the PartSelect site in U.S.
Would you like to shop on the Canadian site?
Stay on this site
Go to Canadian site
✖
Model Number Locations
1Select Category Type
Select Category Type
2Select Product Type
Select Product Type
3Select {MODEL} Type
Select {MODEL} Type
Sample Model Number Tags
Model numbers can be made up of numbers (1005400, for example) or a combination of letters and numbers (LAT1000AAE). The model number will most likely appear on either a paper sticker or a metal plate. Your appliance's model number tag may look similar to the sample model number tags shown here (model number highlighted in yellow):
Model has been saved to My Models. If you're not signed in, your lists are available on this device and will expire within 30 days.
Model has been saved to My Models.
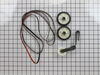
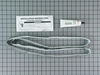
This dryer drum belt (Whirlpool Dryer Belt, Drive Belt) has four ridges, three grooves and is 1/4" wide, and 92 1/4 inches in length. It comes in black and is made of rubber. The belt transfers the ro...
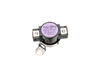
This thermostat (Dryer Operating Thermostat, Dryer Cycling Thermostat, Cycling Thermostat, Dryer Thermostat) is used to maintain a temperature of 155 degrees in the dryer drum. The internal bias heate...
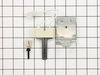
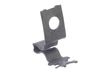
This dryer door switch is a simple on/off switch mechanism that prohibits the dryer from operating when the door is open, and operates the drum light. White in color and 6.5 inches long, this OEM swit...
When the igniter reaches a high enough temperature, these coils (Coil Valve, Dryer Gas Valve Coil Kit, Dryer Valve Coil Kit, Gas Valve Solenoid) work together to open the gas valve and allow the gas t...
The drum support roller kit (Dryer Repair Kit) allows the dryer to tumble properly by supporting the drum cylinder. The idler pulley provides the tension required for a multi-ribbed belt. The belt att...
The drum support roller kit allows the dryer to tumble properly by supporting the drum cylinder. The kit includes two drum rollers, four tri-rings, and one palnut (or retaining washer). The kit does n...
This white OEM dryer door handle is used to open and close the dryer's door. Comprised of plastic and 6-by-2-inches in dimension, the handle is sold individually and attaches to the dryer door. Your d...
If your dryer will not heat, takes too long to dry, or does not provide enough heat, you might want to replace your igniter kit. This silicone carbide igniter with ceramic holder kit includes the 3-in...
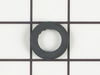
If you notice that your dryer is noisy or will not tumble, you may need to replace the tri ring. This part is triangular, and is less than an inch in size. Tri rings can be found both on the idler pul...
If your gas dryer is not heating up or igniting, then replacing the flame sensor, located in the burner assembly, could solve it. This part senses heat from the igniter to monitor if it is hot enough ...
This OEM drive motor is designed to operate the drum in electric and gas dryers by turning the drive belt, enabling proper rotation during drying cycles. Compatible with most Whirlpool-incorporated dr...
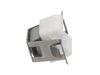
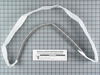
This is a genuine OEM replacement rear drum seal for your dryer. This seal is made of felt and comes with the adhesive required for installation. The purpose of the seal is to prevent hot air from esc...
$42.12
In Stock
Order now and your part arrives by May 4
Questions And Answers for MGD4500MW0
Ask our experts a question about this model and we'll get back to you as soon as possible!
6 questions answered by our experts.
Sort by:
< Prev
1
2
Next >
Search filter:
Clear Filter
Your search term must have 3 or more characters.
Keep searches simple. Use keywords, e.g. "leaking", "pump", "broken" or "fit".
Sorry, we couldn't find any existing answers that matched.Try using some different or simpler keywords, or submit your new question by using the "Ask a Question" button above!
Donald
January 18, 2024
I need a conversion kit. The dryer is set up for natural gas. I need to convert it to LP gas.
For model number MGD4500MW0
Hi Donald, thank you for reaching out. The LP conversion kit for your model is part number PS3493998. Glad to be of assistance!
Hello Christopher, thank you for getting in touch. According to our research, the conversion kit, part number PS3493998, will convert your dryer from Gas to Propane. We hope this helps.
Hello James, thank you for your inquiry. You can remove the lint filter by just pulling it out. Roll lint off the screen with your fingers. Do not rinse or wash screen to remove lint. Wet lint is hard to remove. If the lint filter is clogged because of a residue buildup. Then you can use a nylon brush to clean it. We hope that helps!
Did this question help you?
Thank you for voting!
Gloria
June 15, 2024
Way my dryer doesn’t start
For model number MGD4500MW0
Hi Gloria, thank you for the question. Based on our understanding, the issue could be with the dryer timer, part number PS17629166. You may need to replace it to fix the issue. We hope this solves your problem!
I can not adjust the dial switch for settings. Plastic D shape piece has not held up. Will not operate dryer. How do I fix it?
For model number MGD4500MW0
Hello Bin, thank you for reaching out. Based on our understanding of the issue, we would suggest replacing the knob spring clip, part number PS11743754. It holds the control knob on the control switch shaft. We hope this solves your problem!
Pryed dryer top open and opened front door. . Unscrewed the 2 retaining screws. Pulled old switch from the wiring harness. Put new switch in place and replaced the retaining screws. Put new switch wire plug into the wiring harness. Before closing top, checked door switch function with dryer on. Dryer cut off when door open an
... Read mored when closed dryer started normally. . . Maint. Note instruction book should warn that letting door slam, which I did on occaision, broke the switch arm. Might save future problems.
First I shut off the gas supply and disconnected the dryer vent and unpluged the unit so you can access the rear of the dryer. Then I removed the rear cover. This is where you will find your thermostats and fuses. Holding the new part next to the one to be replaced I transfer the wires one at a time so as not to get them mixed up, then un
... Read morescrew the old part and install the new one. Insert a flat blade screwdriver under the top cover in the 2 front corners to unsnap it from it's clips, also at this time you need to remove the 2 screws that hold the upper part of the lint filter tube to the lid, then lift the lid to expose the drum ( I tilted the dryer back as far as the flex gas line would allow me to and rested the top lid against the wall without removing it, to many wires). Behind the front cover in the top right corner is the plug for the door switch,un-plug it and also there are 2 screws one in each corner. After that lift the front cover straight up and pull it away from the cabinet ( it has clips at the bottom to hold it in place). Reaching under the drum on the right side pull down on the belt tensioner and release the belt from the motor then you can remove the drum. Laying the drum down on it's front edge I removed the rear felt seal and took a piece of sand paper to rough up th old glue and clean off some of the felt that was still stuck to the drum. Following the directions from the seal package I put the glue around the edge of the drum and re-installed the new felt. This is a good time to clean out your dryer, while the glue sets up. A shop vac works the best, but be carefull not to suck up the money, it will help pay for the repair ( I found over a dollar in change ). At this time I also changed the coils on the gas valve, remove the 2 screws that hold the clamp and replace them one at a time. Re-install the drum with the belt on it, fold it and push it through the tensioner and put it on the motor pulley. rotate the drum to make sure that the felt is not kinked under itself, re-install the front cover bottom clips first, then the 2 screws and the plug for the door switch, pull down the lid and snap it in place, before installing the rear cover this is a good time to remove the rear cover to the lint chute and clean in there also ( it's easy to see why there are so many dryer fires). Re- install that cover and the rear cover and vent tube, turn your gas back on and check it for leaks ( even if you didn't disconnect it) plug your dryer back in and get busy catching up on the laundry that you haven't had a chance to do because your dryer broke, then smile and think about all the money you saved by doing this simple repair your self. Thanks Parts Select