


Models
>
LAT9824BGE
LAT9824BGE Maytag Washer - Overview
Sections of the LAT9824BGE
[Viewing 7 of 7]


Keep searches simple, eg. "belt" or "pump".

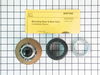
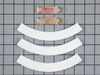
Mounting Stem/Tub Seal Kit
PartSelect #: PS2351899
Manufacturer #: 6-2095720
This kit comes with a hub assembly, agitator seal, and spanner nut. If your washer leaks once it is full (with or without clothes in it) or leaks during agitation, then you should replace the seal. Th...
No Longer Available

Screw
PartSelect #: PS12349731
Manufacturer #: W11233072
This is a multi-use and multi-appliance screw. It can be used on a microwave, refrigerator, range/oven, air conditioner, dehumidifier, washer, or dryer. The measurements of this screw are 8 x 1/2 inch...
$20.79
In Stock

Screw, 8/18 x 3/8
PartSelect #: PS11746840
Manufacturer #: WP90767
This screw is sold individually.
$5.42
In Stock

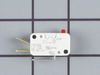
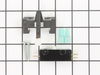
Lid Switch
PartSelect #: PS11723153
Manufacturer #: W10820036
This 3 prong lid switch is used for washing machines that do not have a tub light.
$23.69
In Stock

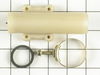
Hose Clamp
PartSelect #: PS11743008
Manufacturer #: WP596669
This hose clamp is used in a wide variety of household appliances. Most often it is found in washers, dishwashers, refrigerators, freezers, dehumidifiers, garbage disposals, or air conditioners. This ...
$11.80
In Stock

Rubber Foot Pad
PartSelect #: PS11738859
Manufacturer #: WP210684
The leveling leg pad or foot pad fits over the leveling leg on your washing machine. The foot pad is designed to protect your floor and keep the washing machine level and in place. This foot pad is ju...
$15.28
In Stock

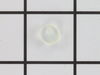
Washing Machine Lid Hinge Ball
PartSelect #: PS11738871
Manufacturer #: WP211726
This washing machine lid hinge ball is well under an inch in diameter. These hinge balls are sold separately, though two are required per lid. This lid hinge ball is made of plastic and is used for Ma...
$11.14
In Stock

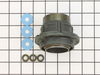
Tub Bearing Kit
PartSelect #: PS2347235
Manufacturer #: 6-2040130
This kit is used on 2-belt washers. It is recommended to change the seal kit at the same time. The tub bearing kit fixes issues with leaking, loud noise, excessive shaking/moving or if your pump is no...
$55.59
In Stock

Lid Check Switch
PartSelect #: PS11738787
Manufacturer #: WP207166
This lid switch check is used in washers to detect if the washer lid is open or closed. This prevents a cycle from spinning when the lid is still open and is also used to start your washer once a cert...
$48.41
In Stock

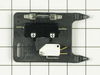
Lid Switch Assembly
PartSelect #: PS11739302
Manufacturer #: WP22001682
This black lid switch assembly comes complete with a bracket, two switches, and a fuse. An open fuse might indicate that the lid switch is bad. The point of the lid switch is for the tub to stop spin...
$42.42
In Stock

Adjustable Leveling Leg
PartSelect #: PS2021026
Manufacturer #: 22003428
If your washer shakes or vibrates loudly when it reaches its max speed, make sure the 4 levelling legs are even. Adjust the legs so that the machine is level, and tighten the locking nuts on the legs ...
$18.47
In Stock

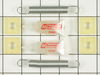
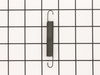
Spring Retaining Clip
PartSelect #: PS11739294
Manufacturer #: WP22001650
This spring retaining clip is just under 1 inch long. The clip is made entirely of metal and is attached to the back wall of the washer, under the console. If your washer is vibrating and louder than ...
$11.10
In Stock
Questions And Answers for LAT9824BGE
We're sorry, but our Q&A experts are temporarily unavailable.
Please check back later if you still haven't found the answer you need.
Common Symptoms of the LAT9824BGE
[Viewing 10 of 10]Leaking
Fixed by
these parts
these parts
Show All
Will Not Start
Fixed by
these parts
these parts
Show All
Will not agitate
Fixed by
these parts
these parts
Show All
Will not drain
Fixed by
these parts
these parts
Show All
Burning smell
Fixed by
these parts
these parts
Show All
Spins slowly
Fixed by
these parts
these parts
Show All
Lid or door won’t close
Fixed by
these parts
these parts
Show All
Shaking and Moving
Fixed by
these parts
these parts
Show All
Won’t Start
Fixed by
these parts
these parts
Show All
Noisy
Fixed by
these parts
these parts
Show All


Keep searches simple. Use keywords, e.g. "leaking", "pump", "broken" or "fit".
water leaking from around center shaft below fixed tub
My washer is 5 years old and water began to leak on the floor. I took off the front panel and filled the tub. Water did not leak immediately, but after the tub filled with about 3-4 inches of water, the water began to leak from a rubber washer between the fixed tub and the drive shaft. I looked online for exploded diagrams of Maytag wa
... Read more
shers, when I came across your site. By looking at your diagrams, I determined what parts I needed and ordered them. The parts arrived in 2 days, and I installed them. There were no leaks and it cost me under $70 (a repairman would have cost at least $250). The only thing I would recommend to those in similar situations, is to purchase a spanner wrench (your site does not sell, but others do). The stem seal and hub assembly is reverse threaded (clockwise to loosen) and is difficult to remove due to tight quarters in the tub.
Read less
Parts Used:

-
douglas from bonita springs, FL
-
Difficulty Level:A Bit Difficult
-
Total Repair Time:1- 2 hours
-
Tools:Nutdriver, Pliers, Socket set
523 of 545 people
found this instruction helpful.
Was this instruction helpful to you?
Thank you for voting!
No spin. Pump working. Smell of burning rubber.
I determined that the spin bearing was bad and decided to replace the brake too. Placed the machine on its side and then removed the rubber cap, v-belt, screw, drive lug and pulley. Then used a chain-vise grip to turn the brake off with the aid of a 3 foot long pipe extender for leverage. Blocked up the tub to align the transmission and i
... Read more
nstalled the new spin bearing, brake, pulley and drive lug. Adjusted the drive lug position to contact the ccw motion of the pulley at the point when I could just feel the brake pressure. Installed the screw and rubber cap. Replaced the drive belts. Tested and all works. Halleluah!
Read less
Parts Used:


-
John from Spring Valley, CA
-
Difficulty Level:A Bit Difficult
-
Total Repair Time:More than 2 hours
-
Tools:Nutdriver, Pliers, Screw drivers, Socket set, Wrench (Adjustable), Wrench set
130 of 175 people
found this instruction helpful.
Was this instruction helpful to you?
Thank you for voting!
Washer was dead and would not turn on
Well the washer died and would not turn on in the middle of a wash cycle. Absolutely dead. I disconnected it from power and opened up the front panel on which all the control switches and knobs are mounted. This is removed by unscrewing 4 screws at the top of the washer.
Checked the fuse, and found blown. Replaced the fuse, cl ... Read more osed the panel and plugged it in. Still not working. Checked the Check switches and found the Check Switch really limp. Checked with Digital Multimeter and found no continuity at either position. Unscrewed the check switch. Removal and re inspection with DMM of the check switch confirmed it was bad. Opened up the check switch and found contacts were blown.
Installed a new check switch making sure all the connecting wires go in the right places. The wiring diagram in the washer was very helpful in doing so since u dont want these wires reversed. Adjusted the plunger which operates the check switches when the lid is opened to make sure it is not over or under operating the switches. This is done by loosening the bolt holding down the check switch assembly and slidint the whole assembly forwards or backwards till the plunger has just enough push on the switches. This is done to avoid the plunger from exerting excessive pressure on the check switch and the safety switch in lid open or lid closed position. (both switches are operated by the same plunger according to the lid position)
Closed panel cover and plugged the washer in. There u go, it was alive again!
Read less
Parts Used:

-
Suleman from Canoga Park, CA
-
Difficulty Level:Easy
-
Total Repair Time:15 - 30 mins
-
Tools:Screw drivers, Wrench set
109 of 124 people
found this instruction helpful.
Was this instruction helpful to you?
Thank you for voting!