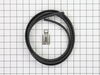
This part is a door balance link kit, also sometimes known as door cable or door spring cable kit, that helps support the door as it opens and closes by connecting to the dishwasher door hinges. The k...
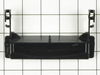
The mounting bracket is sold individually, without screws. This part secures the upper side of the dishwasher to the underside of the counter or cabinet to prevent the dishwasher from moving, shaking,...
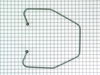
This one-piece door gasket provides a water tight seal between the tub and the door, to keep water from leaking out of your dishwasher. If your dishwasher is leaking, tears, or there are gaps in your ...
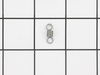
The rubber washer is a part which is specific to dishwashers and should not be substituted by a similar part. It works with the heating element to seal the receptacle opening where the heating element...
The tine row on your dishwasher rack divides the rack into columns to keep your kitchen items in place during the washing cycle. If you notice that one or more of the tines on your current tine row is...
$67.25
In Stock
Questions And Answers for KUDM01TJBL0
Ask our experts a question about this model and we'll get back to you as soon as possible!
1 question answered by our experts.
Sort by:
< Prev
1
Next >
Search filter:
Clear Filter
Your search term must have 3 or more characters.
Keep searches simple. Use keywords, e.g. "leaking", "pump", "broken" or "fit".
Sorry, we couldn't find any existing answers that matched.Try using some different or simpler keywords, or submit your new question by using the "Ask a Question" button above!
Wanda
December 12, 2019
How old is this dishwasher
For model number KUDM01TJBL0
Hello Wanda, thank you for writing. We will need the serial number in addition to the model number you provided to determine the year it was manufactured. We look forward to hearing back from you!
Was this helpful?
Thank you for voting!
< Prev
1
Next >
✖
Ask a Question
Ask our experts a question on this model and we'll respond as soon as we can.
Pulled dishwasher from under counter, attached link to spring, hooked spring back into frame/chassis, threaded link through pulleys, attached other end of link onto door, reinstalled dishwasher under counter. All's well. Note-I purchased an extra link anticipating that the other one will fail. They're cheap enough.
Rather than remove the pump assembly - as an earlier post had done - I pulled the entire dishwasher out and laid it down on the floor. This allowed easy, direct access to the motor (that was the hard, messy part). From this point it was easy. Unplug the wiring, remove the retaining bolt, rotate the motor off the mounting brackets and pull
... Read more it out. Then put the new one in. That was the easy part (about 15 minutes). The entire job took 2-and-a-half hours, most of which was taken in disconnecting, cleaning up and reconnecting the dishwasher. It's much quieter now.
I dropped the upper rack to its lowest position. I pulled the upper water channel down from the spring clip [on the top of the washer] to get access to the hole on the top of the front end of the channel. The front end of the channel only drops an inch or two. I put the new upper wash arm pivot [larger of the two small pieces]
... Read morethrough the new upper washer arm from the bottom, placed the assembly up into the hole on the under side of the upper water channel, and snapped in the new keeper [smaller piece] through the hole in the top of the upper washer arm. Finally, I snapped the upper water channel back into its spring clip. It was not even necessary to remove the racks. There were no instructions or diagrams with the new parts, so it took me a few minutes to be sure which of the two small parts goes in from the bottom and which goes in from the top. Otherwise, I could have installed the new washer arm in one or two minutes.


 Diagram and Parts List for KitchenAid Dishwasher")