This long oven sensor is also commonly known as a temperature sensor. It is designed for use with ovens and ranges. It is similar to a thermostat; it measures and regulates the internal temperature of...
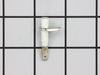
This is a burner electrode for your oven, range, or stove. This part has a male spade. It helps your burner ignite by creating a spark, producing a flame, and lighting the surface burner. If your burn...
This is a replacement oven rack and it is designed for use with ranges and ovens. This is a genuine OEM replacement part. The rack provides a level and stable surface for cookware inside of your appli...
This is a multi-use and multi-appliance screw. It can be used on a microwave, refrigerator, range/oven, air conditioner, dehumidifier, washer, or dryer. The measurements of this screw are 8 x 1/2 inch...
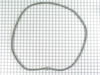
The oven door gasket on your range functions as a seal between the warm interior of your oven, and the outside. It prevents heat from fleeing your oven when the door is closed. Before making any repai...
This part is for oven ranges, it connects individual wires and protects the device from electrical surges, voltages, and current. With this part, the house power is connected to the range wire harness...
This is the burner head and electrode for your gas range. If your gas igniter glows but will not light, or if the element will not start or heat entirely, you may need to replace the burner head. This...
Removed the oven door by opening slightly, then pic door up to remove. Remove 2 screws holding oven sensor in place, gently pull on sensor to remove, had to remove about 8 inches to get at plastic connector. Unplug connector, had to use an adapter cable supplied with the PartSelect kit to install new sensor, push cable back into opening,
... Read morereinstall 2 screws. The oven works fine! Note that due to thermal lag the temperature overshoots to 370 degrees and undershoots to 340 degrees, this appears to be normal oven operation. Putting door back in place was easy.
As others reported, there are 2 torx screws that need to be removed so that the burner element can be removed. One came out with a little effort, the other one did not as it was corroded. After breaking a torx bit, a second torx bit succeeded in breaking off the screw head. This then required a drill to drill out the broken shaft and th
... Read moreen rethreading the screw hole. On to the ignitor replacement. The tiny screw holding the ignitor was corroded and would not come out. It too had to be drllled out and rethreaded. It was a 1/3" #4 screw with fine threads. Had to get it an appliance repair store as the local hardware places don't carry fine threaded screws. Finally got it all put back together after a week. My advice before ordering an ignitor is make sure you can take the current burner off the cooktop first to do the repair in the first place. BTW, the ignitor I ordered came quickly and was the correct part!
First I removed the two screws that hold the element in place. I then pulled the sensor out about 3 inches and disconnected the two wires. Next, I connected new sensor and screwed the new sensor back in place. One area for caution. Make sure that the electrical connection is pushed in past the insulation on the back side of the oven. Fa
... Read moreilure to do so will cause the plastic plug connector to melt from oven heat.


 Diagram and Parts List for Jenn-Air Range")
 Diagram and Parts List for Jenn-Air Range")


.gif "SUPPLEMENTAL INFORMATION Diagram and Parts List for Jenn-Air Range")


 Diagram and Parts List for Jenn-Air Range")