


GLEQ642CAS1 Frigidaire Dryer - Overview
Sections of the GLEQ642CAS1
[Viewing 4 of 4]


Keep searches simple, eg. "belt" or "pump".

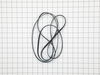
Drum Belt
PartSelect #: PS1148434
Manufacturer #: 134503600
This drum belt, often referred to as a drive belt, is used in the assembly of dryers. It goes around the drum, the idler pulley, and the motor pulley. As the armature on the motor spins, this belt is ...
$17.15
In Stock

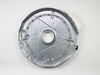
Drum Support Bearing
PartSelect #: PS418807
Manufacturer #: 131825900
If your dryer does not tumble, will not start, is noisy, or is leaving marks on your clothing, you may need to replace the drum support bearing. The drum is supported at the rear by a bearing, which a...
$10.70
In Stock

Drum Glide - White
PartSelect #: PS5574052
Manufacturer #: 137513300
This white drum glide is used in a clothes dryer to ensure the front of the dryer drum is supported as it does rotations. *Please note: these are sold individually, however there are two of these in y...
$27.36
In Stock

Heating Element Assembly
PartSelect #: PS418120
Manufacturer #: 131553900
This dryer heating element produces heat to dry clothes and is located in the rear of a dryer. If the heater element is burned, the dryer does not heat or over heats, or clothes are taking too long to...
$129.80
In Stock

Timer Knob
PartSelect #: PS418921
Manufacturer #: 131873500
This knob accepts a D-shaped shaft.
$51.61
In Stock

Turn - Type Start Switch
PartSelect #: PS975832
Manufacturer #: 134398300
This part is used to start the dryer once you have selected a setting on the timer.
$63.64
In Stock

Dryer Drum Bearing Bracket
PartSelect #: PS12579101
Manufacturer #: 131724301
This drum bearing bracket is for dryers. Drum bearing bracket holds and supports the drum bearing
$22.52
In Stock

High Limit Thermostat
PartSelect #: PS446428
Manufacturer #: 3204267
This high limit thermostat is used in a dryer and monitors the temperature to make sure it does not exceed 260 degrees Fahrenheit. When your dryer temperature reaches 260 it will cut it out and only c...
$57.61
In Stock

Lint Filter
PartSelect #: PS417841
Manufacturer #: 131450300
Located at the front of the dryer, this lint filter traps lint and debris from the exhaust air flowing out of the dryer drum. This part measures approximately 12 inches long x 7 inches high, has a pla...
$31.58
In Stock

Idler Arm Assembly
PartSelect #: PS1156706
Manufacturer #: 131863007
Part may differ in color from image. Please note that this is only a cosmetic difference.
$59.35
In Stock

Screw
PartSelect #: PS417463
Manufacturer #: 131302800
This is a replacement screw for your washer or dryer. The screw is approximately half an inch in length and is a Phillips-head screw. It screws in from the outside of the drum, into the vane/baffle. T...
$23.60
In Stock

Door Handle
PartSelect #: PS418388
Manufacturer #: 131644700
This part is the replacement door handle for your dryer. It is made of white plastic and measures about 2 ½ inches long and 4 inches wide. The door handle allows you to open and close the dryer door. ...
$52.67
In Stock
Questions And Answers for GLEQ642CAS1
We're sorry, but our Q&A experts are temporarily unavailable.
Please check back later if you still haven't found the answer you need.
Common Symptoms of the GLEQ642CAS1
[Viewing 7 of 7]Noisy
Fixed by
these parts
these parts


Show All
Marks left on clothes
Fixed by
these parts
these parts
Show All
Drum Not Spinning
Fixed by
these parts
these parts
Show All
Too hot
Fixed by
these parts
these parts


Show All
Not Heating
Fixed by
these parts
these parts
Show All
Won’t Start
Fixed by
these parts
these parts

Show All
Timer Not Working
Fixed by
these parts
these parts

Show All


Keep searches simple. Use keywords, e.g. "leaking", "pump", "broken" or "fit".
short circuit with a brasier metal support
Disconect the dryer from the main power source.
1) Remove the two screws from the rear / upper panel (below the control panel).
2) Snap the front side using a flat head screw driver.
3) On the inside front, remove two screws (one on each side) from the upper side and snap the door assembly off.
... Read more 4) Remove the rear motor access panel (two screws) and appying tension to the spring remove the belt.
5) Pull the drum upwards (verticaly) unnapping it from the rear wall and remove it horizontally through the front panel.
6) Disconect the four leads to the heating element and remove the four screws from the rear of the dryer and replace the heating element.
Follow the same steps backwards to put the dryer together again.
Read less
Parts Used:
-
Juan Carlos from Weston, FL
-
Difficulty Level:Easy
-
Total Repair Time:30 - 60 mins
-
Tools:Screw drivers
235 of 273 people
found this instruction helpful.
Was this instruction helpful to you?
Thank you for voting!
burned out heating element
I unlatched top panel then removed two screws holding front panel on. I then lifted drum out of hanger to make room to remove element. Disconnect wires to limit switch and element. I then removed four screws on back of dryer that hold the pan. I removed old assembly and replaced with new one. Assemble in reverse.
Parts Used:
-
michael from stanton, MI
-
Difficulty Level:Easy
-
Total Repair Time:15 - 30 mins
-
Tools:Pliers, Screw drivers
74 of 86 people
found this instruction helpful.
Was this instruction helpful to you?
Thank you for voting!
Hub inside knob cracked
What the pictures do not show is the inner clamp spring that grips the selector switch shaft so it will not easily fall off. It is not shown or mentioned but in fact was installed in the knob.
Parts Used:
-
Robert from McMinnville, OR
-
Difficulty Level:Really Easy
-
Total Repair Time:Less than 15 mins
59 of 64 people
found this instruction helpful.
Was this instruction helpful to you?
Thank you for voting!