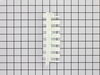
This sensor (Temperature Sensor, Thermistor, Refrigerator Temperature Sensor) sends the temperature reading of the compartment to the control board. If you notice your refrigerator is too warm, too co...
The Module Shelf Insert is a complete assembly for the module shelf. This repair is rated as "Easy" by users. Simply remove the old shelf insert and snap the new one into place using the locking tabs....
This 10 by 5 inch ice maker (Electromechanical Icemaker Kit, Ice Maker Assembly) produces ice. This particular model will produce seven crescent shaped cubes every cycle. It is constructed of plastic ...
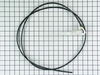
If you notice that your refrigerator or freezer is noisy or too warm, you may need to replace the evaporator fan grommet. This part is red in color, and is about 1 inch in diameter. The evaporator fan...
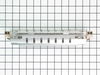
This electronic board (Main Control Board Assembly, Control Board, Motherboard) controls the temperature and defrost functions of the unit. This control board is located on the back of the refrigerato...
This evaporator fan motor grommet, or condenser fan grommet is built for refrigerators. It provides a cushion between the fan motor and the motor mounting bracket. It is made or round, black plastic a...
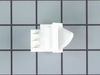
This is the light switch that goes in your refrigerator. If the light is not working or stays on, you may need to replace the switch. It is made of mainly white plastic, and is an OEM part, directly f...
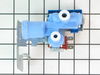
This fan motor is most times used with frost-free refrigerators with a condenser coil. When the compressor runs, so does this fan, circulating air through the refrigerator grille, cooling the compress...
This compression ring is meant to hold the evaporator fan motor in place in the freezer compartment of your refrigerator. This is is a genuine OEM part. The tools needed to complete this repair are a ...
After replacing the defrost heater, main board and thermistor I still had the same problem. Called a repair guy and he (with the help of GE on the phone) diagnosed that the temperature sensor was bad. So I ordered from partselect and installed it and it fixed the problem. Been good for a couple months (knocking on wood). To install I
... Read morehad to cut the 2 wires to the old sensor, crimp the 2 new wires on and snap the new sensor to the clip on the evaporator. Very easy. Make sure you seal the ends of the wire crimps so moisture doesn't get in and corrode the connection.
After checking the stories, the consensus of opinion was to change the mother board. I had a tremendous help from Tom Paone at quality@applianceeducator.com. He also told me to change the motherboard but to make sure that the coils were totally defrosted before starting up the refrigerator after changing the board.
Took off thr
... Read moreee nuts around the board at the back of the unit. Removed the input wires and you have to push in the plastic tabs holding the board in. Then just put the new board in place and push till the tabs click. Re-install the wires and put the cover back on.
Really simple task,
It is now a week since doing this and the unit is working perfectly. No soulds and good nights sleep. The ghost has moved on.
I went to a GE repair center to explain my problem, the service center reccomended that I have a techinician come out o look at it. $75.00 for the visit and what ever labor and materials wuld cost.
I went on line to see if there were others having this same problem and found that there were many with the same problem.
... Read more />After reading some of the ways that people found out what was wrong ...it became a matter of three components, the timer, heater or thermostat.
I tried the most common component and the less expensive one first , the thermostat switch I installed it very easily snipping two wires and attaching the news using wire nuts I used the diagram on this website to pinpoint the component and there has not been a problem since.