


Models
>
ED25SM1LWR0
ED25SM1LWR0 Whirlpool Refrigerator - Overview
Sections of the ED25SM1LWR0
[Viewing 11 of 11]


Keep searches simple, eg. "belt" or "pump".

Light Bulb - 40W
PartSelect #: PS884734
Manufacturer #: 8009
This an authentic OEM 40-Watt replacement light bulb, used in a number of household appliances. It is specially designed to withstand extreme temperatures, which is why these replacement bulbs are mos...
$11.73
In Stock

Door Cam - Black
PartSelect #: PS11752991
Manufacturer #: WPW10329686
The Door Cam is a black plastic part which helps the door pivot shut while keeping the door and hinge in proper alignment. Lubricating this part upon installation may help it move easier. It attaches...
$10.56
In Stock

Refrigerator Door Switch
PartSelect #: PS12728638
Manufacturer #: W11384469
Door switch turns the light off when you close the door.
$38.48
In Stock

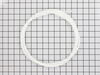
Ice Bin Auger Drum
PartSelect #: PS372186
Manufacturer #: 4388736
This white ice bin auger drum comes with a washer.
$53.27
In Stock

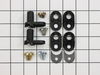
Door Closing Cam Kit
PartSelect #: PS358690
Manufacturer #: 4318165
This door closing cam kit is intended for use with the bottom of refrigerator and freezer door hinges. The cam helps with the closing of the doors and to keep them slightly in position when opened.
$13.52
In Stock

Light Bulb - 10W
PartSelect #: PS11739347
Manufacturer #: WP22002263
This ten watt appliance light bulb is two inches tall. It is used with both washers and dryers.
$16.32
In Stock

Condenser Fan Motor Kit
PartSelect #: PS395284
Manufacturer #: 833697
This condenser fan motor kit is designed for use with refrigerators. This fan draws air through the condenser coils and over the compressor. It does this with the goal of cooling the warm refrigerant ...
$63.18
In Stock

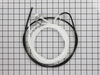
Ice Maker Water Fill Tube Kit
PartSelect #: PS11739222
Manufacturer #: WP2196157
The icemaker water fill tube provides water to the icemaker so it can produce ice and dispense water. If you notice that your ice maker is not making or dispensing ice, or is leaking, you may need to ...
$10.14
In Stock

Dual Outlet Valve Kit
PartSelect #: PS358630
Manufacturer #: 4318046
This part comes with several mounting brackets and plastic unions.
$83.55
In Stock


Water Tube Kit
PartSelect #: PS11730901
Manufacturer #: W10823511
This is the replacement water tube kit for your refrigerator. This tubing is made of plastic, is 1/4 inch in diameter, and comes with 2 inserts. This tube may be longer than the original tube, and may...
$36.12
In Stock

Touch-Up Paint - White
PartSelect #: PS385132
Manufacturer #: 72017
This touch-up paint can be used on a wide variety of household appliances. It is most often used on washers, dryer, refrigerators, dishwashers, ranges, freezers, trash compactors, or microwaves. It is...
$8.00
In Stock
Questions And Answers for ED25SM1LWR0
We're sorry, but our Q&A experts are temporarily unavailable.
Please check back later if you still haven't found the answer you need.
Common Symptoms of the ED25SM1LWR0
[Viewing 16 of 16]Door won’t open or close
Fixed by
these parts
these parts


Show All
Light not working
Fixed by
these parts
these parts


Show All
Leaking
Fixed by
these parts
these parts


Show All
Ice maker not making ice
Fixed by
these parts
these parts

Show All
Ice maker won’t dispense ice
Fixed by
these parts
these parts

Show All
Noisy
Fixed by
these parts
these parts


Show All
Fridge too warm
Fixed by
these parts
these parts
Show All
Freezer section too warm
Fixed by
these parts
these parts
Show All
Clicking sound
Fixed by
these parts
these parts
Show All
Not dispensing water
Fixed by
these parts
these parts
Show All
Door Sweating
Fixed by
these parts
these parts

Show All
Fridge runs too long
Fixed by
these parts
these parts
Show All
Will Not Start
Fixed by
these parts
these parts
Show All
Fridge and Freezer are too warm
Fixed by
these parts
these parts
Show All
Ice maker dispenses too little ice
Fixed by
these parts
these parts
Show All
Too warm
Fixed by
these parts
these parts
Show All


Keep searches simple. Use keywords, e.g. "leaking", "pump", "broken" or "fit".
Plastic bits dispensed from Ice Dispenser in Door
Removed Ice bin from Fridge
Removed all bolts on bin with nut driver...about six
Removed housing...be careful with spring on crusher/cube control rod
Removed C clamp on end of auger with small slotted screw driver and needle nose pliers.
Removed plastic nut on end of auger shaft
Remov ... Read more ed Ice crusher jaws and laid them out in the correct order
Removed Ice propeller and installed new part
Put back together in opposite order
Easy
Read less
Parts Used:
-
john from seaford, VA
-
Difficulty Level:Easy
-
Total Repair Time:15 - 30 mins
-
Tools:Nutdriver, Pliers, Screw drivers, Socket set
203 of 239 people
found this instruction helpful.
Was this instruction helpful to you?
Thank you for voting!
Sometimes the condenser fan would start causing the refrigerator to overheat.
Unplug the appliance.
Removed the screws holding the back panel.
Removed the fan blade.
removed 3 screws holding the condenser fan.
Remove the 3 metal brackets attached to the fan.
(First note which studs the brackets are attached to. Attach the 3 metal brackets to the new fan. (New screws were supplied)
Cut ... Read more and strip the wire about two inches from the fan.
Cut and strip the new wire. I cut the new wire in half (about 6 inches.) Connect the two wires, twist and used 2 wire nuts. Tie wrap the wire to the wire harness. Mount the new fan (three screws)
Screw the back panel back on.
Mount the new
Read less
Parts Used:
-
Tom from Franklin, WI
-
Difficulty Level:A Bit Difficult
-
Total Repair Time:15 - 30 mins
-
Tools:Nutdriver, Pliers
180 of 204 people
found this instruction helpful.
Was this instruction helpful to you?
Thank you for voting!
The door would not close properly. The CAM had broken.
The repair was very simple.
1. Remove the food from the door shelves.
2.Remove the door by first removing the three screws holding the hinge at the top of the refrigerator.
3. Lift door off of the bottom hinge.
4.Replace bottom CAM on bottom hinge (one screw)
5. Replace top CAM and sh ... Read more im on door (one screw)
6. I put a little grease on the cam to make it slide better.
7. Place door on bottom hinge. Remount top hinge.
8. Done and works better than new.
Read less
Parts Used:
-
Thomas from San Clemente, CA
-
Difficulty Level:Really Easy
-
Total Repair Time:Less than 15 mins
-
Tools:Nutdriver, Screw drivers
143 of 147 people
found this instruction helpful.
Was this instruction helpful to you?
Thank you for voting!