This an authentic OEM 40-Watt replacement light bulb, used in a number of household appliances. It is specially designed to withstand extreme temperatures, which is why these replacement bulbs are mos...
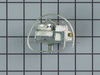
This capacitor (Refrigerator and Freezer Compressor Run Capacitor, Run Capacitor) provides the voltage or energy current required to start the compressor and keep it running. It allows the compressor ...
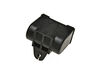
This condenser fan motor kit is designed for use with refrigerators. This fan draws air through the condenser coils and over the compressor. It does this with the goal of cooling the warm refrigerant ...
This refrigerator defrost thermostat will cut out at 55 degrees Fahrenheit and kick back in when the temperature drops to 20 degrees Fahrenheit. The thermostat itself is a little over an inch long whi...
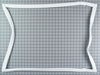
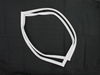
This door gasket is white and made of rubber. It measures approximately thirty-one and a half inches wide by thirty-eight and a half inches long.
$127.78
In Stock
Questions And Answers for BX22A2W
Ask our experts a question about this model and we'll get back to you as soon as possible!
1 question answered by our experts.
Sort by:
< Prev
1
Next >
Search filter:
Clear Filter
Your search term must have 3 or more characters.
Keep searches simple. Use keywords, e.g. "leaking", "pump", "broken" or "fit".
Sorry, we couldn't find any existing answers that matched.Try using some different or simpler keywords, or submit your new question by using the "Ask a Question" button above!
Patrick
March 24, 2020
The freezer works fine on my fridge but the fridge part is not blowing
For model number BX22A2W
Hi Patrick,
Thank you for your question. If there is no cold air being blown into the refrigerator section, the may be an issue with the air damper control. This part allows the cold air from the freezer section to be aired into the fresh food section and it is controlled by the thermostat. To inspect the part, disconnect your refrigerator from the power source and open your refrigerator door to locate the damper or baffle. It will be found where the cold air enters the fresh food compartment. The housing that the baffle or damper is encased in is often made of plastic with a styrofoam lining and may have a foam seal to prevent air leakage. Care should be used when inspecting the housing to avoid damage to the seal or the Styrofoam. Some refrigerator models use a temperature sensing bulb attached to this control that will automatically adjust the control for changes in the interior temperature. Make sure that the sensing bulb is in the correct position and is not damaged. Attempt to operate the control knob to verify that the linkage is intact and that it moves freely. If the damper/baffle is stuck in the closed or nearly closed position or does not move freely, then you need a replacement air inlet damper or baffle. We hope this helps. Thank you and have a great day.
I knew the chances of all the freon leaking out was unlikely so I looked at the wiring to the compressor and there was a capacitor and a starter/overload so i figured I would start there. I went on line and found the parts at this site and they were less than the minimum service call charge for a service tech so I figured what the heck le
... Read moret's give her a shot so I did give it a shot. I ordered the parts and they were there in less time than a service tech could come out and i installed the parts and guess what for 90.00 in parts and 15 minutes in time I repaired my refrigerator. Thanks guys, It took less time to order the parts than it did to make the repair so thanks, your website rocks and is very well designed so my hat is off to you guys!
Unplug the appliance. Removed the screws holding the back panel. Removed the fan blade. removed 3 screws holding the condenser fan. Remove the 3 metal brackets attached to the fan. (First note which studs the brackets are attached to. Attach the 3 metal brackets to the new fan. (New screws were supplied) Cut
... Read moreand strip the wire about two inches from the fan. Cut and strip the new wire. I cut the new wire in half (about 6 inches.) Connect the two wires, twist and used 2 wire nuts. Tie wrap the wire to the wire harness. Mount the new fan (three screws) Screw the back panel back on. Mount the new
Unplug refrigerator. Open freezer door. Lift the old gasket from the edge closest to the center of the door to expose the hex-head screws. Get a nut driver the appropriate size (1/4" if I remember) and loosen, but do not remove all of the screws. Once loosened, the old gasket can be removed. Slip the new gasket in just like the old o
... Read morene was. Lift the edges closest to the center of the door and tighten the screws. Test the fit of the new gasket by closing the door and sighting carefully down each of the four seal lines. Typically there will be spots where there are gaps, that is, the gasket is not "pulled out" enough to contact the refrigerator body. This is due to kinks that occur to the gasket during shipping. A paper that comes with the gasket notes the effect and recommends using a hair dryer to remove the kinks. Although the recommendation is to use the dryer BEFORE putting the gasket on, I used the dryer after, when I could see exactly where the gaps were. After noting the spots, open the door and with the dryer on HIGH setting, wave the hot air stream back and forth for a minute or two on each spot. Pull each spot out by hand with the hot air off and if/when the gasket is cool enough to touch but still warm. Close the door, inspect and repeat the process if necessary. I was able to achieve a good seal all the way around this way.