This is a genuine OEM thrust spacer for your washer, and is also commonly known as a retainer ring. The spacer is about 2.5 inches in diameter, is made of plastic, and is white in color. It is used in...
This is an inner cap seal, but may also be known as an O-ring, and it is a part for your washing machine. Some symptoms replacing this part will fix include: leaking from your appliance, uncontrollabl...
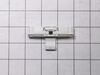
The point of the lid switch is for the tub to stop spinning when the washer lid is opened. It is a safety precaution just in case someone decides to stick their hand inside the washer while the tub is spinning.
This is a replacement clutch assembly or cam kit for your washer. The clutch assembly is mounted on the drive shaft on the bottom of your washer. You may need to replace the clutch assembly if the spl...
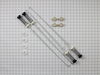
This suspension rod kit is a genuine OEM kit specially designed for washing machines. Each kit includes a set of 4 rods, 4 suspension balls and 4 bushings. The suspension rods are responsible for supp...
This agitator cam kit contains an almost three inch white retainer and four agitator dog ears. This kit is used to move the upper agitator and it connects the base of the agitator with the agitator top (mover).
This part is the replacement lid latch or latch assembly for your top-load washer. The lid latch holds your washer door closed, and allows the washer to run its cycle. If the lid latch is damaged, you...
$44.48
In Stock
Questions And Answers for 7MMVWC200DW2
Be the first to ask our experts a question about this model!
✖
Ask a Question
Ask our experts a question on this model and we'll respond as soon as we can.
The instructions that came with the part were worthless. Essentially, unplug, put in new part, plug it back in. I spent a considerable amount of time on the internet and finally found a video showing how to open the top. Unlike other models, it is held down by clamps in the back rather than clips in the front. Once finding this inform
... Read moreation the installation was simple. Remove the clamps and the back of the console, slide the top forward and lift, remove and replace the lock and reassemble. You don't even have to remove the hoses.
First I removed the fabric softener container and set it aside. Below that, there is a plastic cover with a rubber gasket that distributes the fabric softener. I also just pulled that out and set it aside. Below that was an 11mm bolt that attached the upper and lower agitator to the drive mechanisim. The lower agitator is attached dir
... Read moreectly to the shaft and that was working properly so I knew it was't a motor or drive issue. Until it broke, the top half of the agitator sat still for a second, then it turned clockwise with the lower agitator. This helped push the clothes down to the lower part to be circulated throughout the wash cycle. Well, now the upper agitator just sat there, like it wasn't attached to anything at all. Below the aforementioned plastic cover with the rubber gasket, I found a part that had 4 plastic "teeth" that moved in and out, releasing and grabbing the inside of the upper agitator, respectively. Over time, these teeth wore down and stopped "grabbing" the ridges on the inner part of the upper agitator, causing it to stop turning with the lower agitator. I removed the 11mm bolt and tried to seperate the upper agitator from the lower agitator to replace the teeth. This part was kind of tough to get out because the plastic clips that held it in were deformed. I just had to pull hard and eventually it came apart. In the process, I broke two of the clips. I wasn't really concerned because the 11mm bolt holds everything in place anyway. After that I just swapped out the worn teeth with the new ones. I put it back together in the opposide order I took it apart and viola....good as new. And it only cost me $15 bucks.


 Diagram and Parts List for Maytag")